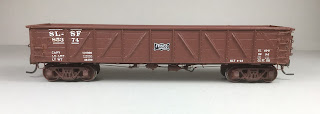
While working on two Walthers plastic 40 foot USRA composite 50 Ton gondola kits, undecorated kit 933-6859, for service on my Minneapolis & Northland Railroad Company, I continued my search for a prototype photo of one of the road names Walthers made available other than the undecorated kit. One of the road names was the St. Louis-San Francisco, kit 933-6856. Eureka! I did find a photo of St. Louis-San Francisco composite gondola 85230, series 85000-85999, assigned to class GB. SL-SF 85230, a USRA 50 Ton composite design, had a steel underframe, fixed ends, a solid wood floor, Miner brake hardware, Carmer uncoupling levers and rode on Andrews trucks.
 |
| SL-SP composite gondola 85203. An internet photo. (click or tap on this or any image to enlarge) |
Shortly after my photo find, a post on RealSTMFC groups.io offering freight cars for sale from the Jim Hayes estate appeared. Over the years having exchanged emails with Jim I asked for a cars available list. I looked at the list and to my surprise a Walthers St. Louis-San Francisco composite gondola built by Jim was on the list. I purchased the kit that soon arrived.
Upon opening the Jim Hayes built composite gondola , numbered 50374, I found it had the correct sides; however, the braced ends were not correct for this car. Therefore, I removed the ends.
 |
| Assembled SL-SF gondola with ends removed. |
I had a correct corrugated end on hand from my previous build of the undecorated kit so I made a rubber mold and cast a set of correct ends in my M&N Shops.
 |
| Master and casting made from master. |
Once the end castings were ready I used a single edge razor blade (SERB) to remove the ends from the built car and installed the ends I had cast. Jim had used the kit wire drop grab irons (large wire size) which I removed and replaced with wire straight and drop grab irons, Tichy Train Group (Tichy) #3015, 18” drop type, on the sides and for ladder rungs. I bent the straight grab irons from Tichy #1106, .0125” phosphor bronze wire (PBW).
 |
| Grab irons installed. |
And, on the sides I removed the molded on sill steps and replaced them with A-Line #29000, style A, sill steps.
| Sill steps installed. |
On the ends, ladder stiles were needed for the grab iron rungs. I cut the stiles from a ladder from Tichy ladder set, #3065.
 |
| Tichy ladder stiles with wire rungs installed. |
After finishing the ladders, I continued adding detail parts on the “B” end. Detail parts installed on the “B” were as follows:
- Brake step cast in M&N Shops ( a Tichy set #3013 could be used)
- Brake step brackets from styrene in bits box
- Brake shaft step A-Line #29000
- Brake shaft, Tichy #1106, .0125” PBW
- Minor brake handle, Tichy, set #3013
- Retainer valve cast in M&N Shops ( colored with silver Sharpie)
- Retainer line, Tichy # 1100, .008” diameter PBW
- Fasteners were made with MEK Goop (plastic melted in MEK)
- Archer #AR88026 rivets, 5/8” diameter decals (no photo taken after application)
 |
| "B" end details installed. |
 |
| "B" end details installed. |
With the “B” end work done, I moved on to the underbody. I thought the look of the underbody could be improved so I removed trucks and underframe. I installed two Evergreen #154, .060 X .080” strip styrene strips on each side of the weight to give the underbody a better look. I installed the Athearn brake components I had cut off and pre-drilled for piping in their proper location using various brackets to mount them on. For mounting brackets I used styrene from the bits box for the AB valve, cut off plastic sill steps from this car for the air reservoir and a Sunshine Models resin one from the parts box. And, the brake cylinder was drilled with a #76 drill to accept a Tichy brake piston (Tichy set #3013).
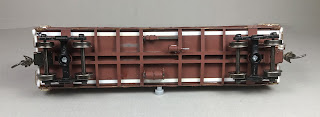 |
| Brake components installed. |
Next I removed the kit trucks, with previous tapped kingpins for 2-56 screws and installed Accurail Andrews trucks with InterMountain 33” metal wheels with 2-56 1/4” Fastenal screws. I hand painted the underbody and trucks with Vallejo Model Color mix of Mahogany Brown 70.846 50% and Black Red 70.85950%. I let the painted underbody with mounted brake components set over night as I usually do before adding the detail parts. The next day the following detail parts were installed:
- Brake cylinder lever, made with Evergreen #8108, 1” x 8” strip styrene
- Brake floating lever, made with Evergreen #8106, 1” x 6” strip styrene
- Brake lever hangers, wire grab irons from parts box
- Brake piping from air reservoir to control valve, Tichy #1101, .010” dia. PBW
- Brake pipe from brake cylinder to control valve, Tichy #1106, .0125” dia. PBW
- Brake rods, Tichy #1106, .0125” diameter PBW
- Brake rod clevises, Tichy turnbuckles #8021
- Chain, A-Line #29219, black 40 links per inch (not in kit)
- Train line, .017” diameter flora wire (not in kit)
- Dirt collector, resin casting in my M&N Shop
 |
| Underbody details installed. |
All installed parts were hand painted with the same mix of Vallejo Model Color above.
 |
| Underbody added parts painted. |
Not wanting to waste mixed paint, I hand painted the detail parts added on the ends.
 |
| Added details on ends painted. |
When end parts were dry, I taped off the sides and sprayed the ends and interior with the same Vallejo Model Color mix of Mahogany Brown 70.846 50% and Black Red 70.859 50%.
Once dry, I went back to sides to change the car number and the Cubic Feet number number. The 50374 number on the car was a good number in the 50000-50398 series for a gondola with a steel frame, fixed ends and wood floor; however, as I used the prototype photo above for car 85230 in the 85000-85999 series with the same features I decided to change the car number to 85374. Therefore, I removed the “50” in the car number and the Cubic Feet number with a Euro scratch brush with nylon bristles, cleaned the area with a cotton swab dipped in 91% isopropyl alcohol and brushed the areas with Future Acrylic Premium Floor Finish to provide a gloss decal base. Champ Private Name numbers used for “85” and Champ Gondola 50 and 70 Ton dimensional data set HD-6 provided the cubic feet decal. Walthers Solvaset was used to set the decals.
 |
| Number changed and cubic feet decals applied. |
On the ends reporting marks SL-SF and number 85374 were made by applying Clover House Condensed Bold White Railroad Roman Dry Transfers, 9600-11 to decal paper and coating them with Microscale Liquid Decal Film. The decals I made were applied as on sides on a dry Future Acrylic Premium Floor Finish gloss base. Again, Walthers Solvaset was used to set the deals.
While the decals on the ends were drying I installed uncoupling levers. The uncoupling levers, Yarmouth Model Works #400 were installed on a Tichy #1101 .010” PBW wire installed in a hole located in the center of a small square styrene pad installed on the car end. The small square styrene pad was cut from scrap .010” styrene in the bits box and the hole in it was drilled with #80 wire drill.
 |
| Carmer uncoupling lever installed. Note Archer rivets. |
As with other added detail parts the uncoupling levers were hand painted with the Vallejo Model Color mix of Mahogany Brown 70.846 50% and Black Red 70.859 50%. After the car was left overnight to dry, the next day the car body exterior and interior were sprayed with Vallejo Gloss Varnish 70.510 to protect decals.
 |
| Vallejo Gloss Varnish applied. |
 |
| Uncoupling lever painted and Vallejo Gloss Varnish applied. |
And, when dry the car body exterior and interior were sprayed Model master Acryl Flat Clear 4636 to further protect decals and provide a base for weathering. Once the car was dry, the exterior and interior of gondola car body 85374 were weathered using Pan Pastels as follows: Raw Umber 780.5 and Neutral Gray 820.5 on interior with sponge makeup applicators and Paynes Grey Extra Dark 840.1 on exterior and interior applied with a makeup brush.
 |
| Car weathered Pan Pastels. |
 |
| Car weathered Pan Pastels. |
 |
| Car weathered Pan Pastels. |
St. Louis-San Francisco (SL-SF) composite gondola 85374 was now ready for service on the Minneapolis & Northland Railroad Company, The Lakeland Route, “Serving today, Shaping tomorrow.” A car card was made for SL-SF gondola 85374, the final step to put the cars in service on the Minneapolis & Northland Railroad Company Railroad.
 |
| SL-SF composite gondola 85374 with pipe load on Wildung siding in Randolph, Minn. |
 |
| SL-SF composite gondola 85374 with pipe load on Wildung siding in Randolph, Minn. |
A “Thank You” to the late Jim Hayes, may he Rest In Peace, for a fine build of this gondola kit. Another “Thank You” to our fabulous internet for prototype photo help with the build of this car and the photo for this blog post.
Thank You for taking time to read my blog. You can share a comment in the section below if you choose to do so. Please sign your comment with your name if you choose to leave one. Please share the blog link with other model railroaders.
Lester Breuer
.
Les, I enjoy reading about your research and the level of detail you discover. I also find that many of your tips apply directly to modeling in any scale.
ReplyDeleteKen, Thank You. Appreciated. Glad you can use tips in another scale.
ReplyDelete