Showing posts with label X-29. Show all posts

Monday, May 2, 2022

Chicago Great Western Box Cars 87420 and 87572

 With the addition of the Chicago Great Western (GGW) interchange to my Minneapolis & Northland Railroad Company I continue to add to the number of CGW boxcars I have to serve customers.   After previous posts with write ups of upgrades of CGW box cars, I had a friend contact me telling me he had two undecorated Red Caboose X-29 box car kits, kit RC-7003  he had available.   With the build of these two kits, I will satisfy my CGW box car needs.

The prototype I chose for these two builds of Chicago Great Western box cars was in CGW series 87000-87998.  More specifically in series, 87000-87499 as this series was equipped with Adjax hand brakes and 87500-87998 as this series was equipped with Equipco hand brakes.  The cars were build by Pullman-Standard Car Manufacturing Company in 1933.  The steel-sheathed cars had plate ends and three panel Pullman doors which we modelers have named “Creco doors”.   The CGW cars had “reverse three panel doors.  The cars were painted boxcar red with white lettering.   These boxcars are referred to as “X-29’s” by modelers.


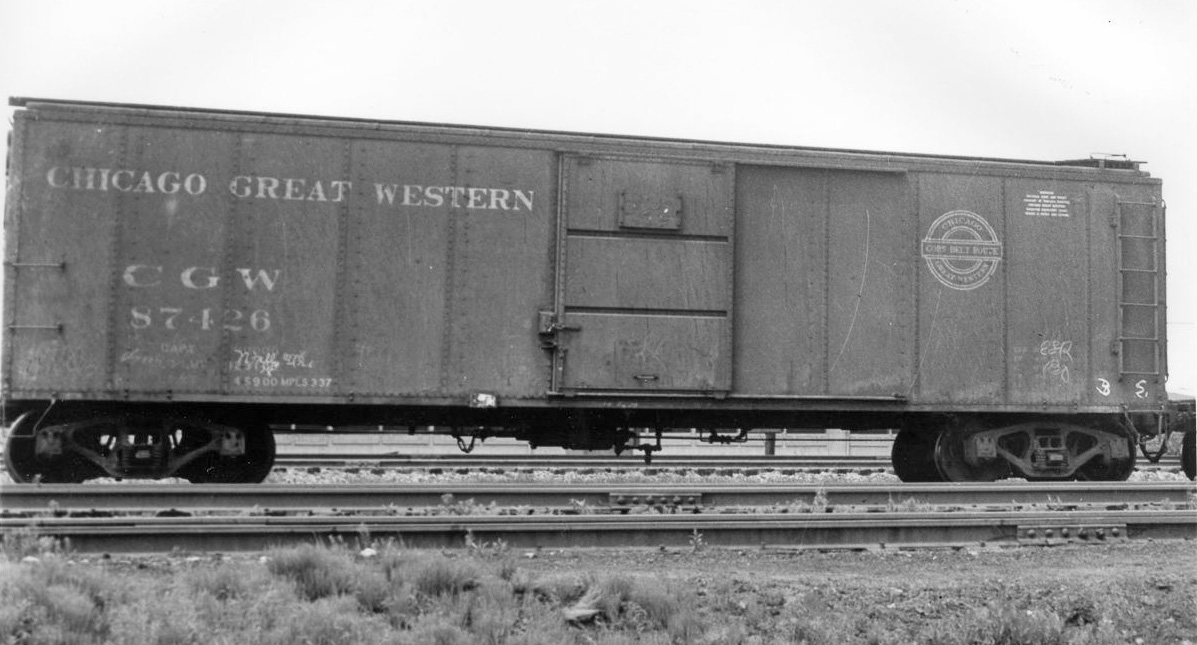
Unknown collection.
(click or tap on this or any photo to enlarge)


Color photos of these cars can be found in Gene Green’s book Chicago Great Western Color Guide To Freight and Passenger Equipment (Morning Sun Books, Inc., 1998) and builders photos in Pullman-Standard Freight Cars 1900-1960 (Signature Press, 2007).  One of the builders photos of CGW 87886 is a 3/4 view showing the “B” end.


I began the build of two CGW Box cars, CGW 87420 and CGW 87572 using Red Caboose X-29 Box Car, kit RC-7003.  This time rather than build one and then the other, I built CGW 87420 and 87572 at the same time.  I installed the underframe and crossties following kit instructions.  Next the coupler pockets and truck kingpins were tapped for 2-56 screws.   Coupler pockets with Kadee #148 couplers and Accurail trucks were installed with Fastenal 2-56 screws.  The Accurail trucks were soon changed to Bowser coil-elliptic with InterMountain 33” metal wheels installed which are correct for these cars.


Basic underbody work done.


After the basic underbody work was done the cars were each weighted to 3.8 ounces with tire weights.  After weights were installed in car body interior, the roof that could not be glued in place until the weights were added was now installed.   Next ladders were installed on the sides and ends.  I took time to create space between the ladders stiles and car sides using a single edge razor blade as a spacer.  Install of the running boards with Testors Tube Cement for plastic models followed.


Weight, ladders and running boards installed.


Better view of ladders installed.


I moved onto the underbody where I installed a bell crank from Tichy Train Group (Tichy) from set #3013 before moving onto the “B” ends.  On the “B” ends I installed the kit brake step and brackets, kit provided brake housing, chain, brake rod with clevis connected to the previous installed bell crank.  The plastic brake rod was now cut off using a single edge razor blade between the end of the chain and the bell crank clevis.  And, a  Precision Scale retainer valve, # 31796, was installed.


"B" end work started.


Grab irons bent from Tichy #1101, .010” diameter phosphor bronze wire (PBW) were installed on sides and ends in manufacturer drilled holes.  On the sides kit sill steps were installed.  And, after glue was set the step portion of the sill step was cut off leaving only the mounting portion of the sill step left on the car sill.  Roof grab irons bent from Tichy #1101, .010” PBW with Yarmouth Model Works eye bolts without shoulder for corner legs were installed.


Grab irons and sill step mounts installed.


Better view of sill step mounts.


Back to the “B’’ end where running board supports cut from Evergreen #8102, 1 x 2” strip styrene with MEK Goop (plastic melted in MEK) fasteners were installed.  A new brake rod cut from Tichy #1102, .015” PBW was installed.  A retainer line and bracket fabricated from Tichy # 1100, .008” diameter PBW were installed.  A Kadee Equipco #2031 brake wheel was installed on one car and a Kadee Adjax #2020, brake wheel on the other.  And, kit provided placard boards were installed.


"B" work with only brake wheel needed.


Adjax and Equipco brake wheels installed.


Returning to the sides, Tichy #3015, 18” drop type grab irons were installed under the ladders on the sides.  A-Line sill steps, #29002, sill steps were installed in #76 drilled holes.   MEK Goop was used to connect the mounting bracket on the side sill to the A-Line installed sill steps.


Drop grab under ladder and sill steps installed.


Drop grab iron under ladder and
sill step with mounting bracket 
connected to sill step with MEK Goop.


Time to finish the underbody work.   On the underbody the following details were installed:


  • Brake cylinder lever, made with Evergreen #8108, 1 x 8” strip styrene
  • Brake floating lever, made with Evergreen #8106, 1 x 6” strip styrene
  • Slack adjuster, styrene from bits box with holes drilled with #80 drill and MEK fasteners
  • Brake lever hangers, cut off kit grab irons
  • Brake piping from air reservoir to control valve, Tichy #1101, .010” diameter phosphor bronze wire (PBW)
  • Brake pipe from brake cylinder to control valve, Tichy #1106, .0125” dia. PBW 
  • Brake rods, Tichy #1106, .0125” diameter PBW
  • Brake rod clevises, made with Tichy turnbuckles #8021
  • Chain, A-Line #29219, black 40 links per inch
  • Dirt collector, Tichy set #3013
  • Bell crank, Tichy set #3013


Under body work done.


With the underbody done it was back to the ends to add the final detail, the uncoupling levers.  The uncoupling levers were bent from Tichy #1106 .0125” diameter PBW.  An eye bolt bracket bent from Tichy #1101 .010” diameter PBW was installed in a hole drilled near the poling pocket and one hole drilled in the corner of the coupler pocket were used to install the uncoupling levers.


Uncoupling levers installed.


All that remained to be done before moving the cars to paint shop was to install the “reverse Creco Doors.”   The installed resin reverse three panel doors were cast in the Minneapolis & Northland Railroad Company Shops using a rubber mold.  To make the mold I was able to use Red Caboose doors as masters found in Red Caboose kits RC-7048 (with herald) or RC-7210 (with side sill patches and no herald) provided by my friend John Hotvet.  The molded on door handles were carved off and replaced with wire door handles made with Tichy #1106, .125” diameter phosphor bronze wire. The kit door guides with the triangle supports cut off as not on CGW door guides per prototype photos were installed.  Kit placard doors were installed on the doors.


Resin reverse Creco doors installed.


The cars were ready for the paint shop.  Before I airbrushed the cars I hand painted all added detail parts except the doors which were sprayed with Vallejo Model Air Light Grey 71.050.   After the Grey was dry, the car bodies were airbrushed with Vallejo/MicroMark Box Car Red, X29015X2.  Once dry both car bodies were sprayed with Vallejo Gloss Medium 70.470, to provide a gloss decal base.


Added detail parts hand painted.


After drying overnight, decals from various sets were applied.  Decals sets used were the following:  Microscale #87-1400 for road name, reporting marks, heralds, and dimensional data.  Chicagoland 2017 mini kit for capacity, weights, reweigh date, and repack data,  Sunshine Models CGW XM-1 set for repack data and build date, and Westerfield MILW set D12001 for numbers.  I used photos of CGW box cars in books mentioned above as a guide to apply decals.


Decals were soaked off in distilled water and applied to the car body where MicroScale Micro Set had been applied with a brush.   After the decal was applied in the Micro Set and positioned the edges had MicroScale Micro Sol applied.  Any excess solution was sucked away with the torn edge of a paper towel.  Again when dry, car body sprayed with Vallejo Gloss Varnish 70.510 to better hide edges of decals and protect decals during handling.  Again when dry, the car body was sprayed with Model Master Acryl, #4636, flat to protect decals and provide a flat finish for weathering when applied.


CGW 87420 painted and lettered.


CGW 87572 painted and lettered.


CGW 87420 and 87572 painted and lettered.
Note slight difference in color.


One more step before putting Chicago Great Western (CGW) box cars 87910 and 87956 into service was to weather the cars with Artmatic eye shadow and Pan Pastels.  An Artmatic eye shadow color like a Dark Box Car Red was applied over entire car body.  Pan Pastels used were Paynes Grey Extra Dark 840.1, on roof and over safety appliances on car body, Red Iron Oxide Extra Dark 380.1,  on car body over rivet lines and especially near side sill to show need for patch panels added on prototype when rust areas required repair and Neutral Grey 820.5, on placard boards.


CGW 87572 weathered.


CGW 87572 weathered.


CGW 87420 weathered.


Chicago Great Western 87420 and 87572 were ready for service on the Minneapolis & Northland Railroad Company, The Lakeland Route, “Serving today, Shaping tomorrow.”  A car card was made for CGW 87420 and 87572, the final step to put a car in service on the Minneapolis & Northland Railroad Company Railroad.


Cars sitting on CGW Interchange in Randolph, MN.


Cars sitting on CGW Interchange in Randolph, MN.


Cars sitting on CGW Interchange in Randolph, MN.


I want to say, “Thank You” to John Hotvet for the Red Caboose doors he provided for masters to help me make a mold to produce the “reverse three panel doors” for the build of these cars.


Thank You for taking time to read my blog.  You can share a comment in the section below if you choose to do so.  Please sign your comment with your name if you choose to leave one.  Please share the blog link with other model railroaders.

Lester Breuer


.


Friday, March 25, 2022

Chicago Great Western Box Cars 87910 and 87956

With the addition of the Chicago Great Western (GGW) interchange to my Minneapolis & Northland Railroad Company (M&N) I continue to add to the number of CGW boxcars I have to serve customers. After upgrading CGW box car 87432, an undecorated Train-Miniature X-29 box car kit, and posting the write-up of the upgrade, I had a friend Bob Wilcox contact me telling me he had three Red Caboose X-29 box car kits I could purchase to turn into CGW boxcars.   Another friend made two undecorated Red Caboose X-29 box car kits he had available.   With the addition of these five kits,  once built I will satisfy my CGW box car needs.

The prototype I chose for two consecutive builds of Chicago Great Western box cars was in CGW series 87000-87998.  More specifically in series, 87500-87998 as this series was equipped with Equipco hand brakes.  The cars were build by Pullman-Standard Car Manufacturing Company in 1933.  The steel-sheathed cars had plate ends and Pullman doors which we modelers have named “Creco doors”.   The cars were painted boxcar red with white lettering.   These boxcars are referred to as “X-29’s” by modelers.


Photo source unknown.
(Click or tap on this or any image to enlarge)


Color photos of these cars can be found in Gene Green’s book Chicago Great Western Color Guide To Freight and Passenger Equipment (Morning Sun Books, Inc., 1998) and builders photos in Pullman-Standard Freight Cars 1900-1960 (Signature Press, 2007).  One of the builders photos of CGW 87886 is a 3/4 view showing the “B” end.


I began the build of two CGW Box cars, CGW 87910 using Red Caboose X-29 Box Car, kit RC-7044-5, and CGW 87956 using Red Caboose X-29 Box Car, kit RC-7010-4.  I first built CGW 87910 and followed with the build of CGW 87956.  Each kit required removal of lettering, including reporting marks CNJ, herald  and number 21637 (CGW 87910), PRR herald, number 51645, and all lettering (CGW 87956) with nylon bristle scratch-brush, Walthers Solvaset, and isopropyl alcohol.   Later on CGW 87910 car class “XM”, reweigh date and build date were removed with the same method.  During the removal of this lettering I decided it would have been easier to remove all lettering as I had done on CGW 87956.  Some of the manufacture applied paint was removed with the lettering.  Therefore, a Vallejo Model Color mix of Vallejo Black Red 70.859 75% and Mahogany Brown 70.846 25% was hand brushed on the exposed areas.


CGW 87910 with lettering removed.
And, paint applied.
(Click or tap on this or any image to enlarge)


CGW 87956 with all lettering removed.
And, paint applied.


With no carving off of molded on items detail items needed (an advantage of using a Red Caboose kit), I could move on to the underbody work.   Underbody work consisted of adding the following details:


  • Install underframe and kit crossties
  • Coupler pockets and bolster kingpins drilled and tapped for 2-56 screws
  • Kadee #148 couplers installed in coupler pockets
  • Coupler pocket covers installed with Fastenal 2-56 x 3/16” screws
  • Tichy Train Group (Tichy) brake components from set #3013 installed.
  • Brake components brackets for AB valve and brake cylinder, Tichy set #3013
  • Air reservoir mounts, cut off plastic sill steps 
  • InterMountain 33” metal wheels installed in kit trucks
  • Accurail trucks in kit installed with Fastenal 2-56 x 1/4” screws
  • Kadee #208 .015” thick fiber washers added to kingpins on GCW 87910 and Tichy set #3013 .020”thick plastic washers on CGW 87956 to obtain proper coupler height 


CGW 87910 shown here. 
CGW 87956 had the same work done.


After couplers and trucks installed the trucks were removed and hand painted with a Vallejo Model Color mix of Vallejo Black Red 70.859, 75% and Mahogany Brown 70.846, 25%.  While the paint on trucks was drying the normal details items were added.


  • Brake cylinder lever, made with Evergreen #8108, 1 x 8” strip styrene
  • Brake floating lever, made with Evergreen #8106, 1 x 6” strip styrene
  • Slack adjuster, styrene from bits box with holes drilled with #80 drill (CGW 87910).  No holes drilled (CGW 87956).
  • Brake lever hangers, cut off kit grab irons
  • Brake piping from air reservoir to control valve, Tichy #1101, .010” diameter phosphor bronze wire (PBW)
  • Brake pipe from brake cylinder to control valve, Tichy #1106, .0125” diameter PBW 
  • Brake rods, Tichy #1106, .0125” diameter PBW
  • Brake rod clevises, made with MEK Goop (CGW 87910), Tichy turnbuckles #8021 (CGW 87956)
  • Chain, A-Line #29219, black 40 links per inch
  • Dirt collector, Tichy set #3013 (CGW 87910), resin cast in M&N Shops (CGW 87596)
  • Bell crank, Tichy set #3013


CGW 87910 brake rod clevises made with
MEK Goop and Tichy #3013 dirt collector.


CGW 87956 with Tichy #8021 turnbuckles for clevises
and resin dirt collector cast in M&N Shops.


Once underbody work was completed, the car was weighted to 3.8 ounces using the kit weight and electrical outlet box punch outs on CGW 87910.  CGW 87956 was weighted to 3.8 ounces with 1/4 ounce tire weights.  After weights were installed in car body interior, the roof that could not be glued in place until the weights were added was now installed.  Next, the running board which measured .022” when checked with a caliper was installed with Testors Tube Cement for plastic models.  The install of kit provided longitudinal running board end brackets followed since they were of proper size.  Roof grab irons bent from Tichy #1101, .010” PBW with Yarmouth Model Works eye bolts without shoulder for corner legs were installed.


CGW 87956 with running board and grab irons.
CGW 87910 looked the same as CGW 87956 with
running boards installed..


Now kit ladders were installed on the sides and ends.  I took time to create space between the ladders stiles and car sides using a single edge razor blade as a spacer.  Tichy #3015, 18” drop type grab irons were installed under the ladders on the sides.  After ladders were installed grab irons bent from Tichy #1101, .010” diameter PBW were installed on sides and ends in manufacturer drilled holes (an advantage of Red Caboose kit).  On the sides kit sill steps were installed.  And, after glue was set the step portion of the sill step was cut off leaving only the mounting portion of the sill step left on the car sill.   Yarmouth Model Works sill steps, #213 double angled leg, were installed on CGW 87910 and A-Line #29002, style C, sill steps on CGW 87956.


CGW 87910 with ladders, grab irons and sill steps installed.


CGW 87956 with ladders, grab irons and sill steps installed.


At this point a majority of detail work was finished with “B” end work remaining.  Kit provided brake housing, chain, brake rod with clevis connected to the bell crank were installed on CGW 87910.  On  CGW 87956 only kit brake housing and chain were installed.  The brake rod clevis for CGW 87956 came from Tichy set #3013.  Next the kit brake step and brackets for CGW 87910 and resin cast brake step (master for mold from CGW 87910) and kit brackets for CGW 87956 were installed.  The plastic brake rod was now cut off on CGW 87910 using a single edge razor blade between the end of the chain and the bell crank clevis.  A new brake rod cut from Tichy #1102, .015” PBW was installed on both cars.  The kit retainer valve was cut from the plastic kit retainer line and installed on CGW 87910.  A resin cast retainer valve in M&N Shops was installed on CGW 87956.  A retainer line and bracket fabricated from Tichy # 1100, .008” diameter PBW were installed on both cars.  A Kadee Equipco #2031 brake wheel was installed on both cars.  And, kit provided placard boards were installed on both cars.


CGW 87910 with "B" details installed.


CGW 87956 with "B" end details installed.


Again as had been done with previous added details parts and trucks, the added detail parts on the “B” end were hand painted with a Vallejo Model Color mix of Black Red 70.846, 75% and Mahogany Brown 70.839, 25%.  When dry uncoupling levers bent fabricated from Tichy #1106, .0125” diameter PBW.  Eye bolt brackets were bent from Tichy #1101, .010” diameter PBW.


CGW 87910 with uncoupling levers installed.


CGW 87956 with uncoupling levers installed.


Before heading to the paint shop Creco doors, resin cast in M&N Shops, were installed on CGW 87910 and kit doors on CGW 87956.  The Creco doors for CGW 87910 were cast in M&N Shops using the door from CGW 87956 Red Caboose X-29 kit as a master.  The resin cast doors were sprayed with Vallejo Surface Primer 70.601 and when dry with the Vallejo Model Color mix of Black Red 70.846, 75% and Mahogany Brown 70.839, 25%.  The kit door guides with the triangle supports cut off as not on CGW door guides per prototype photos were installed.  The door and door guide color were lighter than I wanted on CGW 87910 after spraying due to thinning paint so they were taped off and resprayed.   


CGW 87910 with doors lighter than desired.


CGW 87910 with doors resprayed.


Once kit doors were installed on CGW 87956, the car body and underbody were sprayed with the Vallejo Model Color mix of Black Red 70.846 and Mahogany Brown 70.839.


CGW car body 87956 sprayed.


CGW 87956 sprayed.
CGW 87910 under body looked similar after spraying.


When the sprayed car bodies were dry both car bodies were sprayed with Vallejo Gloss Medium 70.510, to provide a gloss decal base.


CGW 87910 sprayed with Vallejo Gloss Medium
to provide a gloss decal base.


CGW 87956 sprayed with Vallejo Gloss Medium
to provide a gloss decal base.


After drying overnight, decals from various sets were applied.  Decals sets used were the following:  Microscale #87-1400 for road name, reporting marks, heralds, and dimensional data.  Chicagoland 2017 kit for numbers , reweigh date, build date and repack data,  Sunshine Models CGW XM-1 set for repack data and build date, and Champ HN-50 for heralds for CGW 87910.  Capacity and weights data is okay on both cars.  The dimensional data from Microscale set #87-1400 applied to CGW 87956 matches prototype photos while Red Caboose dimensional data does not; however, it may have been correct for a CNJ box car (reason for removal).  The build date for CGW 87956 is not correct; however, it can be corrected in the future if I can find the correct year "33" or letter size to make a decal.  I used photos of CGW box cars in books mentioned above as a guide to apply decals.


Decals were soaked off in distilled water and applied to the car body where MicroScale Micro Set had been applied with a brush.   After the decal was applied in the Micro Set and positioned the edges had MicroScale Micro Sol applied.  Any excess solution was sucked away with the torn edge of a paper towel.  Again when dry, car body sprayed with Vallejo Gloss Varnish 70.510 to better hide edges of decals and protect decals during handling.  Again when dry, the car body was sprayed with Model Master Acryl, #4636, flat to protect decals and provide a flat finish for weathering when applied.


CGW 87910 with decals applied.


CGW 87910 after decals applied.


CGW 87956 after decals applied.
All lettering is correct except build date should be 1933.


CGW 87956 after decals applied.
All lettering is correct except build date should be 1933.


One more step before putting Chicago Great Western (CGW) box cars 87910 and 87956 into service was to weather the cars with Artmatic eye shadow and Pan Pastels.  An Artmatic eye shadow color like a Dark Box Car Red was applied over car bodies.  Pan Pastels Burnt Sienna Shade 740.3 was used on both car bodies.  Paynes Grey Extra Dark 840.1  was used on the roof and lightly over safety appliances on car body.


CGW 87910 weathered.


CGW 87910 weathered.


CGW 87956 weathered.


CGW 87956 weathered.


Chicago Great Western 87910 and 87956 were ready for service on the Minneapolis & Northland Railroad Company, The Lakeland Route, “Serving today, Shaping tomorrow.”  A car card was made for CGW 87910 and 87956, the final step to put the a car in service on the Minneapolis & Northland Railroad Company Railroad.


Recently added CGW cars to fleet
on CGW Interchange in Randolph.


CGW 87956 on CGW Interchange in Randolph.


CGW 87910 on CGW Interchange in Randolph.


Recently added CGW cars to fleet
on CGW Interchange in Randolph.


I want to say, “Thank You” to Bob Wilcox for making available the cars I purchased from him to help me increase my Chicago Great Western freight car roster.  And, another “Thank You” to a friend providing the prototype photo to share in this blog.


Thank You for taking time to read my blog.  You can share a comment in the section below if you choose to do so.  Please sign your comment with your name if you choose to leave one.  Please share the blog link with other model railroaders.

Lester Breuer


.