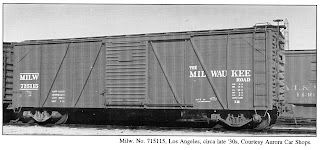
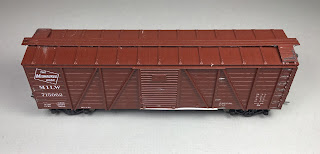
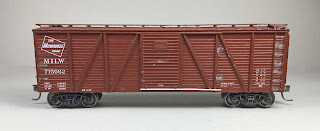
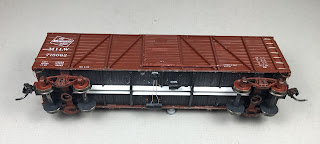
After looking through the plastic freight cars kits I have to build, I pulled two Accurail Milwaukee Road (MILW) kits with the same kit number 71091 and same road number of 715062. To help determine if I should build and rework these cars I first checked the January 1953 Official Equipment Register where I found the MILW did have a series of box cars, class XM, numbered in the 714000 to 715599 series. A photo of MILW 715277 appears in The Postwar Freight Car Fleet (National Model Railroad Association, Inc. 2006). Based on this early information and used decals I had, I decided the car numbers would be changed to 715262 and 715324. Later these numbers were changed again to 716862 and 717024 to have a car number in the series the Klasing power brake was used on.
I continued my search for prototype information in the Steam Era Freight Cars Reference Manual Volume One: Box & Automobile Cars (Speedwitch Media, 2006, 2007). Here I read the car in series 714000-717199 retained an earlier single-sheathed Howe truss design with three panels on each side of the door, a Hutchins Dry Lading roof and the underframes used the ARA center sill. New features on this car series included an increased height, 4/4 stamped metal Dreadnaught ends and Youngstown corrugated steel doors. The Klasing brake systems were of two types: a vertical brake staff type with a geared take-up reel at the sill and early power hand brake with a vertical staff that came out of the brake housing and extended above the running board with a horizontal brake wheel attached there.
 |
Car had Klasing vertical brake staff.
Sunshine Models Prototype Data Sheet #57A
Lester Breuer Collection
(Click on this or any image to enlarge)
|
The Accurail cars did have the correct sides except for missing corner braces, 4/4 ends which at this time I thought were correct, the Hutchins Dry Lading roof and the lettering was fine. I could rework the “B” end of car to have the Klasing power brake that I wanted to model that would give these cars a unique look. Therefore, I began build and upgrade of the MILW box cars.
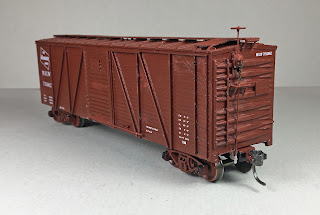
I should have waited to begin the build until my data gathering was complete. Why, you ask. My continued search for prototype photos showed no car with 4/4 ends. All photos of these cars I could find in sources already mentioned and other photos I found had 4/5 ends as did the photo of 716633 with Klasing power brake provided to me by George Toman.
 |
Internet Photo
George Toman Collection |
Not finding any photos with the 4/4 ends, I went finally went back and carefully reviewed the tracing (drawing) of original blue prints found in The Milwaukee Road Freight Cars which contains the Official Employees’s Shop Diagrams of in-service freight cars in 1937 (Normandie House) for series 716500-716999 built by America Car & Foundry and series 71700-717199 built by Pacific Car & Foundry. The drawing confirmed 4/5 ends. And, my friend Steve Steele reminded me of Sunshine Models Prototype Data Sheet (PDS) #57A which provides what Klasing brake was applied to which series of cars. The PDS states the 741000-716499 series used the vertical brake shaft and series 716500-717199 used the power hand brake with vertical brake shaft.
Finally I had all the data I needed that I should have had when I began the build; however, I was now well into the build and upgrade. Therefore, I decided to finish the two cars knowing the ends should be 4/5 ends and the corner braces were missing on the sides. If one did not want to save the lettering and stripped the car the corner braces could have been added using .005” styrene.
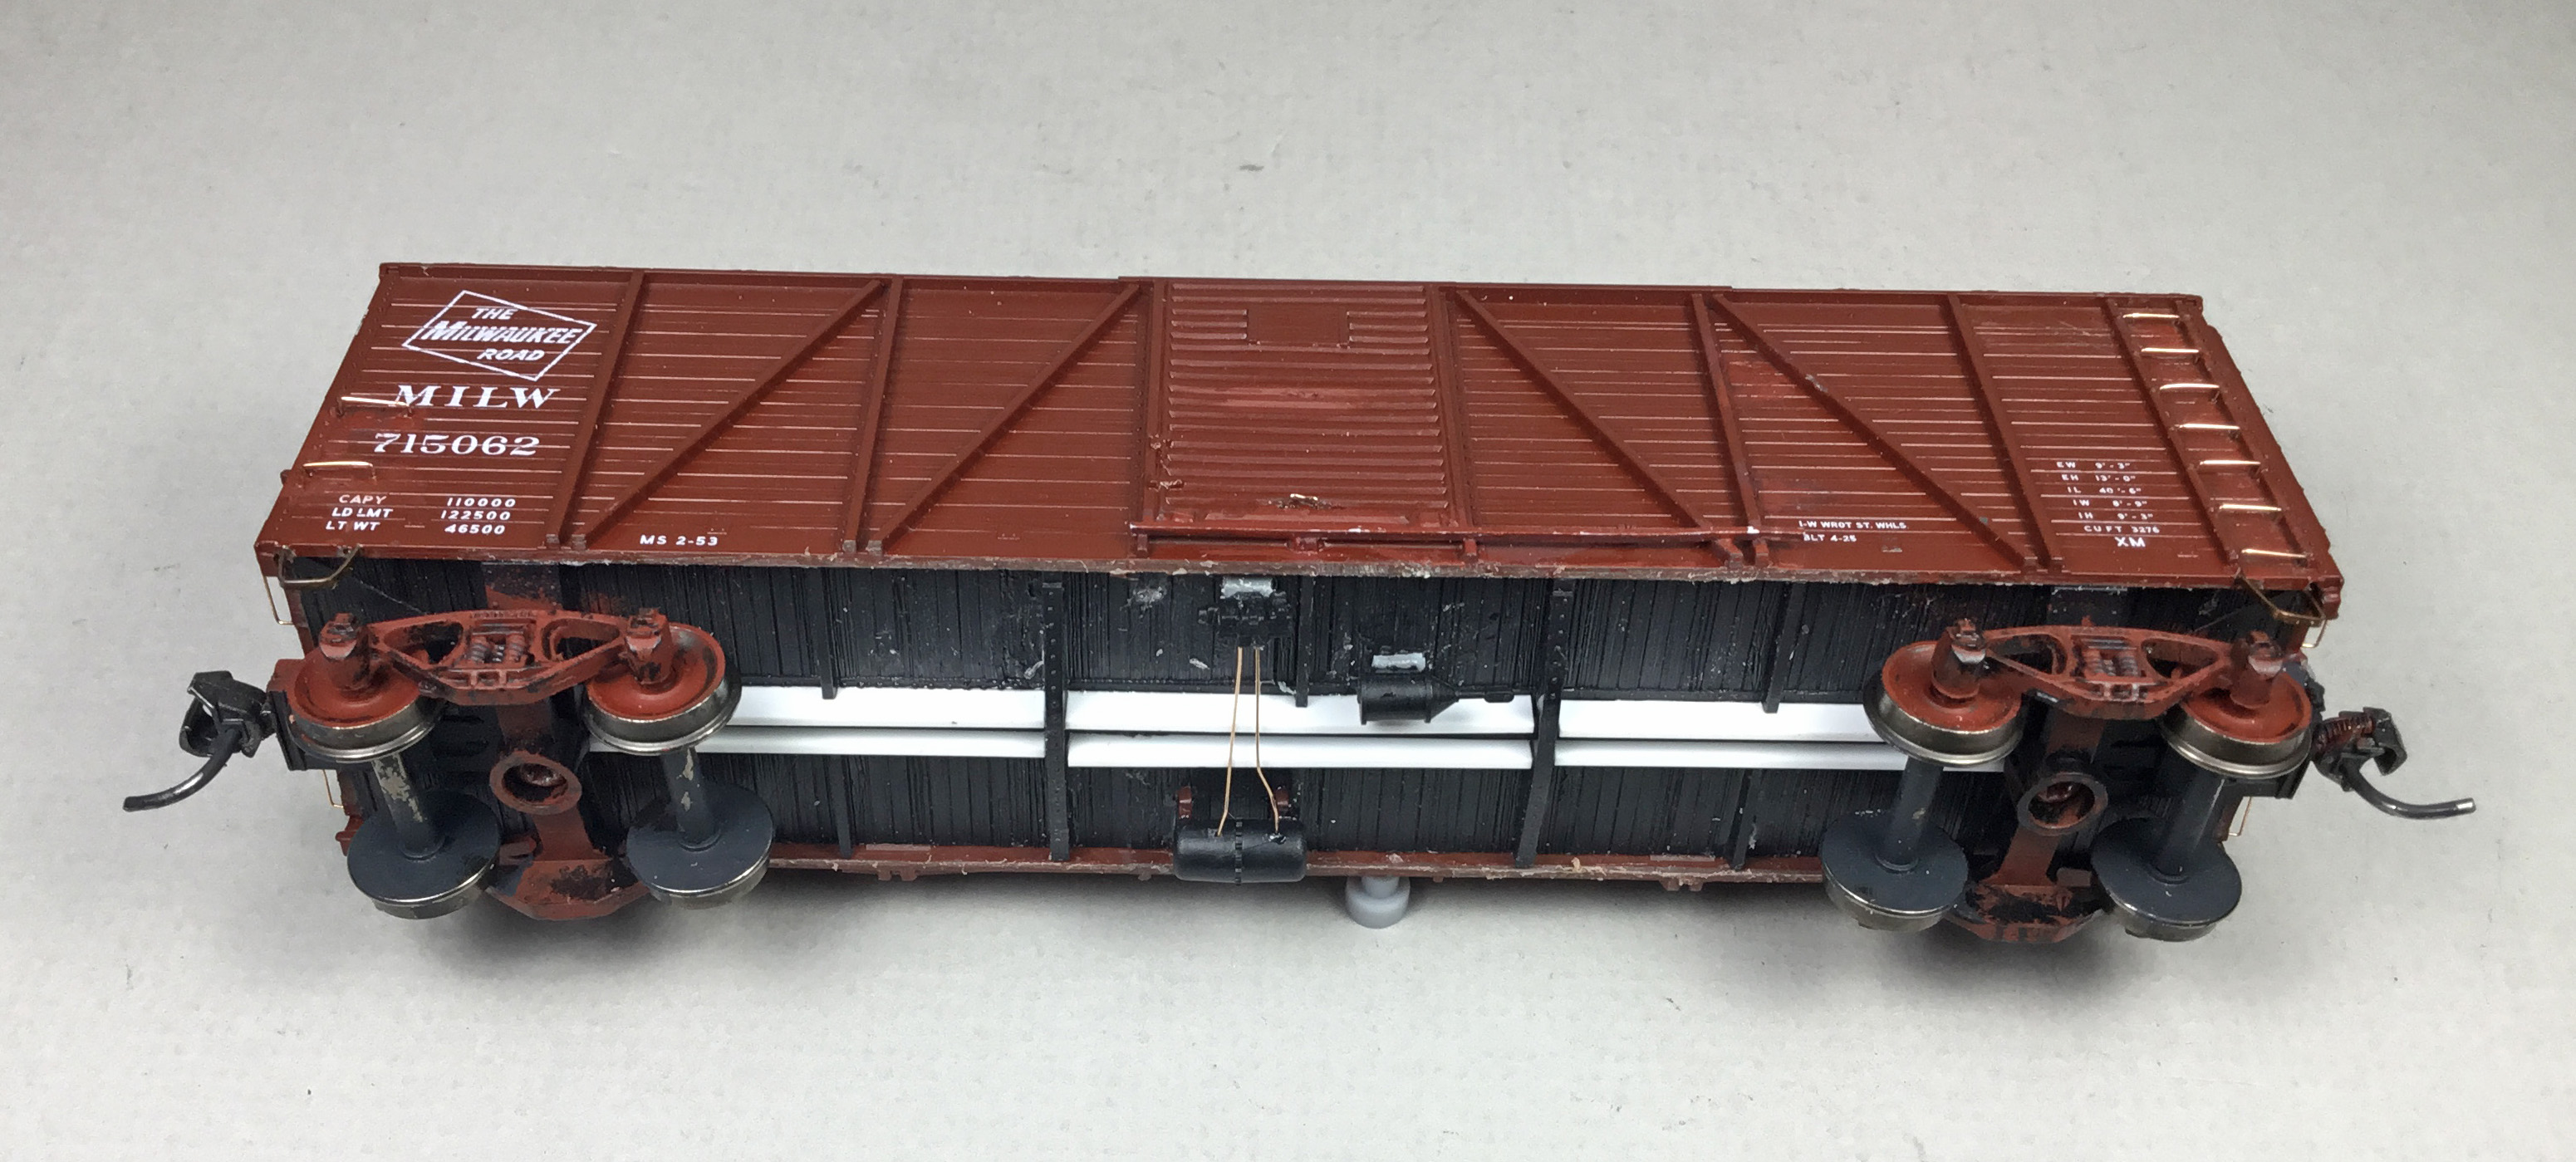
I began the build on the underbodies by removing molded on brackets for brake components with a Xacto knife with #17 blade. Drilling and tapping the coupler pockets and bolster center plates for 2-56 screws followed. Kadee #148 couplers were installed in the coupler pockets and covers installed with Fastenal 3/16” screws. Accurail trucks, ARA cast steel with spring plank, with InterMountain 33 inch metal wheels were installed with Fastenal 1/4 inch screws until correct trucks were found. The kit fish belly center sill was not installed as the MILW cars had a straight sill that would be added later. The kit weight, the only weight needed, was attached to the inside of underbody with Permatex, a clear silicone RTV adhesive sealant, bringing the car weight to 3.8 ounces. When the Permatex was setup the underbody was installed into the car body.
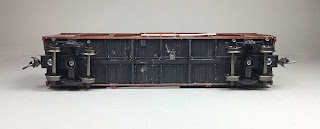 |
| Basic underbody |
On the car body I removed the wood running board, milled and scraped it with a single edge razor blade (SERB) until a thickness of .025” was obtained and reinstalled it with Testors Tube Cement. The longitudinal running board end brackets were made with Plastruct #90501 3/64” styrene angle and Evergreen #8102, 1 x 2” strip styrene.
 |
| Running thinned to .025" thickness and installed. |
 |
| Running board end bracket. |
 |
| Running board end bracket. |
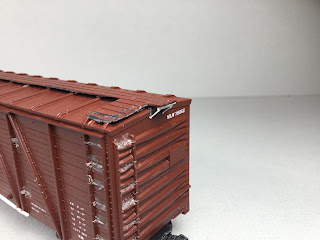
Next all molded on grab irons , ladder rungs, door handles and stops and on the “B” end the brake rod were carved off. Sill steps were also cut off. A bottom door guide, Evergreen 2 x 3” strip styrene was installed.
 |
Molded on grab irons, ladder rungs, door handles
and stops carved off and lower door guide installed.
|
 |
Molded on ladder rungs, grab irons, and brake rod
carved off. |
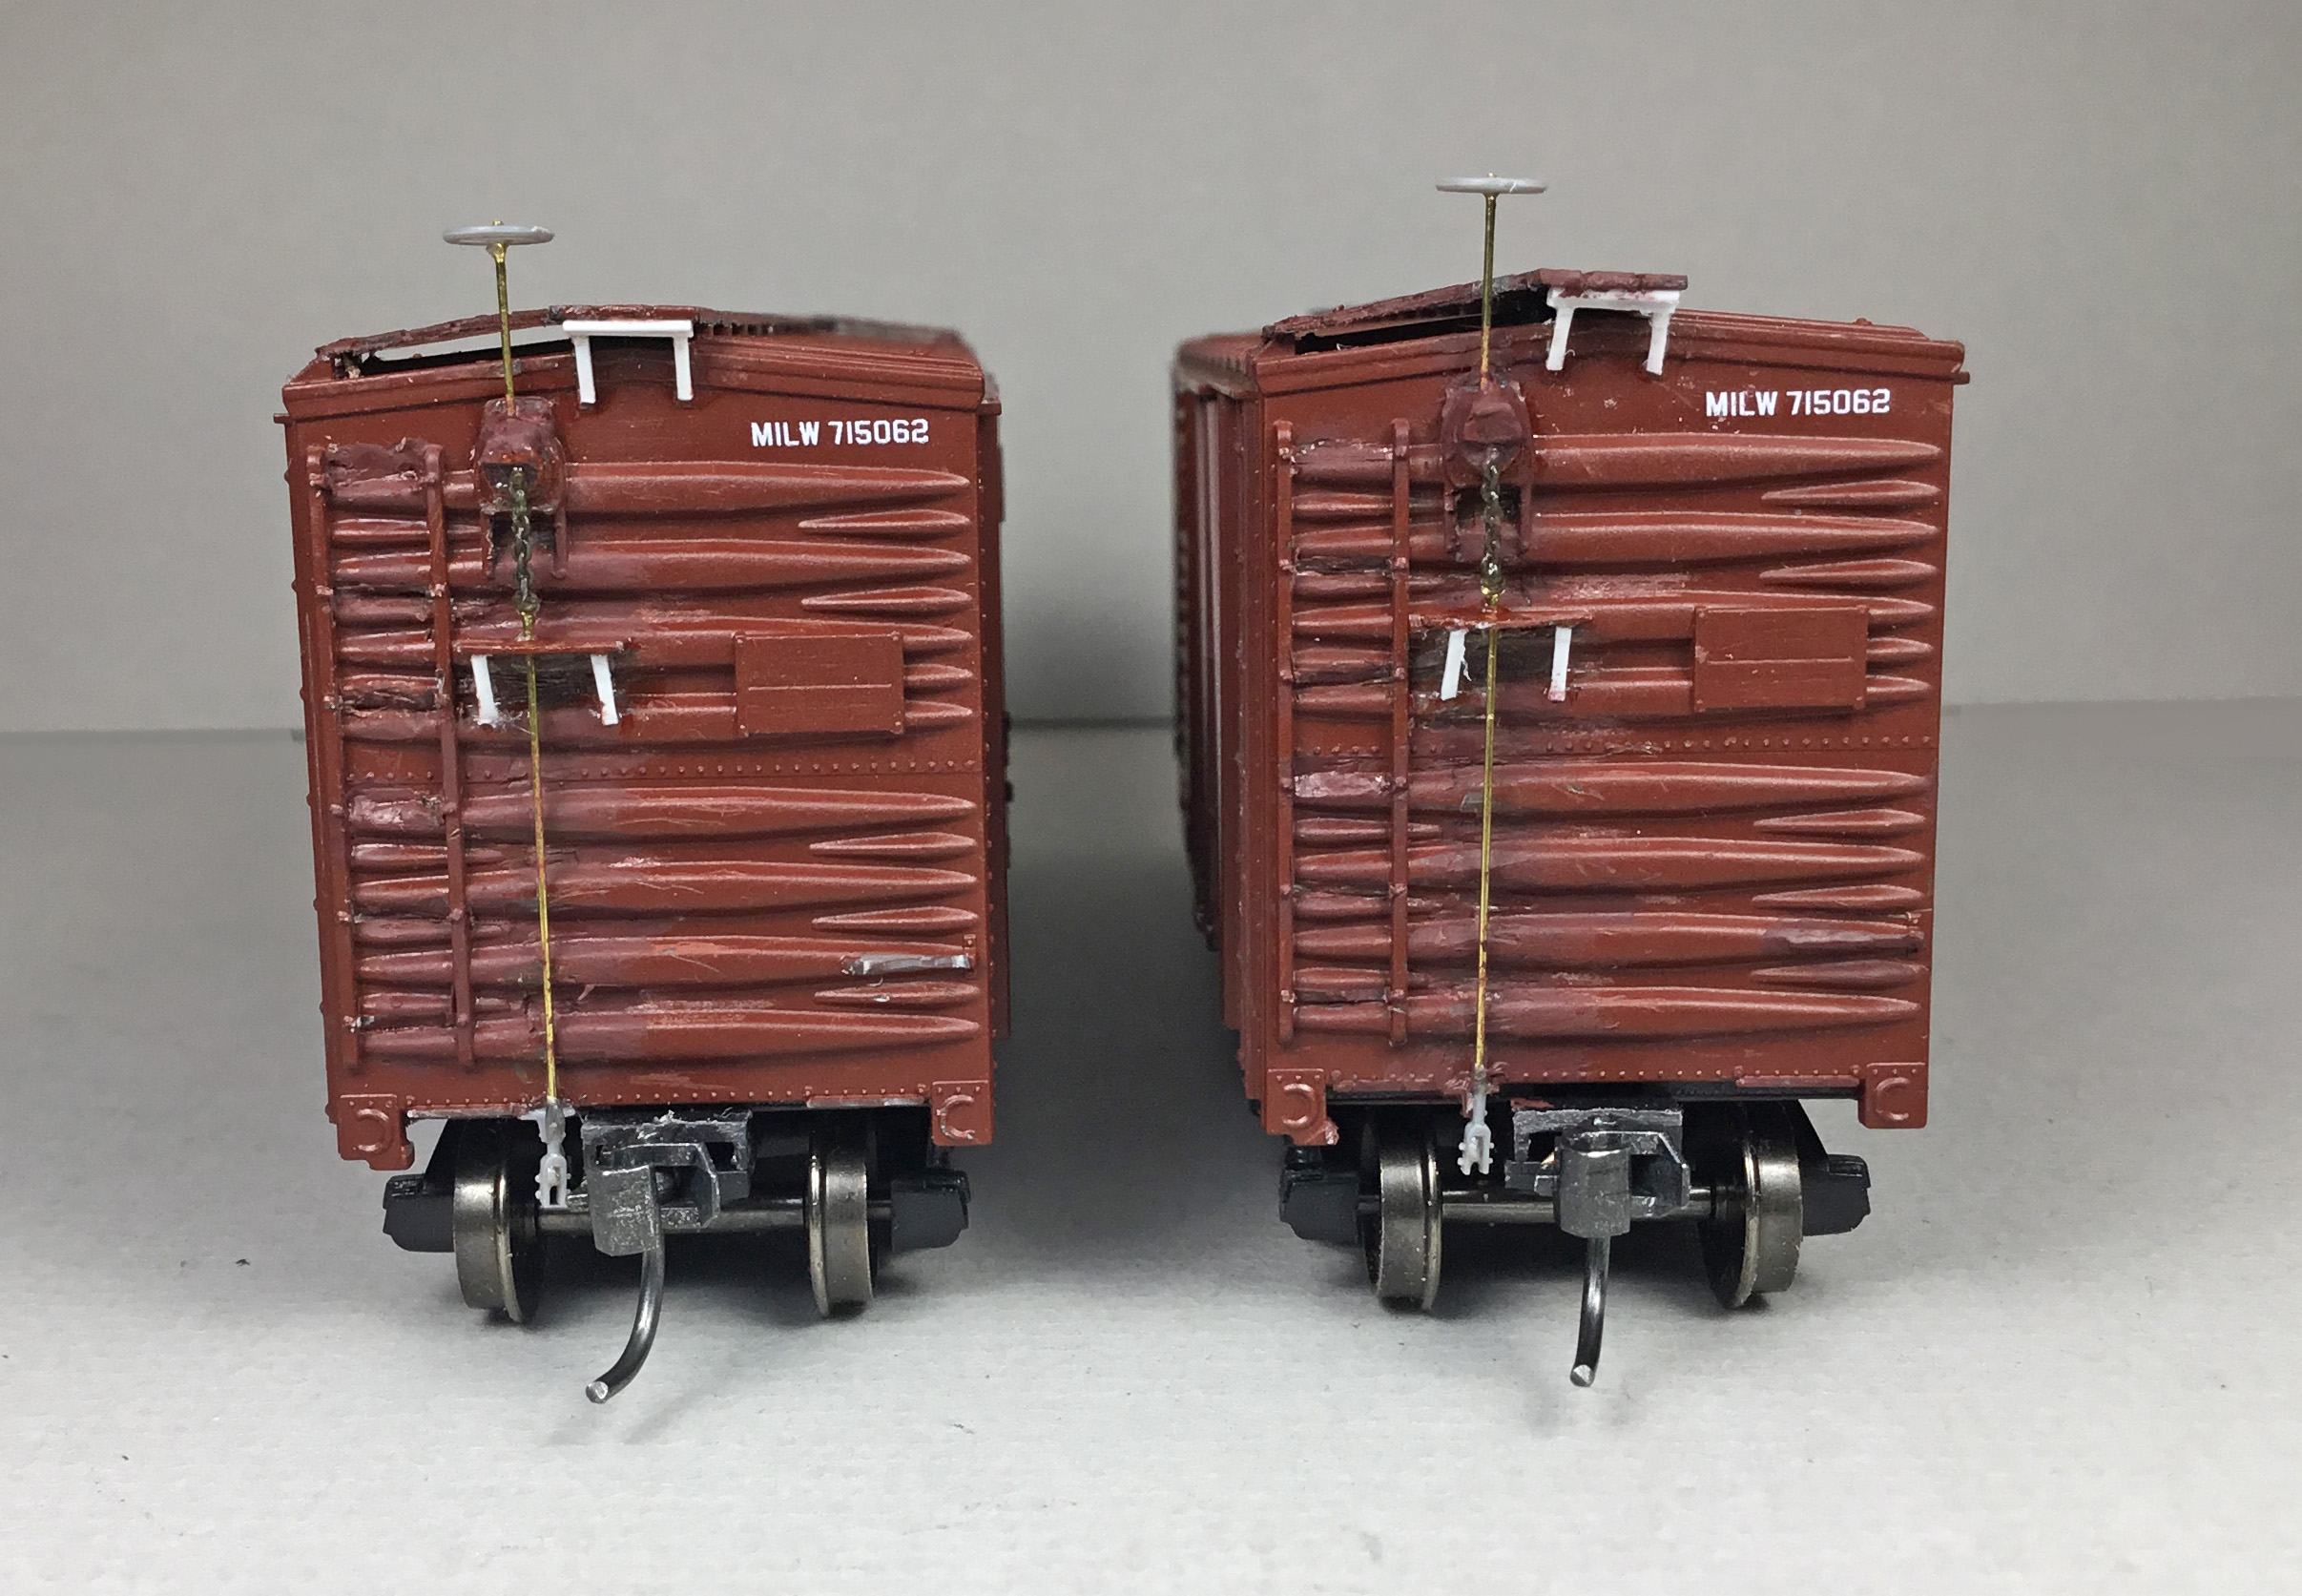
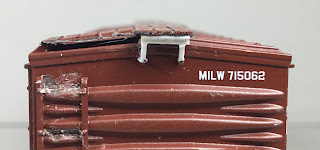
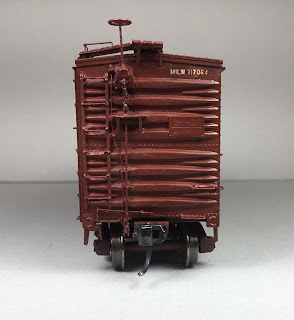
Moving to the “B” end I fabricated the Klasing brake gear by cutting off the portion of the molded on brake housing with the hole. A circle cut from the running board mounting pins that had been cut off was glued to the remaining housing. A second circle was cut in half and a half circle was glued on top of the first circle. MEK Goop was used to form the top of the brake housing. Most modelers would use a modeling putty to form the top.
 |
Molded on brake housing reworked into
Klasing brake gear. |
Before continuing work on the "B" end I installed a bell crank and clevis from Tichy Train Group (Tichy) #3013 AB brake set. On the “B” end I cut off the brake step brackets and replaced them with brackets cut from Evergreen #8102, 1 x 2” strip styrene. I added the chain to the Klasing brake housing using A-Line #29219 40 links per inch black chain. A brake shaft consisting two sections, one above brake housing and one from brake step to bell crank clevis, were cut from Detail Associates #2505 .015” brass wire and installed with CA. A Tichy brake wheel from AB #3013 set was installed.
 |
| "B" end details added. |
Before moving on with adding other detail parts, I hand painted all areas where molded on details had been removed and detail parts already added with a Vallejo Model Color mix of Black Red 70.859 (75%) and Cavalry Brown 70.982 (25%).
 |
| Areas with carved off parts painted. |
 |
| "B" end areas with carved off parts painted. |
Once the paint had dried, grab irons on sides and ends, ladder rungs and door handles bent from Tichy #1101 .010” diameter phosphor bronze wire (PBW) were installed. Sill steps, A-Line #29000, style A, were installed.
 |
| Wire grab irons, ladder rungs, and sill steps installed. |
With car body work done except for roof grab irons I moved onto the underbody work which had details added as follows:
- center sill, Evergreen #136, .030 x .125” strip styrene
- train line, .018” diameter flora wire
- brake components, kit parts, drilled for piping prior to install
- brackets for brake components: air reservoir cut off sill steps, and resin parts for brake cylinder and AB valve
- brake cylinder lever cut from Evergreen #8108 1 x 8” strip styrene
- brake floating lever cut from Evergreen #8106 1 x 6” strip styrene
- brake lever hangers, plastic grab irons
- piping air reservoir to AB valve, Tichy #1101 .010” diameter PBW
- pipe back of brake cylinder to AB valve, Tichy #1106 .0125” diameter PBW
- dirt collector, resin cast in M&N Shops using Tichy part as master
- universal slack adjuster, parts box
- brake rods, Tichy #1106 .0125” diameter PBW
- brake rod turnbuckles, Tichy #8021 plastic turnbuckles
- chain, A-Line #29219, black 40 links per inch
 |
| Side view of center installed. |
 |
| Underbody details added. |
Back to the roof to add roof grab irons bent from Tichy #1101 .010” PBW with Yarmouth Model Works photo etched eye bolts without shoulders for corner legs. And, back to the “B” end to install the uncoupling levers. The uncoupling levers were bent from Tichy #1106 .0125” diameter PBW and eye bolt brackets were bent from Tichy #1101 .010” diameter PBW.
 |
| Roof grab irons and uncoupling levers installed. |
Uncoupling levers being the final detail part to add, it was time for paint. I used the Vallejo Model Color mix of Black Red 70.859 (75%) and Cavalry Brown 70.982 (25%) to hand paint all detail parts added. And, the mix was thinned with a custom thinner mix of 50% distilled water, 25% Vallejo air brush thinner and 25% Vallejo flow improver to airbrush the underbody.
 |
Cars hand painted
|
 |
| Car ends hand painted, |
 |
| Underbodies of cars airbrushed. |
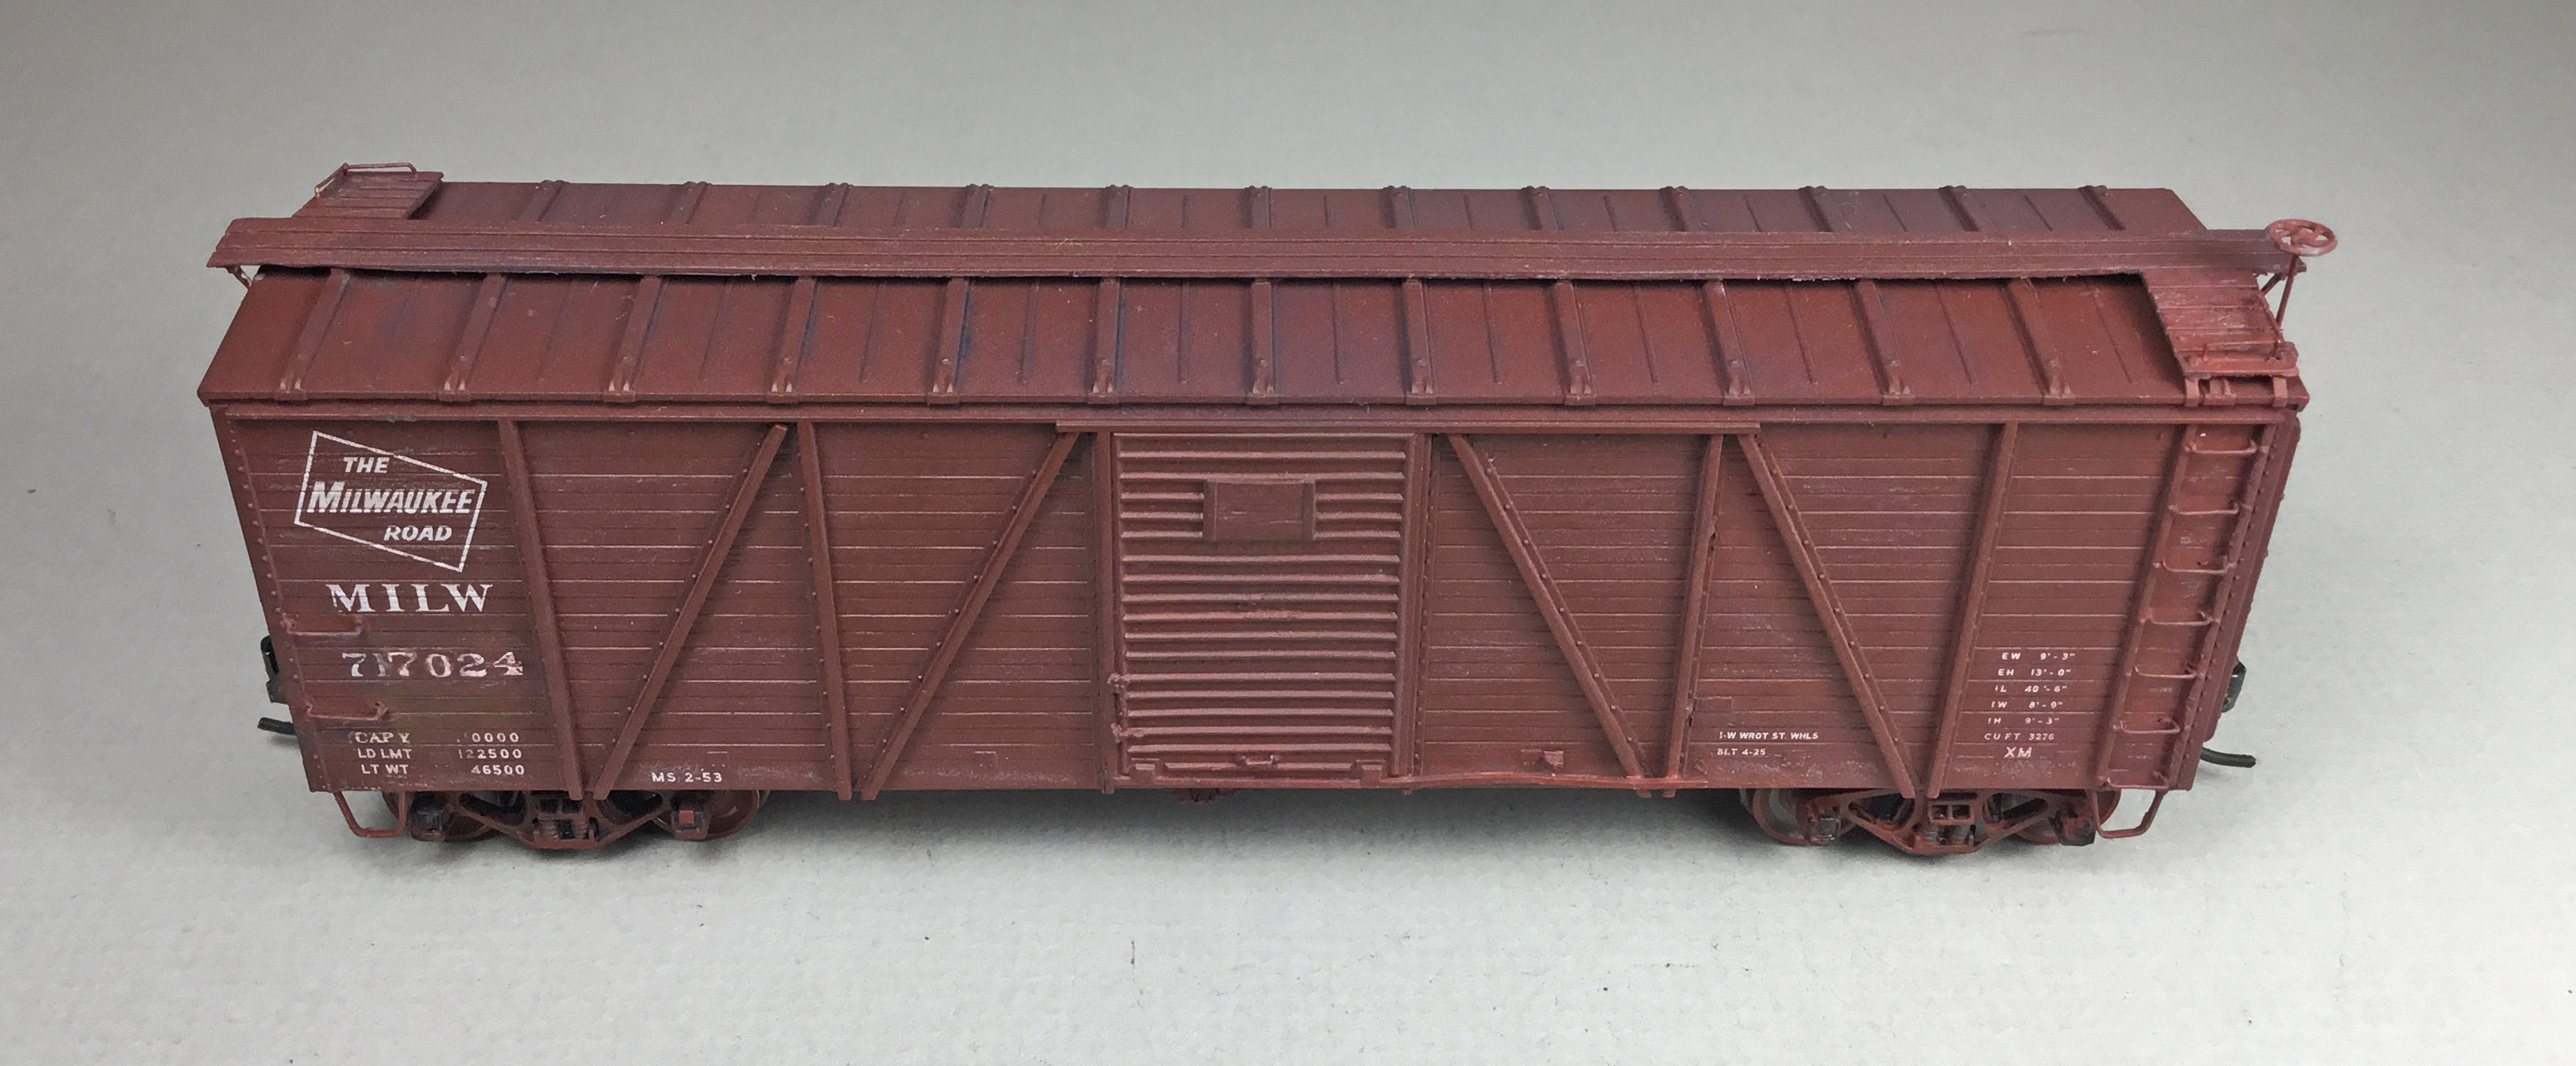
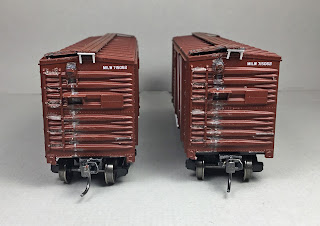
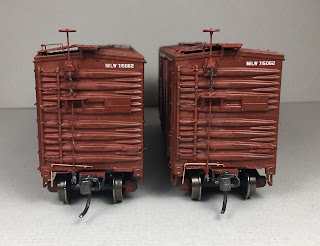
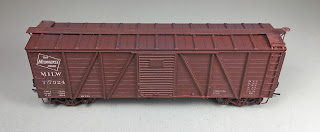
When paint was dry, the numbers in the car numbers that needed to be removed were removed by placing a drop of Walthers Solvaset on them and using the side of a toothpick to gently rub over them until removed. When the areas where numbers were removed had dried, Future Floor Finish was brushed on the areas to provide a gloss base for decal application. Milwaukee Road used decal sets were the source for the new numbers. I attempted to match the Accurail applied lettering as close as I could.
I first changed the car numbers from 715062 to 715262 and 715324 before I found out these numbers were not in the series for cars with the Klasing power brake. Therefore, the numbers were changed a second time. Car number 715262 was changed to 716862 and 715324 was changed to 717024.
Decals were soaked off in distilled water and applied to the car body where MicroScale Micro Set had been applied with a brush. After the decal was applied in the Micro Set and positioned the edges had MicroScale Micro Sol applied. Any excess solution was sucked away with the torn edge of a paper towel. Again when dry, car body sprayed with Vallejo Gloss Varnish 70.510 to better hide edges of decals and protect decals during handling. Again when dry, the car body was sprayed with Model Master Flat Acryl, #4636, to protect decals and provide a flat finish for weathering when applied.
 |
Car numbers changed and clear coated.
|
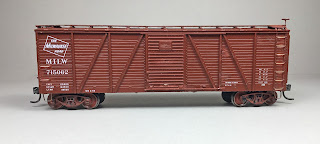
Weathering was applied by going over the sides lightly with Prismacolor, PC1061, cool Grey color pencil. After that was done, Pan Pastels Paynes Grey Extra Dark 840.1 was applied to the roof and sides lightly with a large makeup brush.
 |
| Car lightly weathered. |
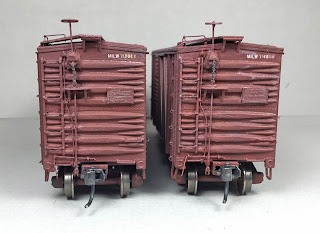 |
| Car ends lightly weathered. |
 |
| Car roofs lightly weathered. |
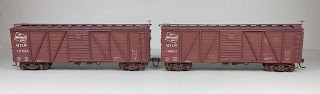
Milwaukee Road box cars 716862 and 717024 were ready for service on the Minneapolis & Northland Railroad Company, The Lakeland Route, “Serving today, Shaping tomorrow.” Even with the 4/4 rather than 4/5 ends and corner boards missing they will be will be fine for service now. A car card was made for each car which is the final step to put the a car in service on the Minneapolis & Northland Railroad Company Railroad.
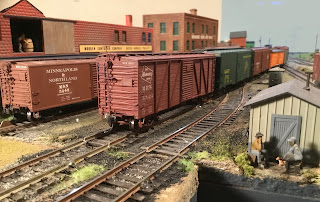 |
MILW 717024 on the CNW Interchange waiting
to be picked up for delivery to the MILW Interchange
in Eureka Center. |
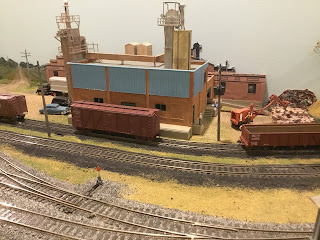 |
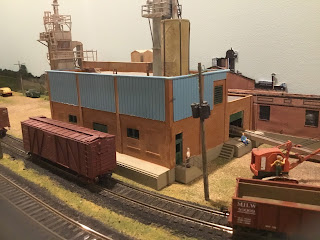
MILW 716862 spotted at Leone Foundry
in Eureka Center. |
 |
MILW 716862 spotted at Leone Foundry
in Eureka Center.
|
 |
MILW 716862 spotted at Leone Foundry
in Eureka Center.
|
My build of MILW box cars 716682 and 717024 were made easier with the help of the following individuals. Their time and effort to assist me is greatly appreciated.
A "Thank You" to Joe Binish for the information provided.
A "Thank You" to Steve Steele for the information and photos provided.
A "Thank You" to George Toman for the information and photos provided.
Thank You for taking time to read my blog. You can share a comment in the section below if you choose to do so. Please sign your comment with your name if you choose to leave one. Please share the blog link with other model railroaders.
Lester Breuer
.