Saturday, March 23, 2024

International-Great Northern Box Car 17109

 When I moved my Minneapolis & Northland Railroad Company to my present home twelve years ago, I still had several bank boxes of wire in my storage area that was removed from under the railroad prior to its move.   After collecting cars for many years, a friend is now building a railroad.  He asked me if I would like to part with a couple of the boxes of wire.   I said, “Sure.”  When I was asked, “How much is it going to cost?”  Since  I had passed on Atlas 1932 design box cars I asked if he had one he could part with.  End of story, an Atlas RTR 1932 design box car, kit 20 001 258, lettered for the International-Great Northern (I-GN),numbered 17109 came into my possession.

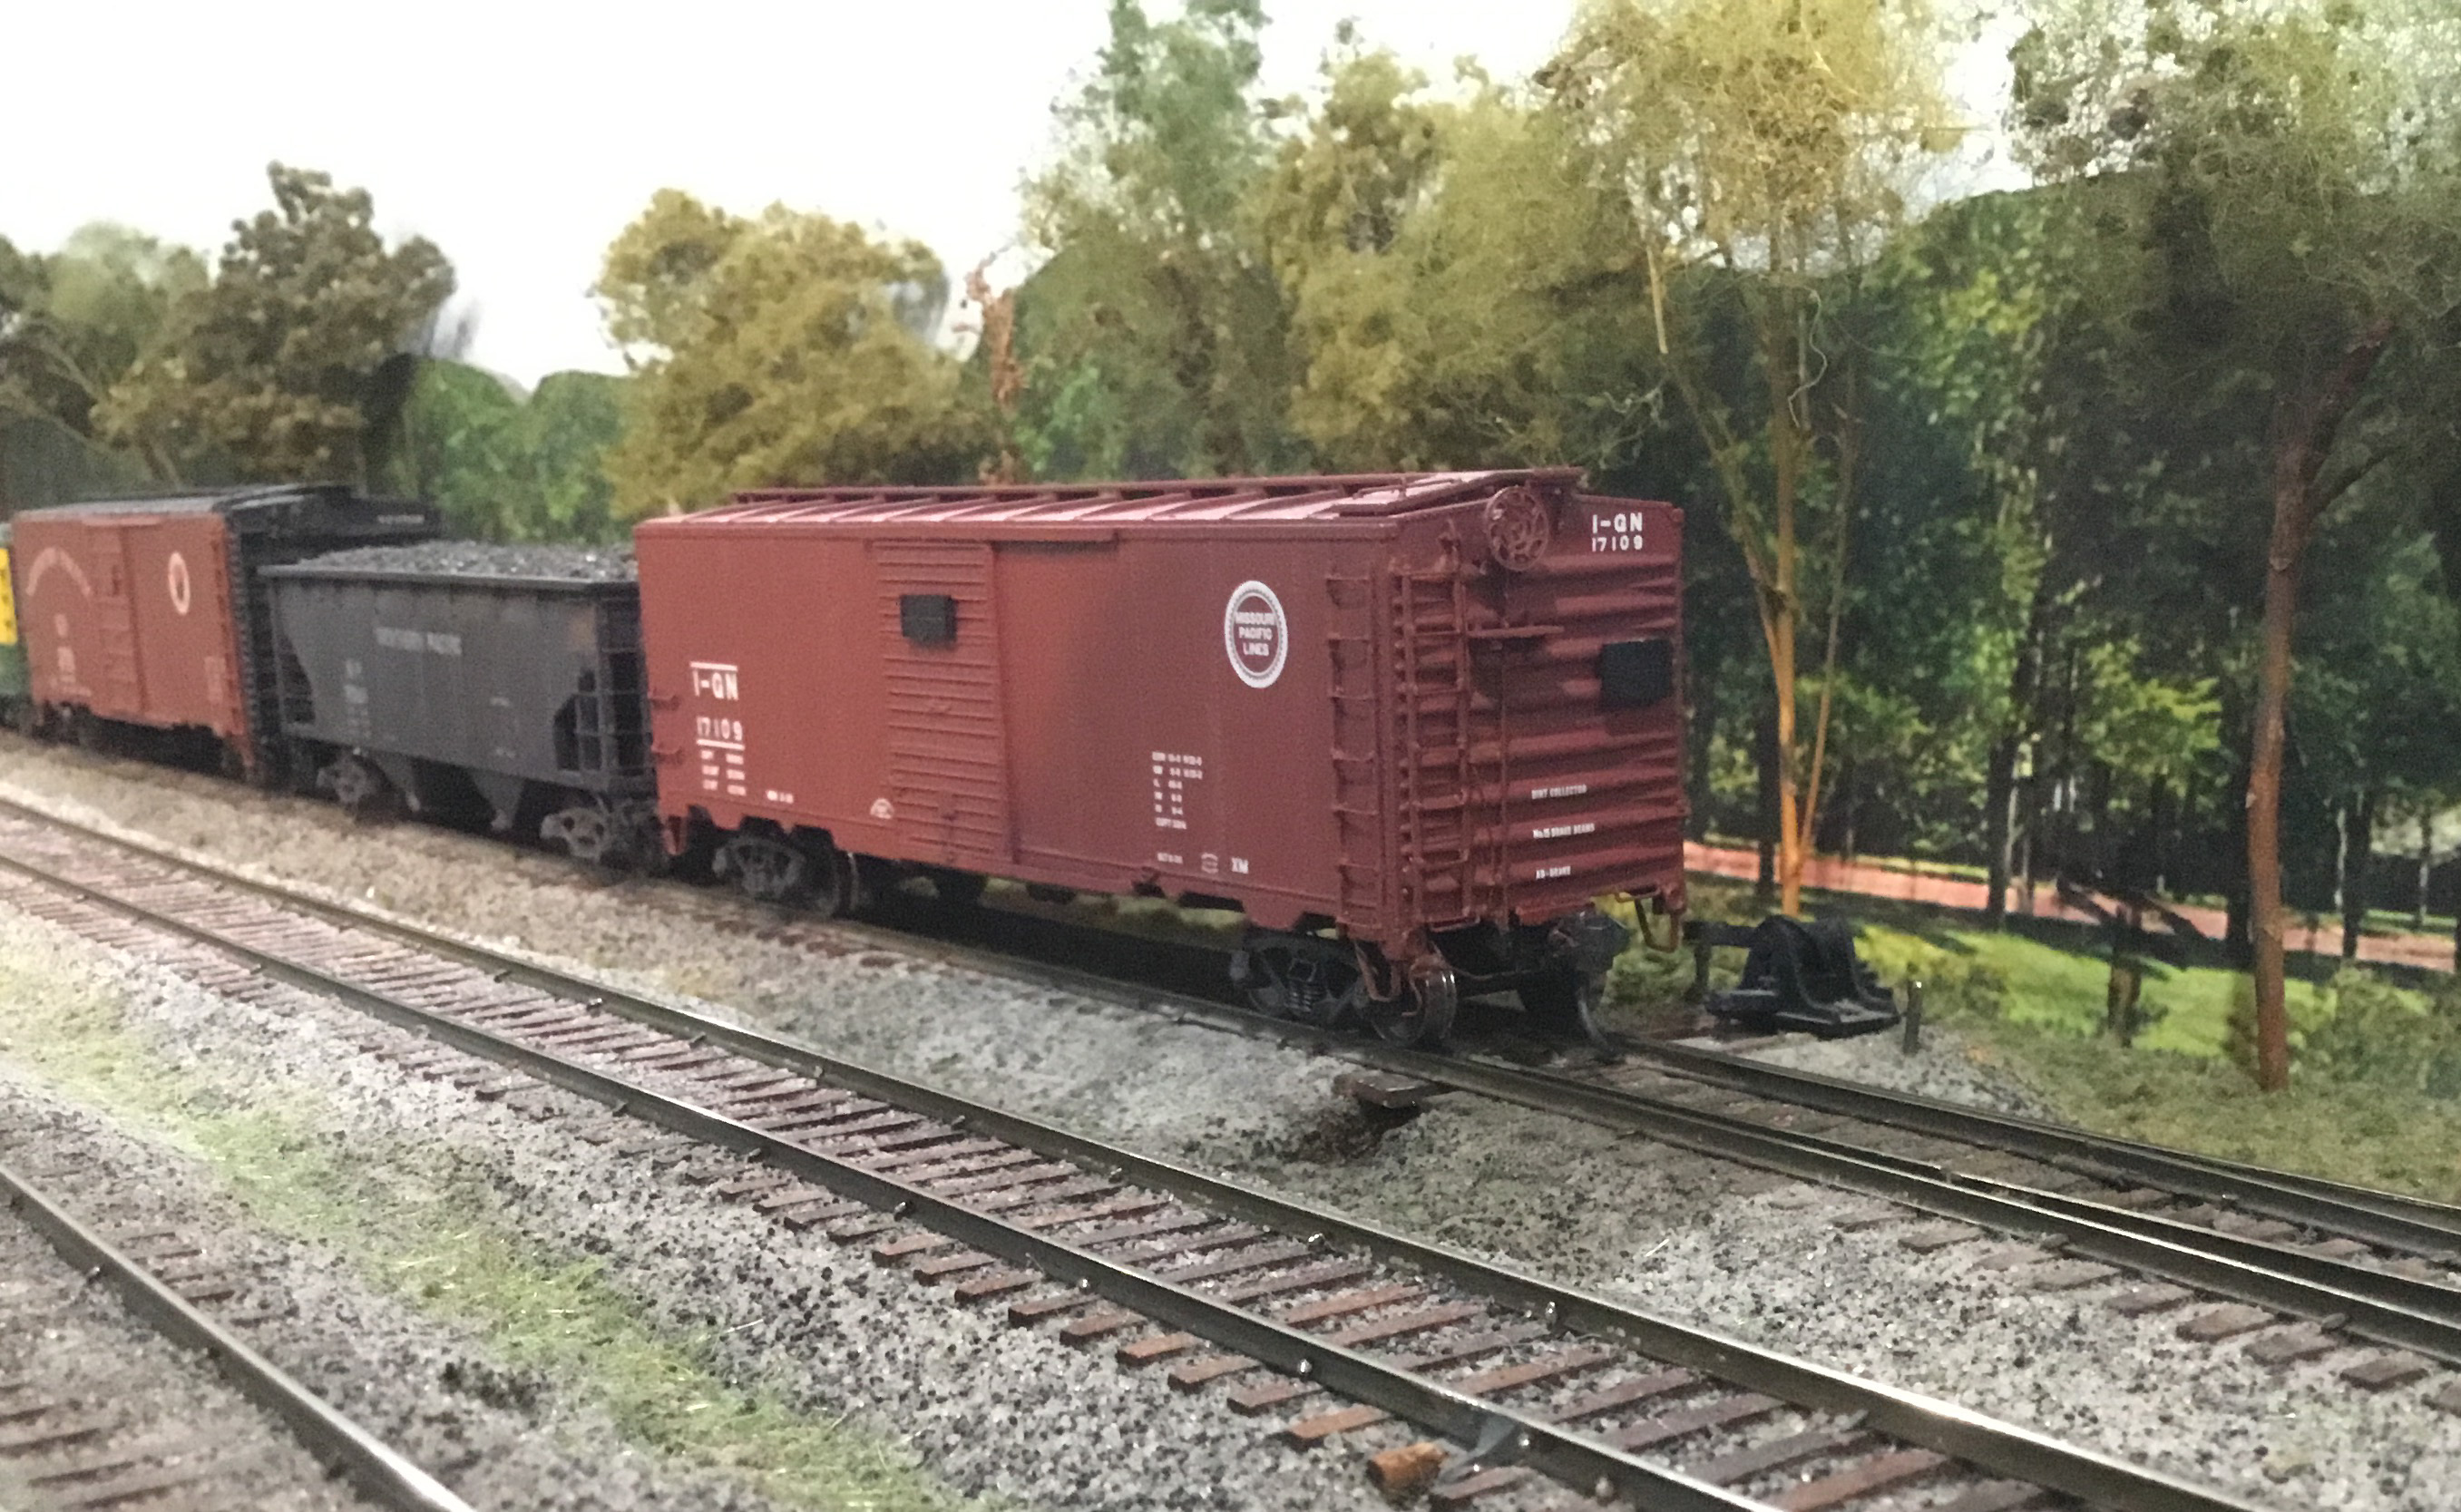
Upon arrival I opened the box with the new Atlas RTR (ready-to-run) 1932 design box car lettered for I-GN 17109 to view the new box car; however, I really wanted to view the freight car on the railroad.  Therefore, I removed the car from its box and placed it on the Soonor Wye in Minneapolis on my railroad.   Your eyes immediately catch the I-GN reporting marks and Missouri Pacific herald.  The I-GN was a sub of the Missouri Pacific, thus the 24 inch Missouri Pacific herald.


I-GN Box Car 17109 sitting on Soonor Wye
(Click or tap on this or any image to enlarge)


Atlas Model Railroad Co., Inc. did a good job of producing this 1932 design ARA box car when compared to prototype photos, including B end, of I-GN 17156 and 17149 in The American Railway Association Standard Box Car of 1932 (Speedwitch Media, 2004).  In the book with detailed coverage of the 1932 design and numerous photos, the Missouri Pacific Lines chapter states “the Missouri Pacific initiated its purchases of 1932 cars with a 300 order for its subsidiary, the International-Great Northern.”


The prototype steel cars were built by American Car & Foundry in June of 1936 and assigned to series 17001-17300.   Features of these cars included 4/4 Dreadnaught ends, Murphy panel roof, wood running boards, Youngstown corrugated steel doors with Creco door fixtures, metal brake step and Universal brake wheel.  And, the cars rode on 40 ton trucks.


I-GN 17156 photo found in The American Railway
 Association Standard Box Car of 1932
       Courtesy of Ted Culota


Off to the computer to put the new car into the data base and print a car card for box car I-GN 17109.  The International Great Northern box car was ready for service on the Minneapolis & Northland Railroad Company.  Normally printing a card card is the final step to put the a car in service on the M&N Railroad.  Well, not the final step this time.   Once I-GN 17109 was sitting on the Great Northern Interchange, I-GN 17109 just did not look right.  Why?  A 1932 freight car running in the late spring of 1955 should show some weathering.


I-GN 17109 on Great Northern Interchange
 needing weathering.


Box car I-GN 17109 went back to the workbench for weathering.   Just a quick application with a makeup brush of Pan Pastes Paynes Grey Extra Dark 840.1.  Since it was on the workbench removal of the molded on sill steps and uncoupling levers would not take long.  Therefore, molded on sill steps were cut off and replaced with A-Line #29000, style B, sill steps installed into holes drilled with a #76 drill.  And, molded uncoupling levers were cut off and replaced with wire uncoupling levers and brackets bent from Tichy Train Group (Tichy) #1106, .0125 phosphor bronze wire (PBW).   Of course, the new installed details had to be painted.   Therefore, the new details were hand painted Vallejo Model Air Brown RLM 26 with a touch of  Vallejo Model Color Black 70.950.  When the paint was dry, details were weathered with black eye shadow makeup applied with a mico brush and weathered box car  I-GN 17109 was returned to the railroad.


Sill steps and uncoupling levers replaced.


The next day I decided box car I-GN 17109 still could use a few changes.  Back to the workbench.   The plastic molded ladder rungs were cut off and replaced with wire ones bent from Tichy #1101, .010 diameter PBW.  Again I-GN 17109 now looking better was returned to Soonor Wye on the railroad; however, still not done.   


Wire rungs installed on kit ladder styles.


After ladder rungs replaced with wire rungs
I-GN 17109 was placed on Soonor Wye.


Once the ladder rungs were replaced why not make a few additional changes on the B end and the underbody.   And, I did.


The funny looking retainer valve, oversize retainer line, strange looking bell crank and oversize brake rod were cut off. 


Easy to see strange looking retainer valve and
bell crank as oversize retainer line and brake rod.


New detail parts installed were as follows:


  • Retainer valve, resin one from spare parts box
  • Retainer line and brackets, Tichy # 1100, .008 diameter PBW
  • Bell crank, Tichy from set #3013
  • Brake rod, cut from Detail Associates #2505, .015 brass wire
  • Brake rod clevis to attach brake rod to bell crank, Tichy from set #3013


The new detail parts were hand painted Vallejo Model Air Brown RLM 26 with a touch of  Vallejo Model Color Black 70.950 weathered with Pan Pastels Paynes Grey Extra Dark 840.1.  And, placard boards were painted Vallejo Model Color Black 70.950 as was done by the Missouri Pacific.


B end details installed.


B end details installed.


B end details installed.


Before putting box car I-GN 17109 back into service there were a few underbody changes I wanted to make.   A square looking control valve (AB valve) was removed after the pipes from the air reservoir were carefully cut off as they would be reattached to the new control valve.   An AB valve, resin cast in the M&N Shops using Sunshine Models as master, was installed.  The AB valve was drilled for piping prior to install.  Molded on air reservoir piping was reconnected to new AB valve.  A missing brake pipe from back of brake cylinder to AB valve was cut and bent from Tichy #1106, .0125 diameter PBW and installed.  Missing brake lever hangers, bent from Tichy #1101, .010 diameter PBW, were installed.  The missing brake rod between the brake levers was installed.  The brake rod was cut from Tichy #1106, .0125 PBW with clevises to attach to brake levers made with MEK Goop.  And, a dirt collector, resin cast in M&N Shops using Tichy in set #3013 as master, was installed.  Now, box car I-GN 17109  was moved to the paint shop where the underbody was hand painted Vallejo Model Color Black 70.950.


Underbody before details installed.


Underbody with details installed.


Underbody with added details painted.


Out of the paint shop box car I-GN was placed back in service.   I-GN 17109 sat on the mainline for a while before being moved back on the Great Northern (GN) Interchange.  In the next operating session box car I-GN 17109 was placed into the scheduled Western Arrow, better known as Number 5, a train on the Minneapolis & Northland Railroad Company (M&N)  and moved to the passing siding in Little Chicago from where it was moved by the local switch engine to Hiawatha Elevator.


I-GN sitting on mainline in Minneapolis
prior to  move to GN Interchange.


I-GN 17109 moved to GN Interchange.


I-GN 17109 moved to GN Interchange.


I-GN 17109 spotted at Hiawatha Elevator
in Little Chicago, Minnesota.


After I published this blog I was made aware that I had left the New 1936 reweigh date.  Did I mean to do that?  No, since I model late spring 1955 I did want a much later reweigh date.   I changed the date several days later.  And, a photo of  I-GN 17109 with the new 1951 reweigh date on the Soonor Wye.


I-GN 17109 with new reweigh date  sitting
on Sooner Wye in Minneapolis, Minn.


I want to say, “Thank You” to Ted Culotta for providing photo of  I-GN 17156 and his permission to use it here on my blog.  The International-Great Northern photo of  I-GN box car 17156 (above) is from his book The American Railway Association Standard Box Car of 1932 If you missed this book with extensive photographic coverage, drawings and information of the 1932 design box car, you will have another opportunity to purchase the book as Ted recently announced it is being reprinted and will be available soon from Speedwitch Media.


Thank You for taking time to read my blog.  You can share a comment in the section below if you choose to do so.  Please sign your comment with your name if you choose to leave one.  All comments are reviewed and approved before they appear.  Please share the blog link with other model railroaders.


Lester Breuer


.

Wednesday, March 13, 2024

Missouri Pacific Box Car 30404

In recent months some modelers are reducing their resin kit inventory enabling me to purchase kits that I had missed or passed on when available.   One such freight car kit is Sunshine Models Missouri Pacific (MP) kit 21.32 that builds into a standard steel box car of 1932 design with decals with MP’s slogan  “Route of the Eagles”.  The Sunshine Models resin kit is a flat kit which scares some modelers from purchase; however, it should not as only a few additional steps are needed to assemble the resin car body.

The Missouri Pacific was on of the largest purchaser of cars built to the 1932 design.  The prototype car numbered 30404 was one of the 1,400 cars built by Mt. Vernon Car Manufacturing Company assigned in series 30000-31399.  The car had the unusual Railway Metal Products Union Duplex door fixtures used on the first 750 cars in the series.   Other features for these cars were 4/4 Dreadnaught ends, Murphy panel roof, wood running boards, Youngstown corrugated steel doors, metal brake step and Ajax brake wheel (30000-40649).  And, the cars rode on 50 ton Scullin trucks (30000-30499).

A photo of MP Box Car 30404 appears in the Sunshine Models Instructions for assembly of the A.R.A. 1932 Box Car showing the smaller buzzsaw herald and no slogan on a paint color Sunshine Prototype Data Sheet #21A  describes as a box car red with a medium brown paint hue. 


Missouri Pacific 30404
Sunshine Models Instructions
(Click on this or any image to enlarge)

The same black and white photos appears in The American Railway Association Standard Box Car of 1932 (Speedwitch Media, 2004).  In the book with detailed coverage of the 1932 design and numerous photos, the Missouri Pacific Lines chapter states the 1949 the cars were repainted in a color with a reddish-brown hue receiving a larger 42” buzzsaw herald and slogan “Route of the Eagles” beginning in 1949.  And, among the group of MP photos are photos of MP 30129 and Mp 30943 wearing the new scheme.


Since this was flat kit, I began my normal assembly of the car body with a method I call the “L method” to assemble the resin car body rather than following kit instructions.   After checking the sides and ends to make sure they are equal ( making them equal if not via sanding), an end and side are glued together at the corner forming an “L”.  Once you have two “Ls” you glue them together to form the basic box.  Next I fitted (via sanding) and installed the underbody  in the basic box giving one the car body without roof.  In the kit instructions one end was glued to a sub-end, then the other side to the same sub-end and finally the other end was glued between the sides to form the basic box.  The car ends were than glued to the sub-ends.   With the “L” method I used the  sub-ends as baffles in the car.


Sub-ends used a baffles
on either side of door opening.


On the underbody, bolster center plate and coupler pads were drilled and tapped for 2-56 screws.  Kadee #262 narrow coupler boxes (not in kit) with Kadee #148 couplers inserted (not in kit) were installed with Fastenal 3/16” screws.  Accurail trucks with 33” InterMountain wheel sets were installed with Fastenal 1/4” screws.  To obtain proper coupler height the resin cast washer with tube center in the kit was installed on each bolster.


Couplers and trucks mounted on underbody.
Note washer under bolster without truck.


At this time the car was placed on a scale along with the roof parts to weight the car to 3.8 ounces with stick on tire weights (not in kit).  The roof was put in place to check fit.


Stick on tire weights installed.


Roof checked for fit.


Once roof fit was right, the roof was glued in place to finish the car body.   Next the running boards provided in the kit were installed with Formula 560 Canopy glue.


Running boards installed.


Once running boards adhesive was set, I went back to work on the underbody.   I installed crossties, with face open toward the ends, crossbearer cover plates and basic brake components provided in the kit.  Prior to installing the brake components, they were drilled with a #79 drill for piping.  The bolster cover plates in the kit would best be installed now; however, they were forgot at this time and installed later before underbody painted.


Crossties, crossbearer cover plates and
brake components installed.


Time to work on the ladders.   On the resin kit ladders, the cast rungs were cut off the stiles with a PBL nipper and replaced with wire ladders rungs bent from Tichy Train Group (Tichy) #1101, .010 diameter phosphor bronze wire (PBW).  To replace the ladder rungs, the ladders were left on the kit molding gates ( often referred to as sprues) for drilling the holes with a #80 drill.  After holes were drilled, only every other molded on rung was cut off with a PBL nipper and a wire rung bent from .010” diameter brass wire installed.  Then, the remaining rungs were replaced to complete the ladder.


Example of ladder rung replacement started.


Example of ladder rung replacement finished.


Ladders in kit with wire rungs installed
installed on car.


Now the work on the B end was done.   I installed the brake housing and the running board extension brackets.   The running board extension brackets were made using an angle in the kit and legs cut from 10 x 30 strip styrene also provided in the kit.  I used MEK Goop (scrap plastic melted in MEK) to create the fasteners.  The remaining detail parts installed on the B end were as follows:


  • Brake housing, kit, hole for brake wheel enlarged with a #56 drill
  • Brake housing chain, kit
  • Brake step (platform) brackets, kit
  • Brake step, Apex metal,  Plano Model Products, set #11322
  • Bell crank, kit
  • Brake rod, cut from .015” brass wire in kit
  • Brake rod clevis to attach to bell crank, turnbuckle, Tichy #8021
  • Retainer valve, resin in kit
  • Retainer line and brackets, Tichy #1100, .008 diameter PBW
  • Brake wheel, Ajax, Kadee #2020
  • Grab irons, wire grab irons bent from Tichy #1101, .010 PBW
  • Placard (tack) boards, kit


Details on B end installed.


After install of grab irons on the ends, I continued install of grab irons on the roof.  The roof grab irons were bent from Tichy #1101, .010 PBW and Yarmouth Model Works (YMW) eye bolts without shoulder were used for corner legs.  On this build a “Eureka” moment.  I finally learned and easy way to make the roof grab iron with corner leg prior to install.  After bending the roof grab iron, the eye blot is placed on the grab iron, with end legs facing down the eye bolt is moved to the right angle bend letting the leg portion hang down as the end legs and a drop of CA is placed on the located eye bolt.  After an almost immediate CA setup, you have a roof grab iron with three legs, ends and corner, ready for install.


Roof grab irons installed.


And, sill steps, A-Line #29000 in kit were installed.


Sill Steps installed.


With sill steps installed, I  installed the brackets grab irons provided in the kit next.  Doors with the unusual Railway Metal Products Union Duplex door fixtures used on the first 750 cars in the series provided in the kit were installed.  On the doors the cast on door handles were removed and replaced with wire door handles bent from Tichy #1101, .010 diameter PBW.


Bracket grab irons and doors installed.


Back to the B end to install the uncoupling levers.   The uncoupling levers were bent from Tichy #1106 PBW.


Uncoupling lever on B end installed.


With the car body finished, all I had left to move the car to the paint shop was the underbody work.   Details added to the underbody were as follows:


  • brake cylinder lever, cut from Evergreen #8108, 1 x 8 strip styrene
  • Floating brake lever, cut form Evergreen #8106 1 x 6 strip styrene
  • Brake lever hangers, wire grab irons in kit
  • Piping air reservoir to AB valve, Tichy # 1101, .010 diameter PBW
  • Pipe brake cylinder to AB valve, Tichy #1106, .0125 diameter PBW
  • Brake rods, Tichy #1106, .0125 diameter PBW
  • Brake rod clevises, Tichy turnbuckles, #8021
  • Chain, A-Line black 40 links per inch
  • Train line, Tichy #1114, .020 diameter PBW
  • Dirt collector, Tichy set #3013
  • Dirt collector tee on train line, MEK Goop


Underbody details installed.


The build of Missouri Pacific box car 30404 was finished enabling move to the paint shop.   In the paint shop the car body was cleaned with makeup cotton swabs dipped in 91% isopropyl alcohol and mounted on paint stand for painting and couplers taped with blue painters tape.


Car mounted on painting jig.


Before the car color was applied, MP box car was airbrushed with Model Air Vallejo/MicroMark Undercoat Light Gray, X29013X2 for a primer coat.   While the primer coat was drying the trucks were hand painted Vallejo Model Air Black Grey RLM66, 71.055.  


Car airbrushed Undercoat Light Grey.


Car airbrushed Undercoat Light Grey.


When the car body was dry it was again installed back on the paint stand, taped with blue painters tape, and underbody airbrushed Vallejo Model Air Black grey RLM66, 71.065, as the trucks.


Underbody airbrushed.


When the underbody was dry the trucks were installed and the car placed in my airbrush car holder I made and use to apply paint and clear coats with couplers and trucks installed.


Car holders/jigs for painting.


Example of car in car holder/jig for painting.


The paint car holder with box car and tape applied was placed in the paint booth and airbrushed with Polly Scale Box Car Red, F414281.   If I did not have the no longer manufactured Polly Scale paint, I would have used Vallejo/MicroMark Model Air Box Car Red, #29015X2.  After airbrushed box car red  paint was dry, the car body was airbrushed with Vallejo Gloss Medium 70.470 for a gloss decal base.


Car ready for decals.


Car ready for decals.


After drying overnight, decals were applied.  Decals provided in the kit were used.  Due to the age of the decals, the decals were coated with Microscale Liquid Decal Film to prevent them breaking up.  I used photos of MP box car 30404 as a guide to apply decals.


Decals were soaked off in distilled water and applied to the car body where MicroScale Micro Set had been applied with a brush.   After the decal was applied in the Micro Set and positioned the edges had MicroScale Micro Sol applied.  Any excess solution was sucked away with the torn edge of a paper towel.  Again when dry, car body was airbrushed with Vallejo Gloss Varnish, 70.510,  to better hide edges of decals and protect decals during handling.  Again when dry, the car body was airbrushed with Model Master Acryl Flat Clear, #4636, to protect decals and provide a flat finish for weathering when applied.


Now the placard boards were hand painted Vallejo Model Color Black 70.950 as was the Missouri Pacific practice.


Decals applied and placard boards painted black.


Decals applied and placard boards painted black.


Decals applied and placard boards painted black.


One more step before putting MP 30404 in service was to weather the car with Pan Pastels.  Pan Pastels Paynes Grey Extra Dark 840.1  was used on the roof and lightly over safety appliances on car body.


MP 30404 weathered with Pan Pastels.


MP 30404 weathered with Pan Pastels.


Missouri Pacific  boxcar 30404 was ready for service on the Minneapolis & Northland Railroad Company, The Lakeland Route, “Serving today, Shaping tomorrow.”  A car card was made for MP 30404, the final step to put the a car in service on the Minneapolis & Northland Railroad Company Railroad.


MP 30404 setout on Bass Lake Jct. Team Track


MP 30404 set out on Bass Lake Jct. Team Track


MP 30404 set out on Bass Lake Jct. Team Track


MP 30404 set out on Bass Lake Jct. Team Track


Thank You for taking time to read my blog.  You can share a comment in the section below if you choose to do so.  Please sign your comment with your name if you choose to leave one.  All comments are reviewed and approved before they appear.  Please share the blog link with other model railroaders.


Lester Breuer


.