After putting HJ Heinz Pickle closed side cars 73 and 78 back into service after another upgrade, I decided I should rename and upgrade Minneapolis & Northland Railroad Company (M&N) pickle tank car open side visible tank car 4933 back into a HJ Heinz pickle car. When I purchased the Athearn open side visible tank car, kit 1475, in 1974 I knew after some research that it was not a reasonable match for a HJ Heinz pickle car. At the time I felt it was too much work and not sure I had the skills to modify it into a reasonable HJ Heinz pickle car. Therefore, when I acquired HJ Heinz coffin car, number 73, I changed the number to 78 and eventually changed the reporting marks to M&N and number to 4933.
 |
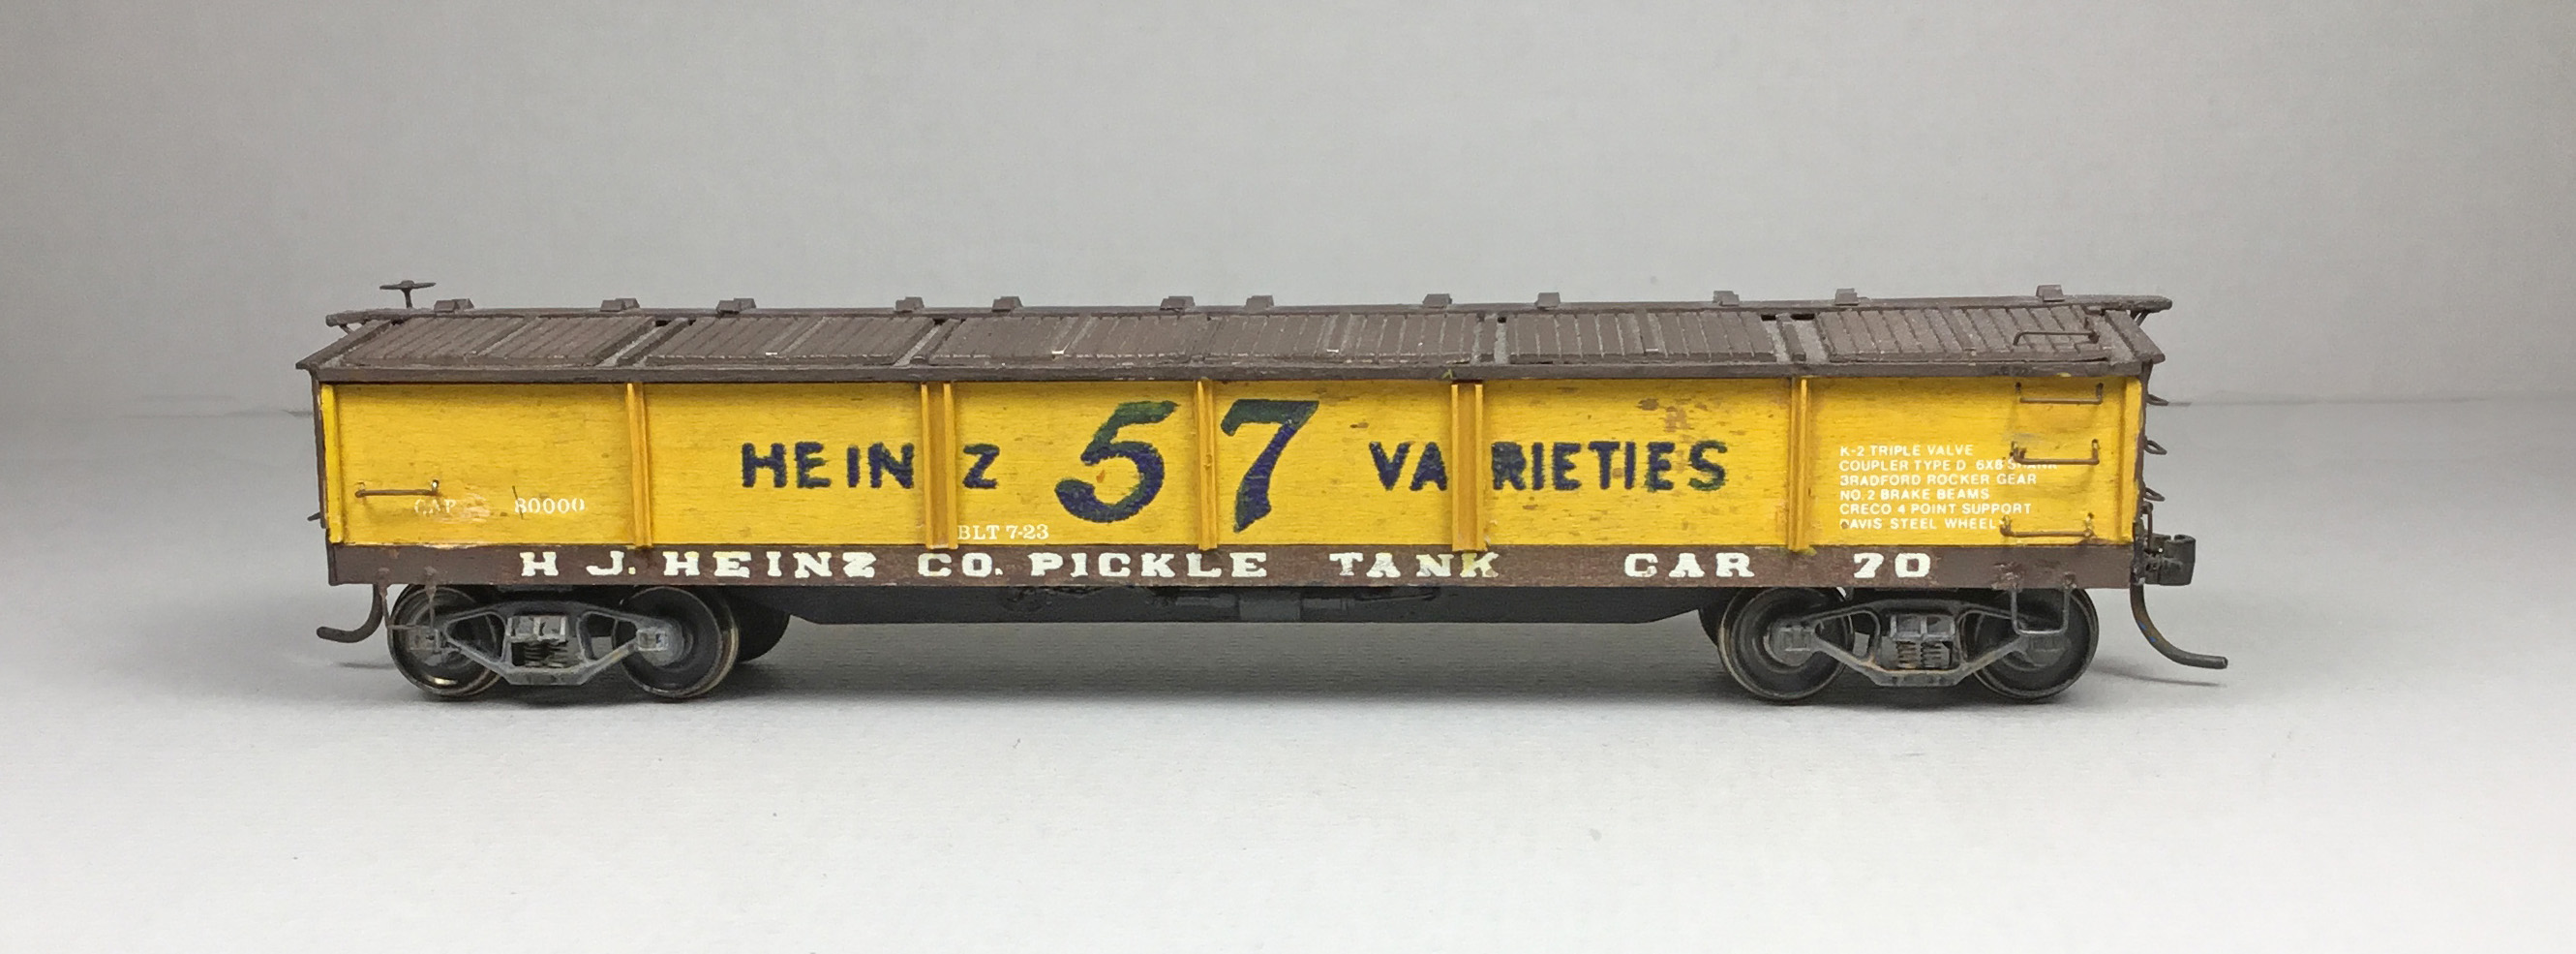
| Athearn Pickle Car assembled out of box. (Click on this or any image to enlarge) |
When reviewing photos for the upgrade of coffin cars 73 and 78, specifically HJ Heinz open side visible tank cars numbered 75 and 77, I decided my modeling skills developed over the years since I had acquired Athearn pickle 73, now M&N pickle tank 4933, were good enough to put it back into a HJ Heinz pickle car, specifically number 77.
 |
| Internet photo of HJHX 77 |
The prototype HJ Heinz Pickle Tank Cars assigned to series 70 to 80, A.A.R. Class TW, were built in 1925 by General American Company. The eleven closed side cars had wood sides and ends. Cars built with open sides with visible four round wood tanks were also placed into the 70 to 80 series with a number replacing one of the original closed side car taken out of service. These cars did have the typical roof hatches.
I have not found the specific history of HJ Heinz car 77 which shows a build date of “Built 8-25”. A photo of a similar, almost identical, looking open side visible four tank pickle car with number 75 and build date of “New 8-52” can be found in the excellent book Pickle and Vinegar Makers of the Midwest (David J. Leider, 2015). I can only guess a transposition in the stenciled build date when “New” changed to “Built”. The January 1953 Official Railway Equipment Register (ORER) has eleven (11) cars listed consisting of a mix of the coffin cars and open side visible tank cars.
After the purchase of the Athearn pickle open side visible tank car Kadee No. 5 couplers were installed and Kadee .015” fiber washers were installed on the kingpins to gain proper coupler height using a Kadee couple gauge. And, the car was weighted to 4 ounces (above NMRA recommended weight) with electrical outlet box punch-outs. The car was in operation until 2002 when removed from service and moved to the M&N Shop to make upgrade changes to the car as follows.
- Molded on grab irons, sill steps, brake housing and running board removed.
- HJ Heinz lettering was removed with 91% isopropyl alcohol.
- Running board fabricated from Evergreen #8106, 1” x 6” strip styrene installed.
- Brake step (platform) extended with Evergreen #8204, 2” x 4’ strip styrene.
- Brake shaft cut from Detail Associates brass wire installed.
- Brake wheel, Grandt Line #5067, Lovsted 15” brake wheel installed.
- A-Line sill steps, #29000, style A, installed.
- Grab irons fabricated, Detail Associates #2504, .012” brass wire and installed.
- Roof grab iron corner legs, Detail Associate SYS2206, eye bolts.
- AB brake components predrilled for piping and installed in proper location.
- Train line, Evergreen .020” diameter plastic rod, installed.
- Brake system piping and brake rods fabricated from Detail Associates .012” brass wire.
- Hatches were painted with a mix of Floquil Boxcar Red #94 and Reefer White #11.
- Underframe was painted Floquil Grimy Black #1
- Car body sprayed Floquil Glaze #5 for decal base.
- Champ Private Name Decals provided reporting marks and number
- Car sprayed with Floquil Flat Finish #15
- Car weathered with powdered chalk.
 |
| M&N 4933 with new upgrade started. |
Pickle car M&N 4933 went into service and remained in service until moved to the M&N Shops June and July of 2023 to be rebuilt into HJ Heinz 77. The modification and upgrade continued on carbody and underbody as described below.
Sides
Kit angle wires on side removed and molded on mounts carved off. Molded on ladder rungs removed and ladders shortened to match prototype photo. Channels, Evergreen #262, .080” strip styrene installed on sides. Angles, Plastruct #90501, 3/64” styrene angle, were installed.
 |
| Channels and angles installed. |
Plates behind center channel and ladders at bottom were cut from Evergreen #126, .020” x .125”strip styrene and installed. Top plates behind channel and ladders were cut from Evergreen #8206, 2” x 6” strip styrene. I used prototype photos to to determine width and length. On the prototype the plates appear to be boxes rather than plates. Not having a car diagram for sizing the boxes and the Athearn car floor above side sill would not allow the box to match the prototype. Therefore, I made and used the plates instead to achieve prototype look.
 |
| Plates installed behind channels and angles. |
At this point, I began to look for a paint match to the Athearn yellow. My first attempt was to hand brush the above side installed details with PollyScale Reefer Yellow F414122. While the paint was drying I installed new ladder rungs, Tichy Train Group (Tichy) #1101, .010” diameter phosphor bronze wire (PBW).
 |
| Ladder rungs installed and Reefer Yellow paint. |
Next the ladders were hand brushed with Vallejo/MicroMark Model Air Undercoat Light Gray #29013X2. The blue painters tape you see on the roof in this and other photos was placed there to keep the hatches from opening while working on the car.
 |
| Ladders painted Undercoat Light Gray. |
Ends
On the ends I removed the running board extension brackets and installed new brackets cut from Plastruct #90501, 3/64” angle to best match prototype.
 |
| Running board extension brackets installed. |
After running board brackets were installed, all previous molded on or installed details from previous upgrade were removed. Cuts to remove the end panels to open the ends were made with a very fine saw blade mounted on a mandrel mounted in a Dremel tool. I do not know the teeth per inch (tpi) of the saw blade.
If you use a Dremel tool with a saw blade you need to let the saw do the cutting and not attempt to push it as this could cause a kickback causing severe injury. Eye protection should be used. If you are not comfortable using an open blade, a safety cover can be purchased from MicroMark.
 |
| Saw blade on Dremel Tool to cut out open end panels. |
First the vertical cuts on the ends were made. A .040” strip of end material (material showing boards) was left next to the side posts to serve as a backing for styrene to be added to create the flat plate look of the prototype.
 |
| Vertical cuts have been made. |
The “X” cuts to form triangles to be removed were made next.
 |
| Saw X cuts have been made. |
After the X cuts were made, the side created triangles are easily removed. Now the top and bottom of the remaining triangles were cut with a #11 Xacto blade. A needle nose pliers was used to push each triangle inward to break it off creating the needed end openings. The openings were finished using Xacto with #11 blade and nail emery boards for sanding.
 |
| Rough openings are made. |
Hand brushing of the created openings with Vallejo/MicroMark Model Air Undercoat Light Gray #29013X2 followed.
 |
| Openings painted Undercoat Light Gray. |
 |
| Openings painted Undercoat Light Gray. |
A piece of Evergreen #142, .040” x .040” strip styrene was cut and installed flush in the left opening to create the back of the face styrene to be added to form new ladder stile.
 |
| Note styrene mounted in back of inner ladder stile. |
Now Evergreen .005” sheet styrene was cut to make strips .040” wide. The cut strips were installed over the .040” side material left when the cuts were made to create end posts and the flush mounted .040” x .040” strip styrene to create ladder stile. Top and bottom plate sections were fabricated with Evergreen .005” sheet styrene strips cut into 1.00” or 9 scale inches wide sections and installed. The plate sections were installed using too much MEK that resulted in some distortion in the styrene added plates. An angle cut from Plastruct #90501, 3/64” styrene angle, was installed on the left side to match the prototype. Ladder rungs, Tichy #1101, .010” diameter PBW were installed on the ladder matching rung spacing of ladders on side.
 |
| End plate made with styrene cut parts and ladders with wire rungs installed. |
With the end plate and ladders fabricated a brake housing, brake housing chain, brake step (platform), brake step bracket, retainer valve, and bell crank all from Tichy AB set #3013 were installed. A brake rod, Tichy #1102, .015” diameter PBW with Tichy turnbuckle #8021 for mounting clevis on bell crank was installed. A retainer line, Tichy #1100 .008” diameter PBW, was installed. And, a Kadee Universal brake wheel, #2023, was installed.
 |
| Detail parts on B end installed. |
 |
| Detail parts on B end installed. |
Underbody
After removing all previous underbody installed upgraded parts on the underframe the four center cross members were removed and only three were reinstalled to match the car diagram (car diagram can be viewed in HJ Heinz Pickle Car 73 & 78 blog post) of underbody for closed side pickle cars. The fish belly center sill was fabricated by adding Accurail fish belly center sill sides cut with portion below cut outs for brake levers cut off. MEK Goop was used to fill and gaps and sanded smooth being careful not to destroy the center sill flanges or rivets.
 |
| Only portion above blue tape used to make fish belly center sill. |
 |
| Fishbelly piece cut from Accurail center sill installed. |
After letting the new center sill install sit overnight, I installed an AB brake system on HJHX 77. Tichy and Sunshine Models brake components were drilled for piping and installed. Tichy brake cylinder was mounted with Tichy bracket (both AB set #3013), Tichy air reservoir (AB set #3013) was installed with cut off sill steps from a plastic car used for brackets and Sunshine Models resin cast AB were installed. Now the following brake system details were installed:
- Train line, .018” flora wire
- Brake cylinder lever, , Evergreen #8108, 1” x 8” strip styrene
- Brake floating lever, Evergreen #8106, 1” x 6” strip styrene
- Piping from air reservoir to control valve Tichy #1101 .010” diameter PBW
- Piping from brake cylinder to control valve Tichy #1106 .0125” diameter PBW
- Dirt collector, resin cast in M&N Shops (Tichy #3013 could be used)
- Brake rods, Tichy #1106, .0125” diameter PBW
- Clevises are made with MEK Goop
- Chain, A-Line #29219 black 40 links per inch
The final part installed was the center sill cover plate cut from Evergreen .005” sheet styrene. A RB Productions rivet tool was used to add the rivets.
 |
| RB Productions rivet tool. |
After brake system parts, piping and brake rods and center sill plate, were installed the new underbody added parts were hand painted with Vallejo/MicroMark Model Air Undercoat Light Gray #29013X2. Once dry the underbody was again hand painted Vallejo Model Color Black Grey 70.862.
 |
| Under body with center sill plate installed and under body painted. |
Paint
With the underbody finished and painted Vallejo Model Color Black Grey 70.862 the car body final paint and lettering was done. If not already, all rebuilt sections and parts installed were hand brushed with Vallejo/MicroMark Undercoat Light Grey X29013X2. Box Car Red sections as the sills or parts installed were hand painted PollyScale Box Car Red F414281 which I still have in paint inventory; however, if I did not have it I would have used Vallejo/MicroMark Box Car Red #29015X2. Yellow sections and parts were hand painted Vallejo/MicroMark Reefer Yellow #29028X2. The Reefer Yellow color still too bright so yellow areas were hand painted again with Vallejo/MicroMark Depot Buff #29027X2. My eyes told me with the Depot Buff over the Reefer Yellow was better match for the Athearn applied yellow to the tanks. The sills were hand brushed with Future Floor Finish for a gloss decal base.
 |
| Car body ready for decals. |
Lettering
Decals were made for the car with Woodland Scenics dry transfers applied to decal paper and coated with Microscale Liquid Decal Film. Reporting marks were made with RR Gothic - White 1/8”, set DT 507, and numbers with set DT512. Car data was made with Box Car Data - Gothic set DT602. If you prefer not to make decals Tichy does have a decal set available to letter this pickle car.
Decals were soaked off in distilled water and applied to the car body where Microscale Micro Set had been applied with a brush. After the decal was applied in the Micro Set and positioned the edges had Microscale Micro Sol applied. Any excess solution was sucked away with the torn edge of a paper towel. Again when dry, sills with decals were hand brushed with Model Master Acryl, #4638, Gloss Clear to better hide edges of decals and protect decals during handling. Again when dry, the car body sills were hand brushed with Model Master Acryl, #4636, Flat Clear to protect decals and provide a flat finish for weathering when applied.
 |
| Decals applied. |
Weathering
Before putting HJ Heinz Company car HJHX 77 into service the car was weathered with eye shadow makeup, Pan Pastels, Bradgon Powders and Number 2 pencil. The yellow Bradgon Powders was applied over the entire yellow car areas. A dark brown eye shadow color was applied over entire car body. Pan Pastels Red Iron Oxide Extra Dark 380.1 was applied over the sill reporting marks and numbers to tone them down. Paynes Grey Extra Dark 840.1 was used on the roof and lightly over safety appliances on car body. A number 2 pencil was used to go over the tank bands to enable them to stand out from the wood tanks.
 |
| Weathering applied. |
 |
| Weathering applied. |
HJ Heinz Company pickle car HJHX 77 was ready for service on the Minneapolis & Northland Railroad Company, The Lakeland Route, “Serving today, Shaping tomorrow.” A car card was made for HJHX 77, the final step to put the a car in service on the Minneapolis & Northland Railroad Company Railroad.
Pickle car HJHX 77 is not an a perfect match to the prototype; however, it will as closed side HJ HJHX 73 and HJHX 78, continue in service on my Minneapolis & Northland Railroad Company until a manufacturer produces a reasonable priced resin or plastic pickle car with decals that match the prototype.
 |
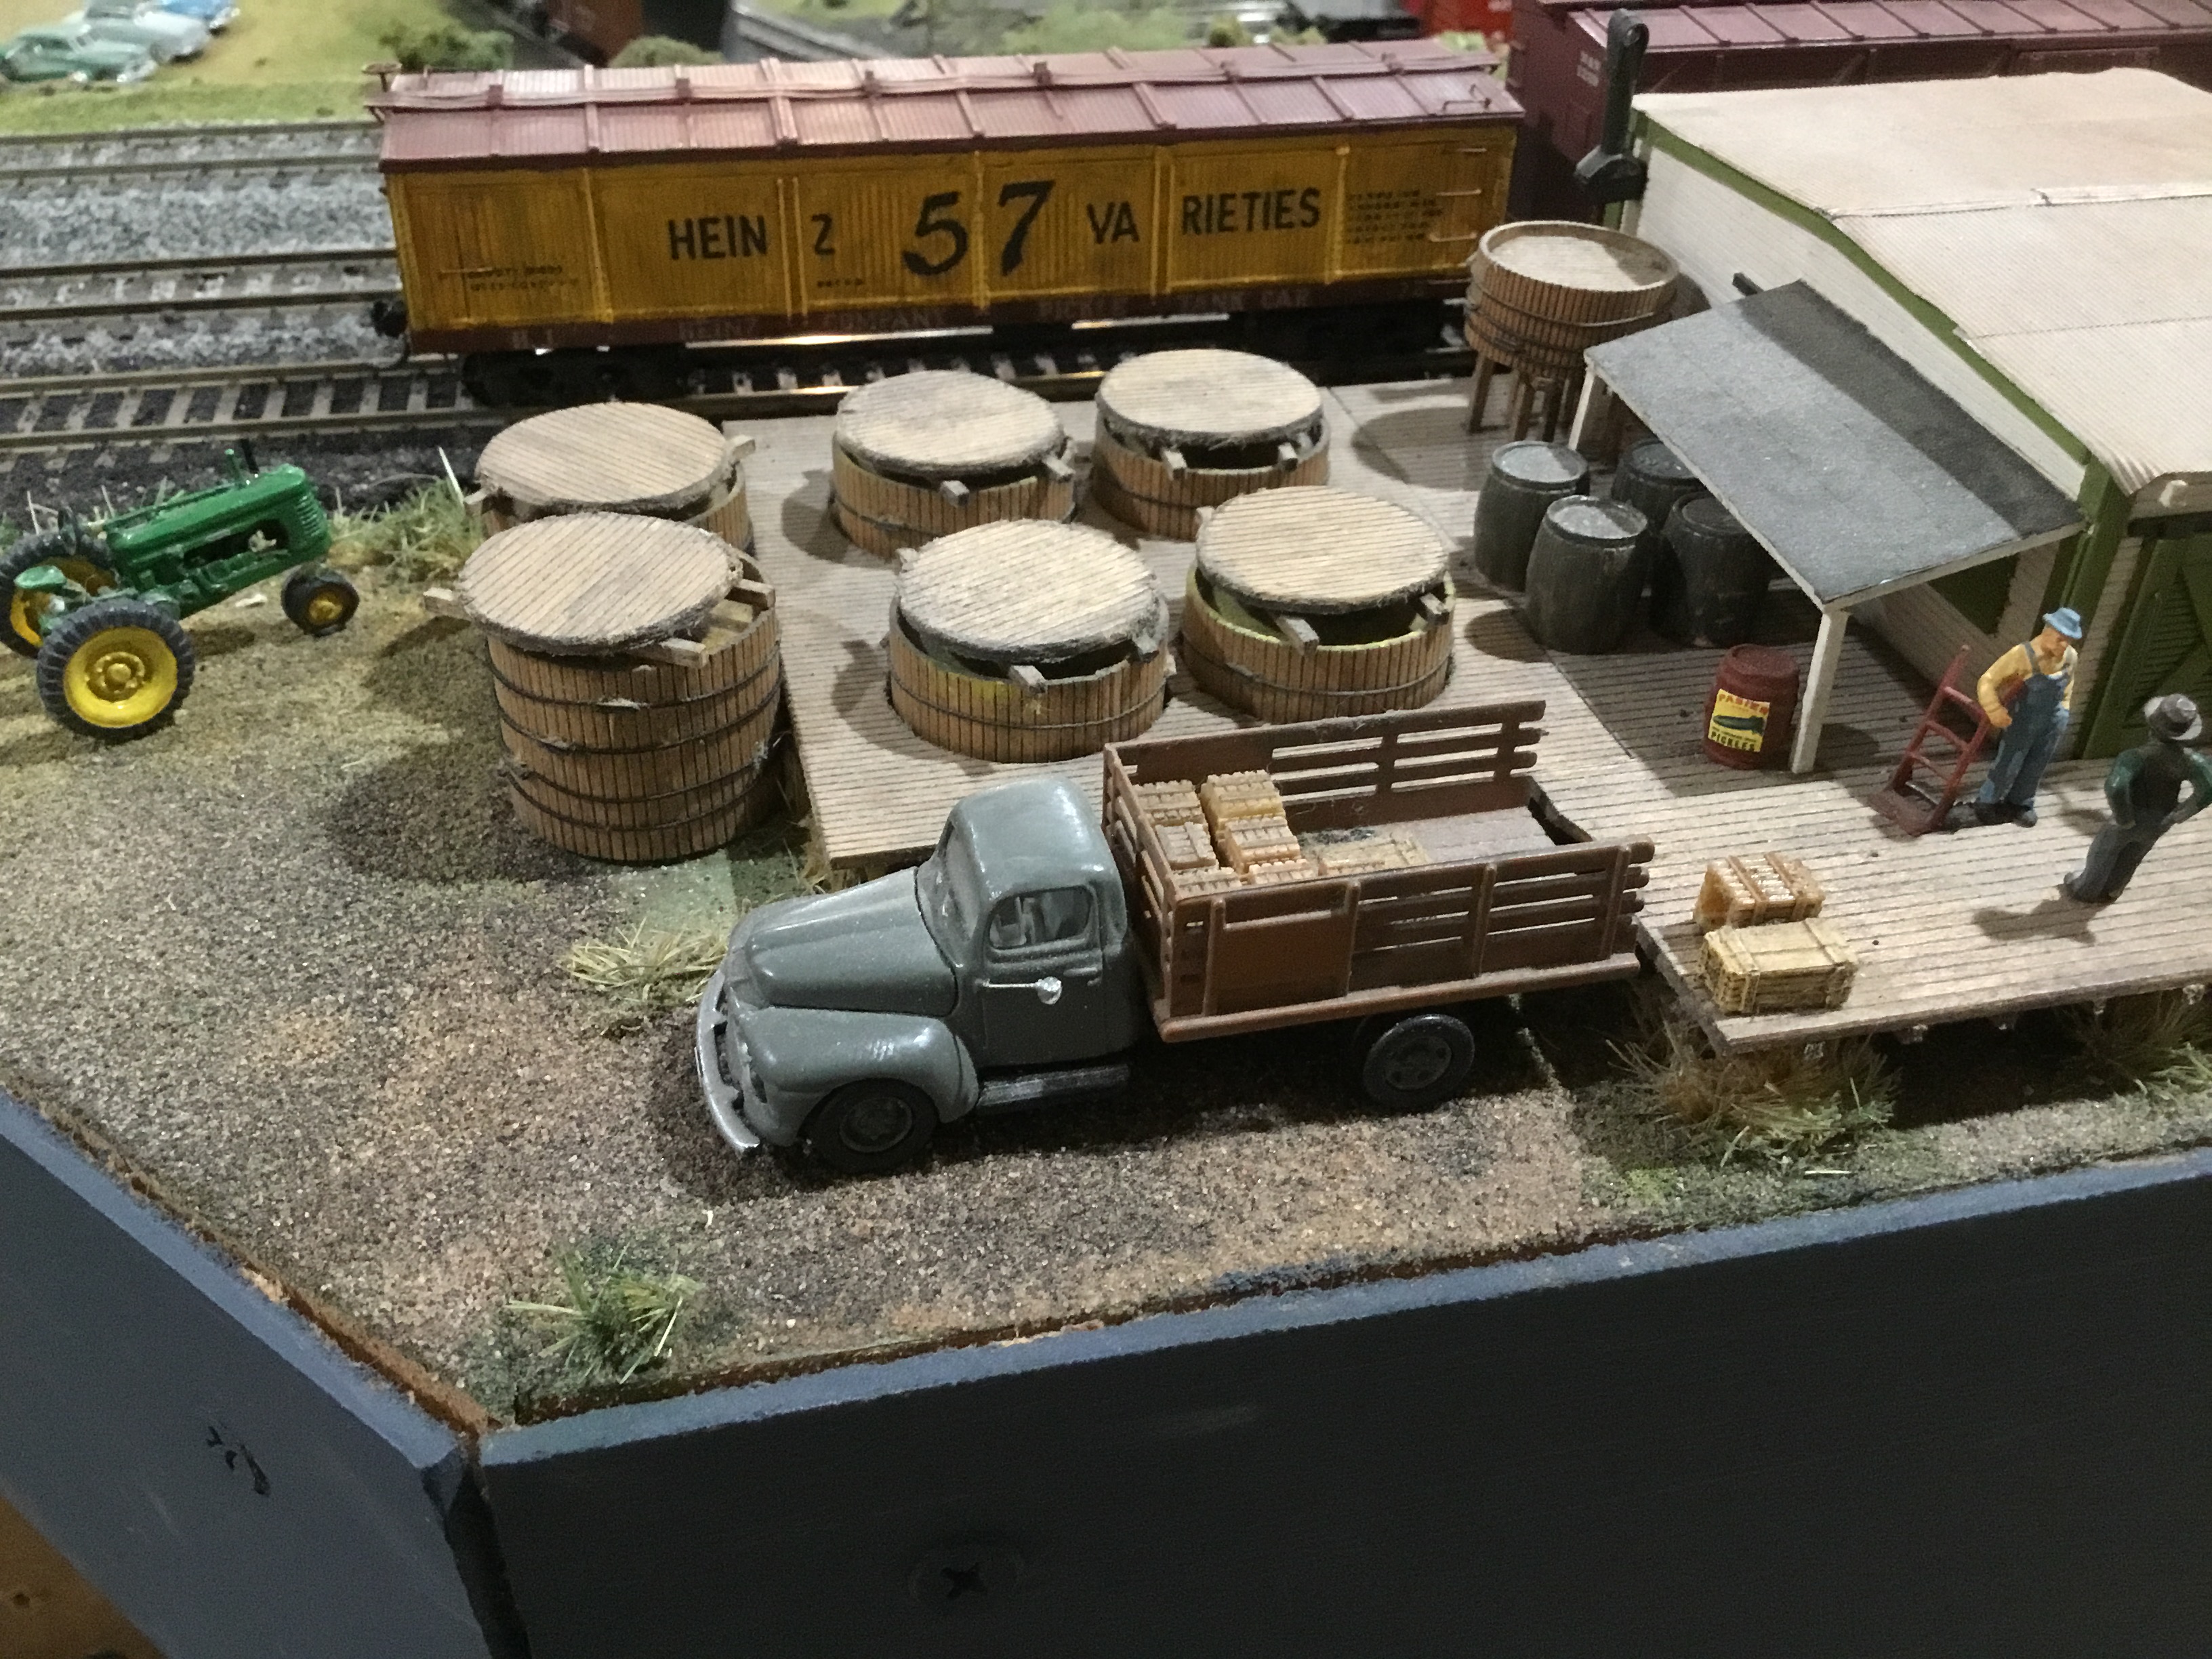
| HJHX 77 being loaded at salting station in Sussex, Minnesota |
 |
| HJHX 77 being loaded at salting station in Sussex, Minnesota |
 |
| HJHX 77 being loaded at salting station in Sussex, Minnesota |
 |
| HJHX 77 being loaded at salting station in Sussex, Minnesota |
Thank You for taking time to read my blog. You can share a comment in the section below if you choose to do so. Please sign your comment with your name if you choose to leave one. Please share the blog link with other model railroaders.
Lester Breuer
.