All of us have freight cars that we wish a manufacturer would produce either in resin, plastic or brass to enable us to add them to our freight car fleet. At times a modification of an existing kit or kitbash can provide us that freight car; however, there are some cars that the only way to add them to our fleet is to scratchbuild the car. Soo Line Pickle Tank Car 4491, an open side pickle tank, was one such freight car I wanted in service on my Minneapolis & Northland Railroad Company.
To build Soo Line Pickle Tank Car 4491 the research including photo and O Scale plan was already done by David Leider and published in his article in the February 2002 issue of Railmodel Journal. David also is the author of the book Pickle and Vinegar Makers of the Midwest (David J. Leider, 2015) that contains photos and plans of Soo Line pickle tank cars used to serve M.A. Gedney Company.
Prototype Soo Line Pickle Tank car 4491, class TW, is shown on the roster in the 1953 Official Railway Equipment Register (ORER) on the Soo Line roster as a vinegar tank car. All Soo Line pickle tank or vinegar tank cars are shown as vinegar cars on the Soo Line roster. Other than David's plan and the data shown in the 1953 ORER and photo of 4491, I have no specific data on this car. In addition to dimensional date and that pickle tank car 4491 was a 40 ton car, the 1953 ORER does tell us the car held 6,094 gallons. I do not know when pickle tank 4491 was removed from the roster; however, Soo Line pickle tank car 4799 shown on the Soo Line roster in 1953 ORER was off the roster by 1960.
 |
| Soo Line 4491 Soo Line Historical and Technical Society Courtesy of Ken Soroos (click or tap on this or any image to enlarge) |
 |
| Plan for Soo Line Pickle Tank 4491 from David Leider's article in Railmodel Jounal. |
As the prototype, the build of Soo Line pickle tank 4491 begins with a flat car to which tanks, roof support structure and roof are added. Like David I chose to use the Tichy Train Group (Tichy) 40 Foot flat car kit, #4021, almost an exact copy of the Soo Line flat car as a starting point; however, styrene rather than wood was used to fabricate tanks and other parts of the pickle tank car.
 |
| Tichy Train Group (Tichy) kit #4021 |
I had previously built the Tichy 40 foot flat cars I had in my freight car inventory so I ordered two flat cars direct from Tichy, one for this build and a second for maybe another Soo Line tank car. While I was waiting for the flat cars to arrive, I made the braces (supports) supporting the roof. The six braces, two end, two middle and two center require 10 x 10s, 6 x 12s and 10 x 12s specified in the plan. I laminated five pieces of Evergreen #8210, 2 x 10 to make the 10 x 10s, three pieces of Evergreen #8212, to make the 6 x 12s and six pieces of Evergreen #8212, 2 x 12 strip styrene to make 10 x 12s, to make the brace parts needed in the plan. I used a Northwest Short Line chopper to cut the parts to length and a tweezer to hold them together while bonded with Methyl Ethyl Ketone (MEK). The braces were assembled as showed in the plan.
 |
| Tweezers holding styrene strips to be laminated. |
 |
| Laminated braces called for in plan. |
Once the braces were made, I made the four required tanks. The four prototype wood tanks are 8.5 feet wide and 5 feet tall with tank bands. After looking at various tank materials with no success to get the proper tank width, I was applying decals to another freight car project when the Microscale Sol bottle caught my attention. The bottle looked like it might be the right size for the inner pickle tank. I pulled a couple of empty Microscale Sol empty bottles out of a scrap collection box I had thrown them in. I was amazed to find the Microscale Sol bottle when wrapped with Evergreen #269-2050 V-Groove siding, .020” with .050” spacing provided the 8.5” scale tank diameter needed.
I used the two Microscale Sol bottles to cut four tanks 5 scale feet in height on my M&N Shop band saw. Back at the work desk, the tanks after some deburring of the edges (not perfect) had Testors Tube Cement (not a cement at all, but a solvent in viscous form) applied to them and a wrapper cut to size from the V-Groove siding applied. Clamps were used to hold the tank wrapper in place where it came together on the Microscale bottle until dry. When the glue on the tanks was set, the tanks and roof braces were test fit on the basic assembled Tichy flat car. I liked the fit. Liking the fit, MEK was used to fasten the braces to the Tichy flat car. The tanks are not glued to the flat car deck at this time as tank bands are still to be added . And, the Tichy flat car had arrived and had basic assembly completed during the search for inner tanks.
 |
| Braces only have been glued to the flat car deck. |
 |
| Microscale Sol bottle interior of tank visible. |
With braces glued on the flat car deck the roof was built to be removed for now. A frame to which the roof is attached was built from Evergreen #8208, 2” x 8” strip styrene. The attached roof was cut from Evergreen .020” sheet styrene, scribed to have 8” wide boards, and glued to the frame with MEK. Running board roof saddles and running board were made with Midwest Products Scale Lumber #8003, 2” x 6” boards. The running board center roof saddle was installed first and two roof saddles were added using a 4 feet 9 inches spacing to each side. The end roof saddles were added and four additional saddles, two from each end, again with the 4 feet 9 inch spacing from the end saddle were installed.
 |
| Running board saddles and running board installed. |
The roof assembly was set aside to thoroughly dry and tanks were removed from the flat car deck to have tank bands installed. The tank bands, .007” diameter soft radio coil wire, were installed on the tanks. The soft fine wire was used for two reasons: looks and to allow wire to easily bend to form a “U” bend on each end of the wire where the ends came together to simulate the look of a turnbuckle. I spent a lot of time on the spacing and adjusting the bands. If I build that second Soo Line pickle tank car , I will scribe tank band lines on the tank wrappers prior to install for the wire tank bands to sit in and be in a straight line. A method George Toman told me he used when he installed tank bands on a water tank he built. Once I was happy with the tank bands look the tanks were glued to the flat deck with cyanoacrylate (CA).
 |
| Tank bands installed. |
After tanks were glued on the flat car deck, I used electrical box punchouts ( washers, bolts or choice would work) with Permatex Clear Adhesive Silicone RTV Sealant to weight the car to 3.8 ounces which increased to 4 ounces (above NMRA recommended weight) after all parts to complete build of the pickle tank car were installed.
 |
| Weight, electrical outlet box punchouts installed. |
Once the Permatex weight adhesive was setup the roof was glued to the roof braces with MEK.
 |
| Roof glued to roof braces. |
Next the guy wire brackets for the sides were made from .006” brass. I used the measurements in the plans to draw the brackets on the brass before cutting out them out with a Xuron cutter for photo etched parts, #9180. A touch up of each cut out part was done with a file before install with CA. After install, the holes in the brackets were marked with a tiny finishing nail and a #78 drill was used to drill the holes to insert guy wires. In addition to the guy wire brackets, the side stake pockets provided in the kit were installed with MEK.
 |
| Plan showing guy wire brace and center brace from David Leider's article. |
 |
| Guy wire brackets and stake pockets installed. |
Now the tank saddles were made and installed. As the roof braces, the tank saddles were cut from a laminated 10 x 10 as specified in the plan. I drew a diagram of a tank and saddles for the cutting and shaping the curved part via sanding. The saddles were cut to length using the UMM-Saw (JLC) with razor blade looking saw blade with extremely fine teeth. The mini miter box made for this saw was used for holding the 10 x 10 when cutting the tank saddles.
 |
| Diagram I made for cutting tank saddles and several of the tank saddles cut. |
| . |
 |
| UMM-Saw and mini miter box used to cut tank saddles. |
 |
| Better view of UMM-Saw in mini miter box. |
 |
| Tank saddles installed. |
I like to have side and end ladders in place to use as a guide to place B end details. Therefore, I installed Tichy ladders, #3065 Reefer ladders with 14” rung spacing, cut to resemble the prototype on the B end side corner. I also installed the plastic kit provided sill steps.
 |
| Ladders installed on side. |
I moved to the “B” end where I installed the B end ladders with ladder rungs on ends lining up with those on side. I continued to install needed details on the B end. Yarmouth Model Works (YMW) running board brackets, YMW #260, were installed. A Tichy retainer valve, AB set #3013, and retainer line, Tichy #1100, .008” diameter phosphor bronze wire (PBW), were installed. A brake shaft, Tichy #1102, .015” diameter PBW, and bracket were installed. The brake shaft bracket was cut from .005” brass. Tichy brake wheel, AB set #3013, and fastener made with MEK Goop were installed.
 |
| Ladder installed on B end with rungs matching side. |
 |
| In addition to ladder, other B end details installed. |
I left the B end to go to the roof to install the hatches and grab irons. The prototype hatches were 32” x 32”. I cast the needed hatches from resin in the M&N Shops after using Grandt Line Reefer hatches, #5106 Reefer Hardware, to make masters. To make the masters a styrene board , Evergreen #8102 1” x 2”, was added to the back of the Grand Line hatch and the hinges shortened. And, a mold was made using the reworked Grandt Line Hatches. Cast hatches were installed followed by the roof grab irons bent from Tichy #1100, .010” diameter PBW with YMW photo etched eye bolts without shoulder for corner legs.
 |
| Grandt Line hatch modified to get square hatch for master to make mold. |
 |
| Roof hatches cast in M&N Shops installed. |
Back to the B end to install sill grab irons bent using Tichy #1100, .010” diameter PBW.
 |
| Sill grab irons installed. |
After grab irons were installed on the B end, I continued to install the side grab irons on the A end side. A post for the grab irons, Evergreen #8202, 2” x 2” strip styrene, was installed. The plastic grab irons, Tichy #3062 18” ladder rungs, were installed. Work on the sides continued. The plastic kit sill steps originally installed to get a wider sill for wire sill steps were now cut off. Sill steps, A-Line #29000, style A, were installed in #76 drilled holes. And, guy wires and brackets on center braces , Tichy #1106, .0125” diameter PBW, were installed and glued with CA. ERROR! In a hurry to see the guy wires installed I forgot to add the turnbuckles on the guy wires before install. Therefore, I cut the Tichy #8021 turnbuckles in half and installed them on the already installed guy wires. Of course, not a recommended method to install. And, I installed the drop grab iron, Tichy #3015, 18” drop type, that the prototype had under the ladders.
 |
| Sill steps and guy wires installed; however, no turnbuckles. |
 |
| Sill steps and guy wires installed; however, now turnbuckles added. |
Normally my final step in freight car builds, the install of uncoupling levers. On this pickle tank car the top uncoupling levers and eye bolt brackets were bent from Tichy #1106, .0125” diameter wire and installed.
 |
| Uncoupling levers, top type, installed. |
With the car body detail install work done, the underbody work was completed as follows:
- Brake cylinder and piston , unknown from parts box on Tichy bracket
- AB (Control) valve, Sunshine Models resin
- Air reservoir, Tichy AB set #3013 on cut off sill step brackets
- Above brake components were predrilled for piping
- Brake cylinder lever,Tichy in kit
- Brake floating lever, Tichy in kit
- Brake piping from air reservoir to control valve, Tichy #1101, .010” dia. Brass wire
- Brake pipe from brake cylinder to control valve, Tichy #1106, .0125” dia. PBW
- Brake rods, Tichy #1106, .0125” diameter PBW
- Chain, Precision Scale # 48553, 34 links per inch
- Train line, .018’ diameter flora wire
- Dirt collector, InterMountain reworked
 |
| Underbody details installed. |
Soo Line Pickle car 4491 was ready for the paint shop. During the build I had already hand painted the running board with Vallejo/MicroMark Undercoat Light Grey X29013X2 to seal the wood. In the paint shop, the car body and underbody were airbrushed Vallejo/MicroMark Undercoat Light Grey X29013X2. The Undercoat Light Grey serves as primer to have any pastel color, here the yellow color, to get color saturation.
 |
| Right side in Undecoat Light Grey. |
 |
| Left side in Undecoat Light Grey |
Once dry, the flat car sides and ends were taped off allowing the tanks, braces and roof to be airbrushed Vallejo/MicroMark Reefer Yellow #29028X2. When dry, the flat car, flat car deck, underbody and trucks were hand painted Model Master Oxide Red Flat #4882.
 |
| Car painted. |
 |
| Car painted. |
 |
| Underbody and trucks painted. |
Again when dry, car body was airbrushed with Vallejo Gloss Medium 70.470 for decal base. After drying overnight, decals were applied. Decals for the name, number and reweigh date WS-12-47 (Soo Line Shoreham Shops) were provided by Ken Soroos from use sets he had. The capacity and weights data is from a used MILW set. I used photos of Soo Line pickle car 4491 (above) as a guide to apply decals.
 |
| Decals applied. |
Decals were soaked off in distilled water and applied to the car body where MicroScale Micro Set had been applied with a brush. After the decal was applied in the Micro Set and positioned the edges had MicroScale Micro Sol applied. Any excess solution was sucked away with the torn edge of a paper towel. Again when dry, car body sprayed with Vallejo Gloss Varnish #70.510 to better hide edges of decals and protect decals during handling. Again when dry, the car body was sprayed with Model Master Flat Clear Acryl, #4636, to protect decals and provide a flat finish for weathering when applied.
One more task needed to be completed before weathering Soo Line pickle tank car 4491. The missing tank saddle on the left side on the second tank from the B end was cut, primed, painted and installed. Now the Soo Line pickle tank car 4491 was ready for weathering.
 |
| Missing tank saddle installed. |
Therefore, before putting Soo Line Pickle Tank 4491 in service , the car was weathered with Artmatic eye shadow and Pan Pastels. An Artmatic eye shadow color, a light brown, was applied with a small brush over entire car body. A Loreal eye shadow yellow color was applied with sponge tipped applicator to the yellow painted part of the car. Pan Pastels Neutral Grey Extra Dark 820.2 was applied to the entire car with brush and micro applicator. Pan Pastels Paynes Grey Extra Dark 840.1 was applied to the running board with a micro applicator.
 |
| Soo Line Pickle Tank Car 4491 weathered. |
 |
| Soo Line Pickle Tank Car 4491 weathered. |
Soo Line Pickle Tank 4491 was ready for service on the Minneapolis & Northland Railroad Company, The Lakeland Route, “Serving today, Shaping tomorrow.” A car card was made for Soo Line Pickle Tank 4491 , the final step to put the a car in service on the Minneapolis & Northland Railroad Company Railroad.
 |
| Soo Line Pickle Tank Car 4491 in service with Heinz car at Brineinger Pickle salting station in Sussx, Minnesota. |
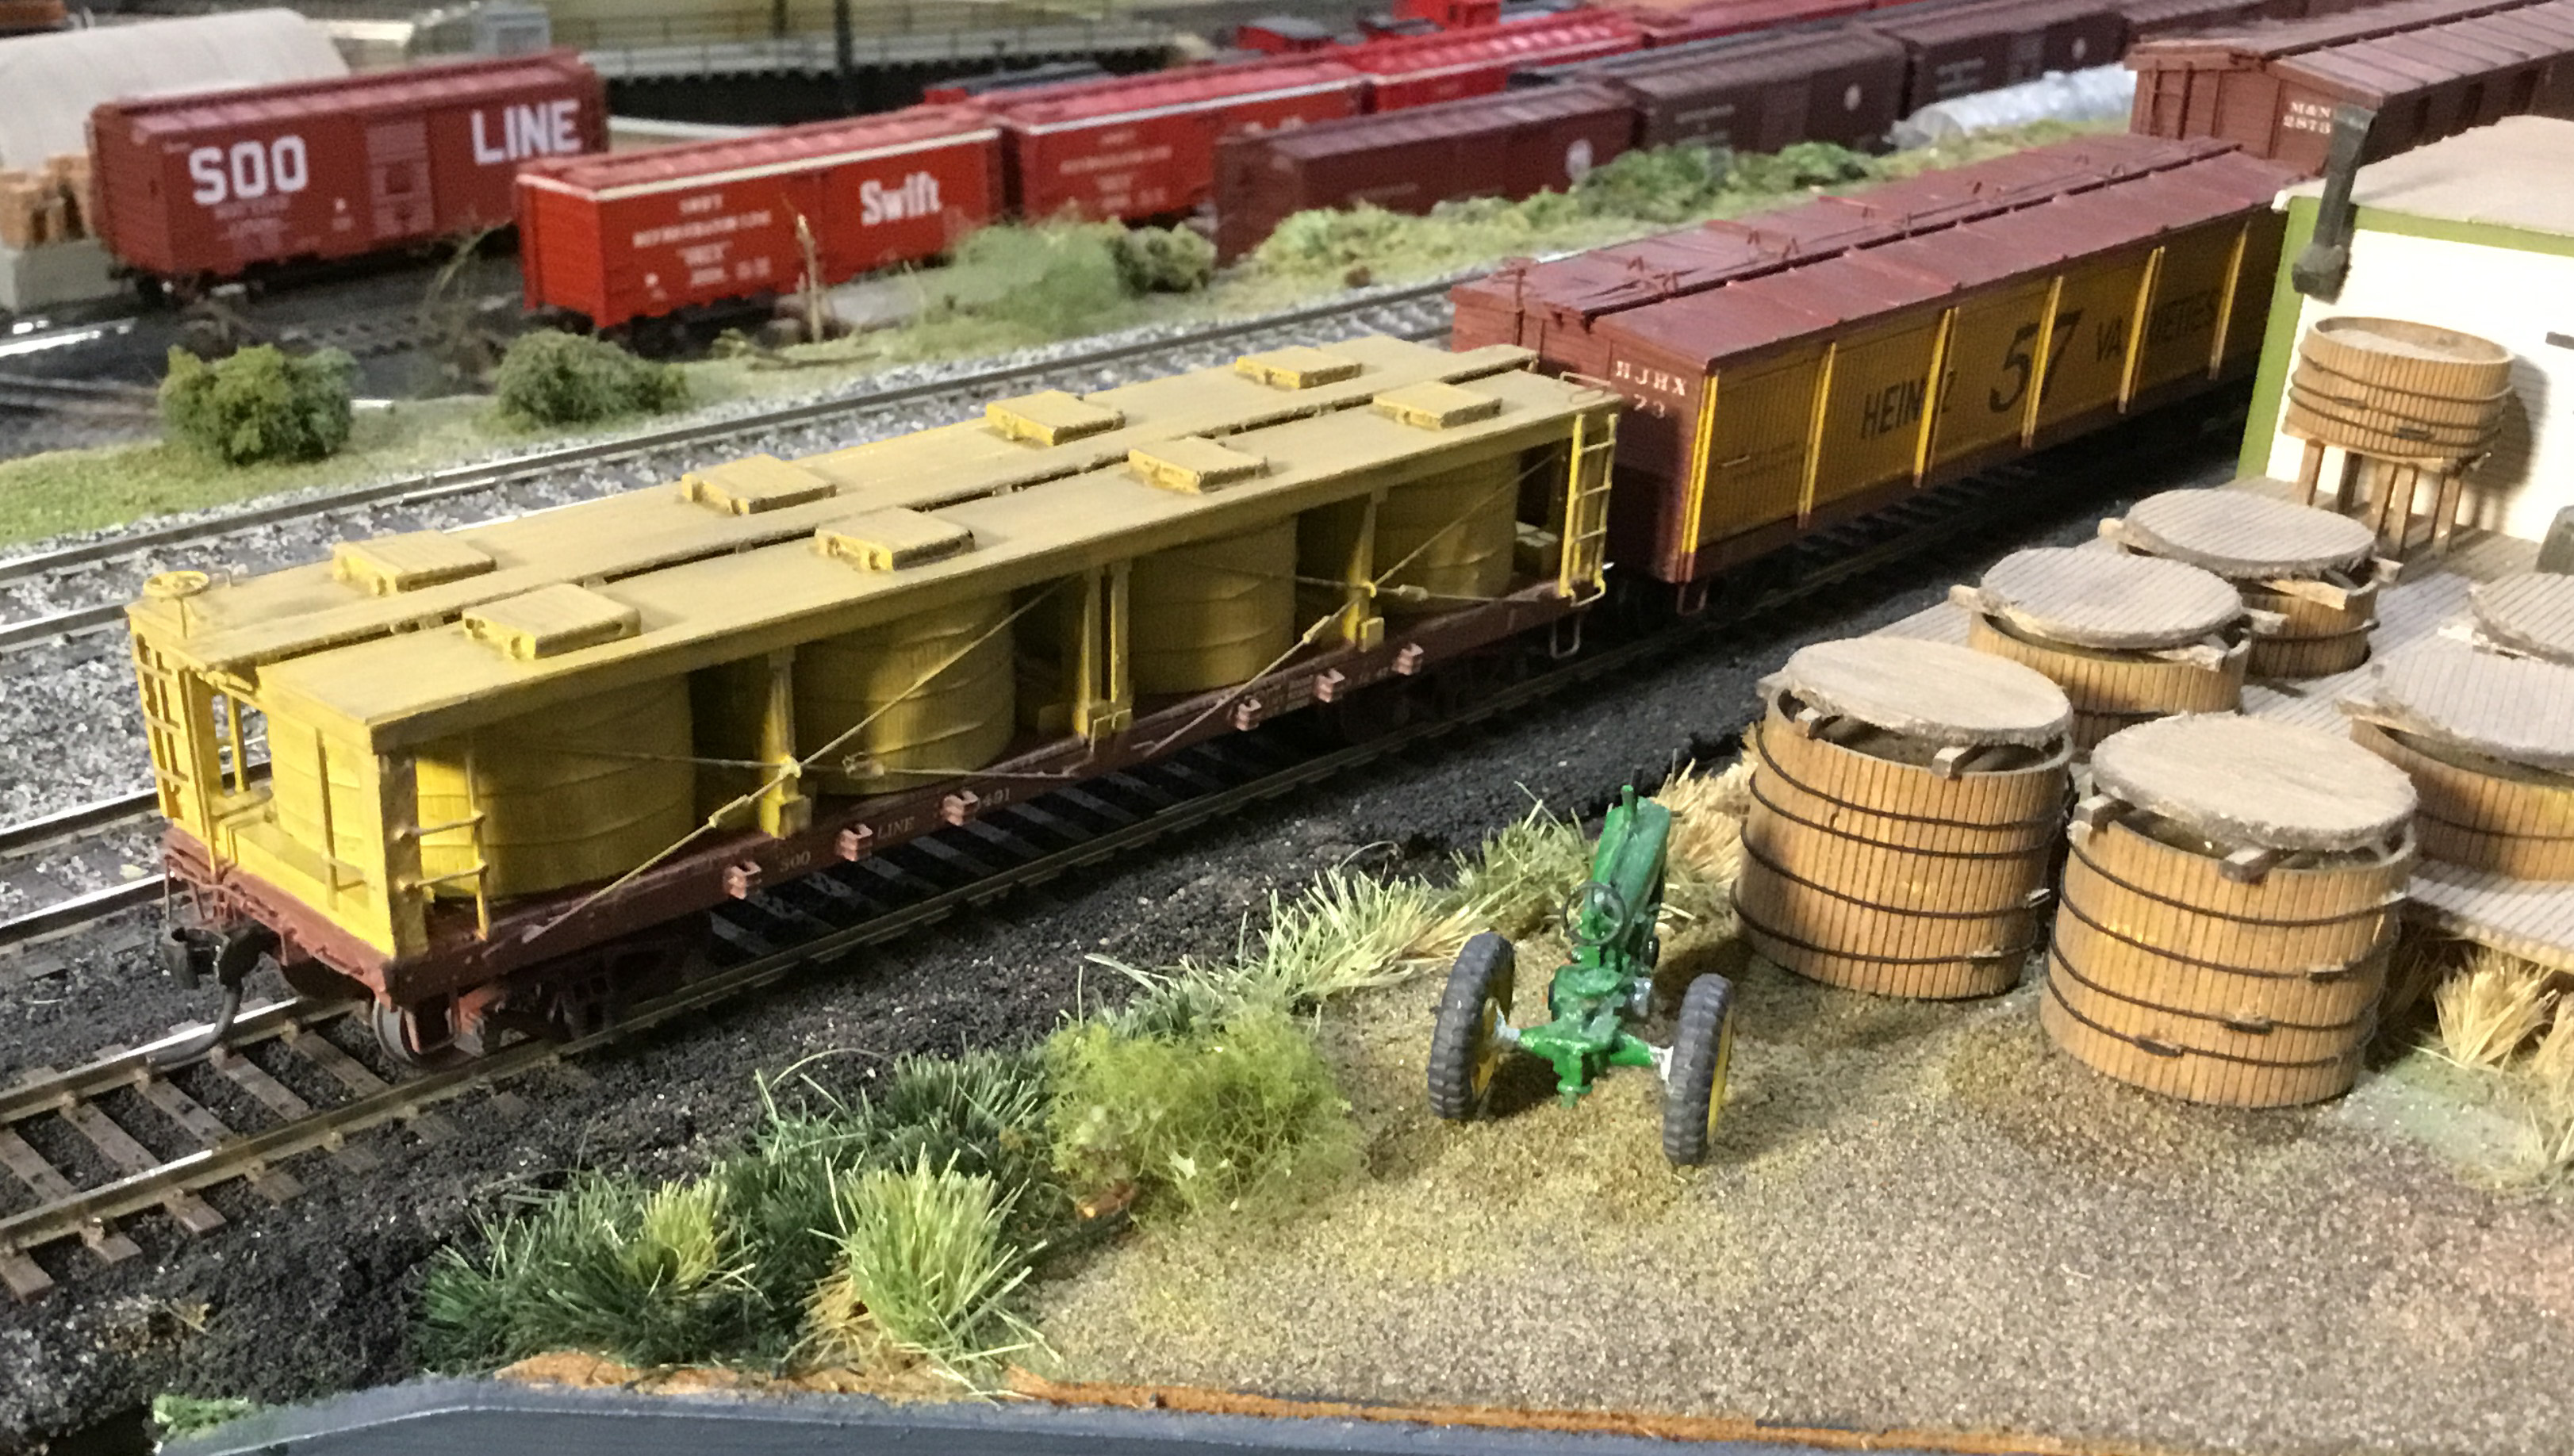 |
| Soo Line Pickle Tank Car 4491 in service with Heinz car at Brineinger Pickle salting station in Sussx, Minnesota. |
 |
| Soo Line Pickle Tank Car 4491 moved from Brineinger Pickle salting station to the CNW Interchange in Little Chiago, Minnesota for delivery to Gedney Pickle Company. |
I want to say, “Thank You” to David Leider for his research, photos and article on Soo Line 4491 and Soo Line Pickle Cars in his book. A, “Thank You” to Ken Soroos for providing information, decal and photo help with this build and upgrade. Definitely appreciated as without their help this build would have been much more difficult. One last "Thank You" to George Toman for sharing his tip to easily get straight line tank bands.
Thank You for taking time to read my blog. You can share a comment in the section below if you choose to do so. Please sign your comment with your name if you choose to leave one. Please share the blog link with other model railroaders.
Lester Breuer
.