Showing posts with label UMM saw. Show all posts

Monday, March 14, 2022

Saws for Modeling

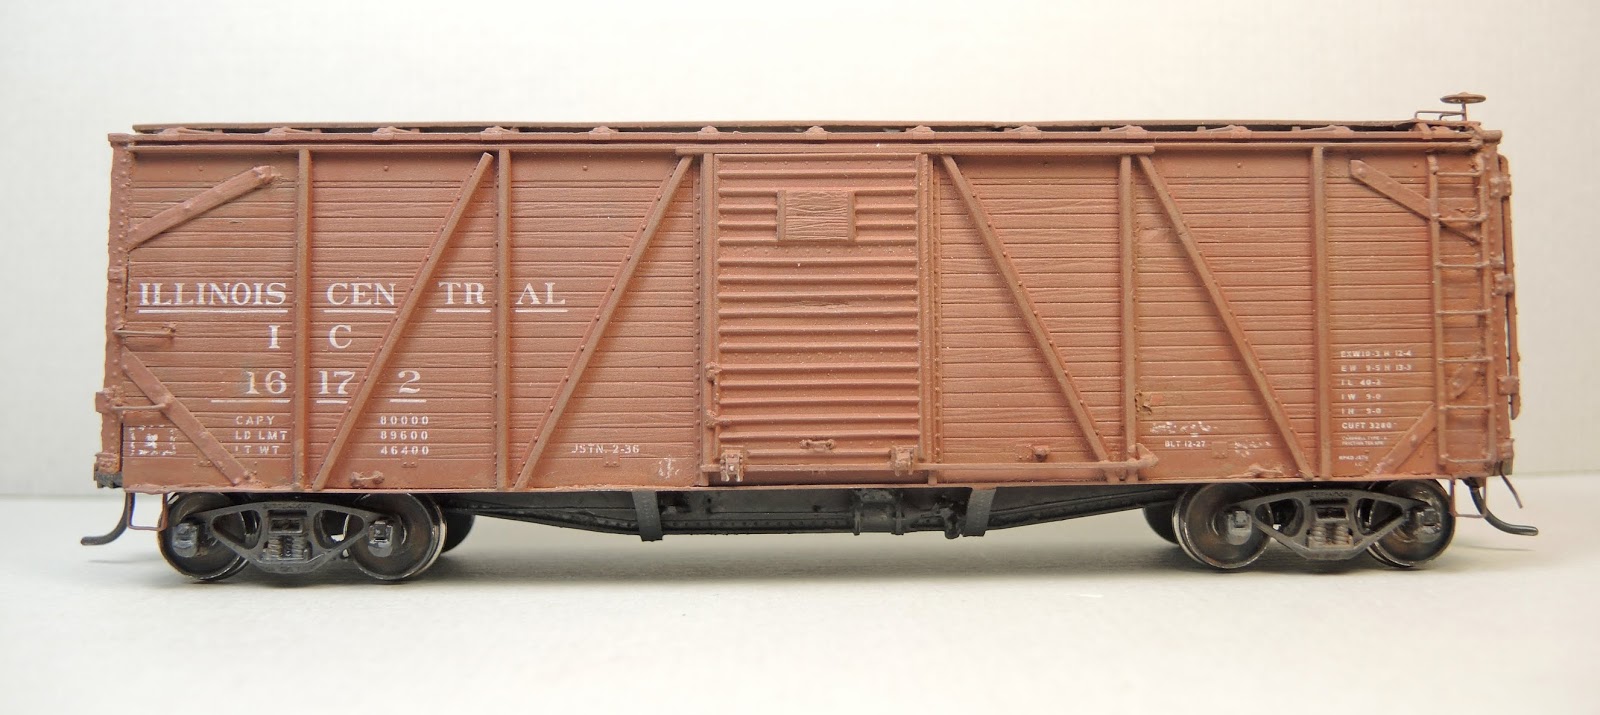
Let us look at one of the basic tools we find in every railroad modeler’s tool drawer, the saw.  A basic cutting tool we may use when building freight cars.  There are many kinds of saws consisting of a blade, wire, or chain with a toothed edge. In the hobby our saws are normally the blade type only with or without a stiffener on the back of the blade. I use the saw to cut heavier materials for the saw will cut thicker materials faster than making repeated knife cuts. And, if you cut metals the saw is one of the better tools to use.

What type of saw do we buy?  Well take a look at one of my tool drawers that I have filled with various saws. How did I accumulate the number you see?  It began when I decided to purchase my first saw.  I headed for the local hobby shop and thought I would grab one until I looked in the tool section and found that a variety were available.  At the time the manufactures I found at my local hobby shop were  Xacto and Zona. I decided to buy a Xacto saw since I had bought their knives and they worked well. Another good reason to purchase Xacto saws was they needed handles and would fit in the Xacto handles I had purchased for the knives.


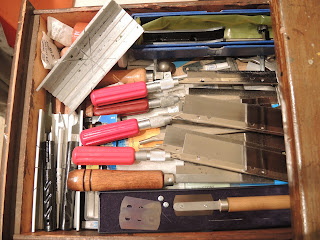
Tool drawer holding saws.
(Click or tap on this or any image to enlarge.)


Looking at the blade variety I found a saw could have a fine, medium or coarse toothed blade which is defined by the number of teeth on the saw blade. The most common measurement of the frequency of teeth on a saw blade is teeth per inch usually abbreviated TPI. At the time I thought I did not need three saw types. I would buy one as I had planned. But wait there was more to decide before making the purchase. You could buy the saw blades with different depths: shallow, medium or deep.  Well I decided to buy a medium blade with a shallow depth.


I soon found the medium blade with a shallow depth did not solve all my cutting needs. One example, the shallow saw blade may not reach the bottom of the slot in a miter box as only the deep blade can. As I built more kits and rolling stock I purchased one of each saw types.


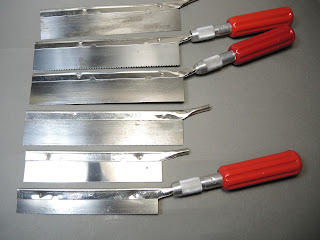
Saws wit various teeth and blade depth.


Not done yet, one more item to consider.  Next to the saw types I saw there were miter boxes that would guide the saw when making straight cuts and were also made to assist with angle cuts. The miter boxes came in wood or metal. I chose the least expensive, a wood one which I soon would find out was a mistake as the slot for the saw in a short time will not stay true and soon you are making poor cuts.  Therefore, over time several metal miter boxes were purchased.  When buying a metal miter box one feature I suggest it have is a lip on its bottom side that catches on the edge of your work surface to help hold it in place when making your cuts. 


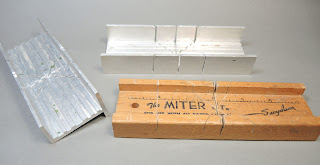
Several miter boxes.  Note the one on the left has
 lip to place against work surface when cutting..


As time went along I found the miter box to have another neat use.  I could cut multiple items of the same length when needed.  You clamp a stop block in the miter box at the length desired, slide the material to be cut up against it, and make your cut.  Repeating these steps you can cut any number of pieces needed to the same length.  However, this method soon was rarely used when I discovered the NorthWest Short Line (NWSL)  tool - “The Chopper.”  The chopper is a great tool; however, I find times I still prefer to use the miter box for certain cutting tasks.  One example of such a task is cutting metal tubes.


Miter box showing two examples of added stops
using clamps.


"The Chopper"


Even purchasing one of each saw type did not solve new problems encountered when building various kits or rolling stock.  One example, I could not use the blades I had to cut out windows in a structure kit-bash or certain cuts I wanted to make in reworking rolling stock. The normal Xacto saw blades were of no use. I needed a much smaller saw blade.  I found you could purchase a Xacto blade that was the shape and size of a number eleven blade and fit the same handle.  I soon added them to my saw collection along with a few other small shaped blades and saws I found.


Various small saw blades useful for modeling tasks.


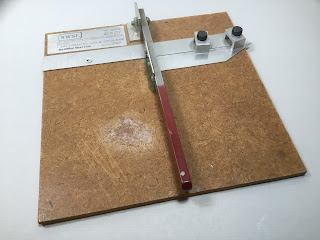
Another of my later finds is a saw with a blade shaped liked a razor blade with very fine teeth that fits into a comfortable handle. I purchased one from MicroMark with a plastic handle (no longer found in catalog).  At Trainfest, a train show held in Milwaukee, I found one with a wood handle and better construction.  It is the "micro combo" saw available from UMM-USA (see internet site).   And, hence the nickname “UMM saw” in my modeling community.  It was well worth the purchase and has become one of my favorite saws.  If guided correctly it will make a cut that needs no or very little sanding.  After the saw was on the market for a time, a mini miter block came out for it.  The micro miter block is available from MicroMark.  The mico, and two larger sizes of the miter boxes or as a set are available from UMM-USA.


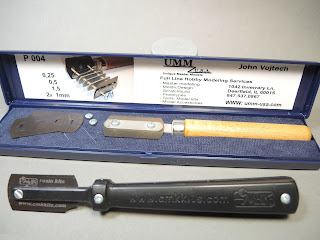
UMM saw and plastic handle saw.
Note website address on card in case.


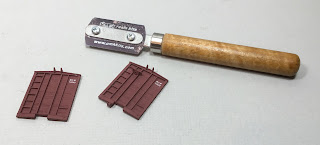
UMM saw used to cut off ends on freight car.


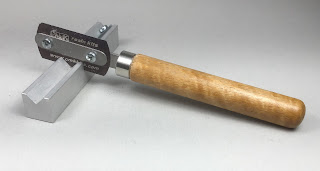
UMM saw in micro miter block designed for this saw.


One more saw blade I use almost ever modeling session is a saw blade with very fine teeth mounted on a mandrel in a Dremel tool to provide me with a motorized saw.  As the razor type blade in the hand UMM saw, it makes a very fine cut that like one made with the hand UMM saw requires very little sanding.


The use of this saw blade requires a steady hand and continued focus when using it as the blade can easily bind in the material you are cutting. One slip and you will have a very nasty cut that could require a trip to the hospital emergency room. You can purchase a guard to use with this saw to protect yourself when using. I purchased my saws blades from the Tool Man (no longer in business due to retirement) so I am not sure of a source at this time.


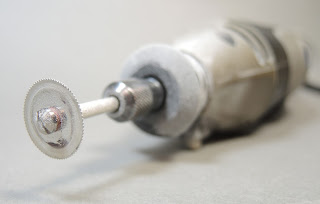
Saw blade with mandrel in Dremel Tool with collet.


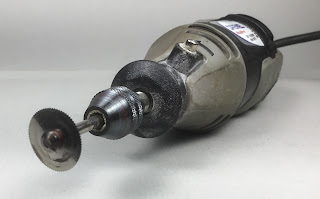
Note Dremel #4486 chuck replacing collet.
Allows quick and easy change of accessories.


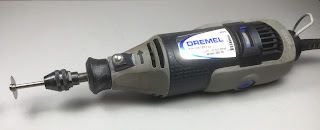
Side view of saw blade with mandrel in
 Dremel tool with #4866 Dremel chuck.


We have now explored the contents of the tool drawer near my workbench.   My saw drawer filled with saws with various toothed blades is one reason I have my friends calling me a “tool junkie.”  Remember “Modeling is Fun” and I believe “Modeling is Fun at a higher level with the right tool”.


Thank You for taking time to read my blog.  You can share a comment in the section below if you choose to do so.  Please sign your comment with your name if you choose to leave one.  Please share the blog link with other model railroaders.

Lester Breuer


.


Friday, November 15, 2019

Illinois Cental SS Boxcar 16172

I was one of the Chicagoland RPM attendees to receive the mini-kit containing resin parts and decals to build an Illinois Central single sheathed boxcar with unusual 3/5 dreadnaught ends.  After arriving home from Chicagoland RPM I went to the Accurail website and ordered two Illinois Central, IC, number 7116 kits.
Chicagoland RPM Mini-kit
(Click or tap on this or any photo to enlarge)


The prototype car I chose to model was one of 500 cars built by Mt. Vernon Car Company in 1927 assigned to the number series 176000-17699.  Another 500 cars built by Pullman Car & Manufacturing were assigned to the same series.   In the 1940’s the cars were renumbered into the 16000-16975 series.  The cars were single sheathed with a Hutchins Dry Lading  roof, Youngstown steel doors, unusual 3/5 dreadnaught ends, angled side sills and a fishbelly center sill underframe.  Photos of cars in the series can be found in the Chicagoland Program or Steam Era Freight Cars Reference Manual. Vol.1: Box and Automobile  Cars (Speedwitch Media, 2006, 2007).


Ray Breyer Photo Collection


Ray Breyer Photo Collection


The kits arrived in a few days allowing the build of car 176172 ( car number on car in kit) to begin.  Instructions for the build can be found in the Chicagoland Program which I read and used; however, deviated from at times.  I started by cutting off the molded on sill steps on the car body.  Next I  removed the running boards, cut off the mounting pins and installed them back into the roof holes.  Once the glue is dry,  the pins are squeezed with a square jaw pliers, cut and sanded to height to form a roof saddle.  I followed the roof preparation by cutting off the ends of the Accurail boxcar with an UMM saw available from UMM-USA or Micro-Mark.  I marked the roof cutting line with a flex rule and pencil.


Flex rule used to mark roof for cutting.


Cutting roof  with UMM saw to remove end.


Once the ends were cut off I cut and installed a false end cut from Evergreen .060” sheet styrene.  I also cut and installed a baffle  cut from Evergreen .060” sheet styrene at this time.


False ends and baffle installed.


Now I inserted the underframe and used the coupler pockets, as a guide to install the ends.  On the ends the notches for the couplers pockets were placed over the floor coupler pockets for easy alignment.  If you use this method be careful not to apply glue below the false end so as not to glue the floor to the resin ends being installed.  After the top section glue dried, I removed the floor and added the glue to the lower section from the inside.


Coupler pocket used as aid to attach 3/5 resin ends.


Next, all molded on grab irons on sides, ends and running boards were carved off followed by the molded on door handles.  Since I thought the molded on ladders were a good match to the prototype I kept the stiles and carved off the ladder rungs.  I did have the Plano Model Products #12121 photo etched ladders that require stile bending suggested in the instruction sheet; however, I chose not to use them.  The corner braces on the sides were applied next.  I used two kit provided braces (.012” thick) after sanding to make them thinner for the top; however, for the bottom braces I cut two from the parts  .006” flash so no thinning needed.  The corner brace fasteners were made with MEK Goop ( plastic melted in MEK).  Back to working on the removed running boards.  The running boards were milled and scraped with a single edged razor blade to a .025” thickness and installed.  You could purchase or  scratch build  new running boards.


Corner braces and running boards installed.


Side corner braces and reworked running boards installed.


After installing corner braces, grab irons bent from Tichy Train Group (Tichy) #1101, .010” diameter phosphor bronze wire (PBW) were installed on sides ends and ends. And, ladder rungs bent from the same PBW were installed on the sides.  Again, the Tichy #1101 .010” diameter PBW was used to bend a door handle with a Xuron wire bending pliers.  Only one door handle is needed as the prototype had only one and not two as came molded on the doors.  Two tow loops were bent from Tichy #1101 .010” diameter PBW and installed. The fasteners for the tow loops were made with MEK Goop.  Another detail needed to complete the car side work was the install of the lower door track cut from Evergreen #8203, 2" x 3” strip styrene .022’ x .033” which is slightly larger than the .020” x .030” specified in the instructions. A door stop, a small triangle on the end of the track in some photos,  was cut from .005” styrene and installed resulting in the removal of the molded on door stops on the sides.  I installed A-Line, #29000, style A, sill steps to complete the sides.   I would recommend adding the Evergreen #8106, 1” x 6” strip styrene for the side flange to the side sill prior to installing the A-Line sill steps and not as I did waiting until finishing the under body work making the install at that time  harder as it required cutting sections of the sill flange to fit around the sill steps.

Side details have been added.


After finishing side details I completed the roof work.  The longitudinal running board end braces cut from Evergreen, #8102, 1” x 2” were installed and fasteners were made with MEK Goop.   I made a mounting bracket for the latitudinal running board from Evergreen #8012 1” x 2” shown in this photo that cracked.  Not happy with the result I removed this bracket and made another cut from photo etched scrap brass and installed it.

Roof after details added.

B" end showing roof and
 longitudinal running board braces and
MEK fasteners.


I worked on the “B” end next.  To match the side ladders I installed  Grandt Line Freight Car ladders, #5124 I had in my parts inventory.  To match the ladder mounts cast on the end casting for the ladders on the left side , the ladder mounts on the right side were cut from Plastruct #90501, 3/64” styrene angle and glued with angle toward the ladder style.  The ladder rung spacing is a close match to those on the side ladders; however, to get a better match I cut off the ladder rungs leaving the styles and installed new ladder rungs cut from Plastruct #90850, .010” diameter styrene round rod.   A Tichy brake step (platform) and brackets from set #3013 were installed.  The retainer valve is a resin one provided in the mini-kit.  A retainer line, Tichy  #1100 .008” diameter PBW followed the retainer valve install.   A brake shaft step, an A-Line #29000 sill step, was installed. The brake shaft  is Tichy #1102, .015” PBW with a Tichy brake wheel from set #3013. The brake shaft bracket is Tichy #1101 wire formed in a “U”, installed, and squeezed with a needle nose plier and filled with gap filling CA to create the bracket.  Placard boards provided in the mini-kit were installed here and on the “A” end.  Finally, Carmer uncoupling levers, Yarmouth Model Works (YMW) # 400 photo etched levers were installed.  A #80 hole was drilled in the end casting mount, a post cast on the end sill for that purpose and a short Tichy #1101 .010” PBW was glued in.   Now the YMW levers using the holes in them were placed on the wire pin and CA applied. When the CA set the wire pin was cut off next to the added levers.


"B" end details installed.


I only had under body work to complete.  Accurail Fish belly center sill was installed.  Accurail coupler pockets and covers were used rather than cutting them off and installing the mini-kit resin cast coupler pockets.  Truck bolster cover plates and coupler pockets were tapped for 2-56 screws.  Molded on cross bearers were cut off and resin cross bearers and cover plates provided in mini-kit were installed.  Mini-kit resin brake components drilled for piping were installed.  The brake cylinder was mounted in the normal location.  Photos show the air reservoir  centered under the door and control valve next to it on the other side of the fishbelly center sill.   Other under body details installed were as follows:

  • Brake Levers, Evergreen #8108 1” x 8” and #8106 1” x 6” strip styrene
  • Pipping from air reservoir to control valve, Tichy #1101 .010” PBW
  • Piping from brake cylinder to control valve, Tichy #1106, .0125” diameter PBW
  • Brake rods, Tichy #1106 .0125” PBW
  • Chain, A-Line black #29219, 40 links per inch
  • Train line, .018” floral wire
  • Dirt collector, Tichy, set #3013
  • Train line couplings and dirt collector tee, MEK Goop
  • Side flange, Evergreen #8106, 1” x 6” strip styrene

Under body details installed.


With the under body work complete the car was moved to the paint shop.  The under body was hand painted with Vallejo Black Grey 70.862.   The detail parts and car ends on the car body were painted with a Vallejo mix:  Model Color Black Red, 70.859, 2 drops or 50% and Model Color Saddle Brown, 70.940, 2 drops or 50%.   At times the paint or paint mix to match a manufacture's paint used can be difficult to find.   Such was the case with this Accurail applied paint.

The car number was changed from 176172 to 16172.   The 1 and 7 in the original car number were removed with a Euro scratch brush and Woodland Scenics R.R. Roman Numbers-White, dry transfer lettering, set DT510, was used to add the 1.  On the ends, the area above the top rib was brushed with Vallejo Gloss Medium 70.470.  When dry, decals I made were applied.  The decals were made with Clover House Railroad Roman Alphabet Condensed Bold White #9600-11 dry transfers applied to decal paper and coated with Microscale Liquid Decal Film.  The decals were applied with Microscale Micro Sol.  When decals were dry, the car body was sprayed with Vallejo Matt Varnish 70.520 to protect dry transfers and decals during handling and for weathering.


Number has changed to 16172 and car body was sprayed
with Vallejo Matt Varnish.


Ends painted and end number decals applied.


Under body after painting.


Illinois Central boxcar 16172 was weathered with Artmatic eye-shadow makeup and Pan Pastels.  The eye-shadow makeup, a brown color similar to the boxcar color, was applied to the sides and roof.  Pan Pastels used were as follows:  Paynes Grey Ex. Dark 840.1, was applied to the roof and lightly to the sides, Neutral Grey 820.5 and Red Iron Oxide 380.3 were applied over the new lettering to tone it down.

Car weathered with eye-shadow makeup and Pan Pastels.

After weathering Illinois Central boxcar 16172 was put into service on the Minneapolis & Northland Railroad Company.


IC boxcar 16172 at Sussex lumber yard.


Better side view of IC boxcar 16172 at Brook's Lumber in Sussex.


"B" end view of IC boxcar 16172 at Brooks Lumber in Sussex.


I want to say, "Thank You" to Ray Breyer for providing prototype photos and permission to use the photos from his collection on this blog.


Thank You for taking time to read my blog.  You can share a comment in the section below if you choose to do so.  Please share the blog link with other model railroaders.
Lester Breuer