I obtained an Intermountain Santa Fe Refrigerator Department (SFRD) kit with no kit number earlier this year with the reporting marks SFRD, number 32153, and Santa Fe class Rr-23. The "D" in the reporting marks originally stood for Despatch which later changed to Department. After comparing the car body to the photos I had access to, I found it was an excellent match to the prototype. I immediately placed the kit at the top of my build list.
I thought the kit had no number as it was produced for the Santa Fe Historical Society; however, I learned from Peter Aue, “The InterMountain tooling was at least partially financed by Longs Drugs in Moreno Valley, CA. In the 1980's in exchange for exclusive distribution rights for several years.” And, “Several members of the Santa Fe Railway Historical & Modeling Society were very much involved in the product design but the Society itself never got involved.”
When I looked up the kit car number 32153 in the 1953 Official Railway Equipment Register (ORER) I found it was in Santa Fe series 31653 - 33155. The car was assigned to class “RS” by the Association Of American Railroads (AAR). And from other sources, the reporting marks SFRD stood for Santa Fe Refrigerator Department (before change Despatch).
Later during the build of this car I asked on the RealSTMFC.groups.io, a freight car internet site, for help to identify running board and brake step. Peter Aue and Ed Hawkins provided provided answers and more. The prototype was built new as class RR-W in 1920-1921. Car 32153 belongs to class Rr-23 which was rebuilt from Rr-W and Rr-X class wood reefers in 1937-1938. All cars received an Ajax hand brake. The cars rode on AAR double truss spring plankless trucks. The cars were modernized from 1954-1959 with features including Camel sliding flush doors, Improved Dreadnaught ends, Preco fans, and a “metal” running board.”
A photo of SFRD 32143 from Bob’s Photo taken by Col. Chet McCold on 11/2/1954 at San Diego and SFRD 32908 showing “B” end appear in Steam Era Freight Cars Reference Manual Volume Three: Refrigerator Cars (Speedwitch Media, 2017). The photo caption on SFRD 32143 states the cars were fitted with Equipco Style A hatch covers and the underbody shows a transverse-mounted air reservoir. In addition, the photos show a wood running board and the shadow of the brake step that it is a Morton. Ed Hawkins informed me his study of a photo of SFRD 32670 showed it was the one with punched round holes in the plate. The plate had the front edge bent downward 90 degrees and the rear edge bent upward 90 degrees.
 |
| SFRD 32153 (Click on this or any image to enlarge) |
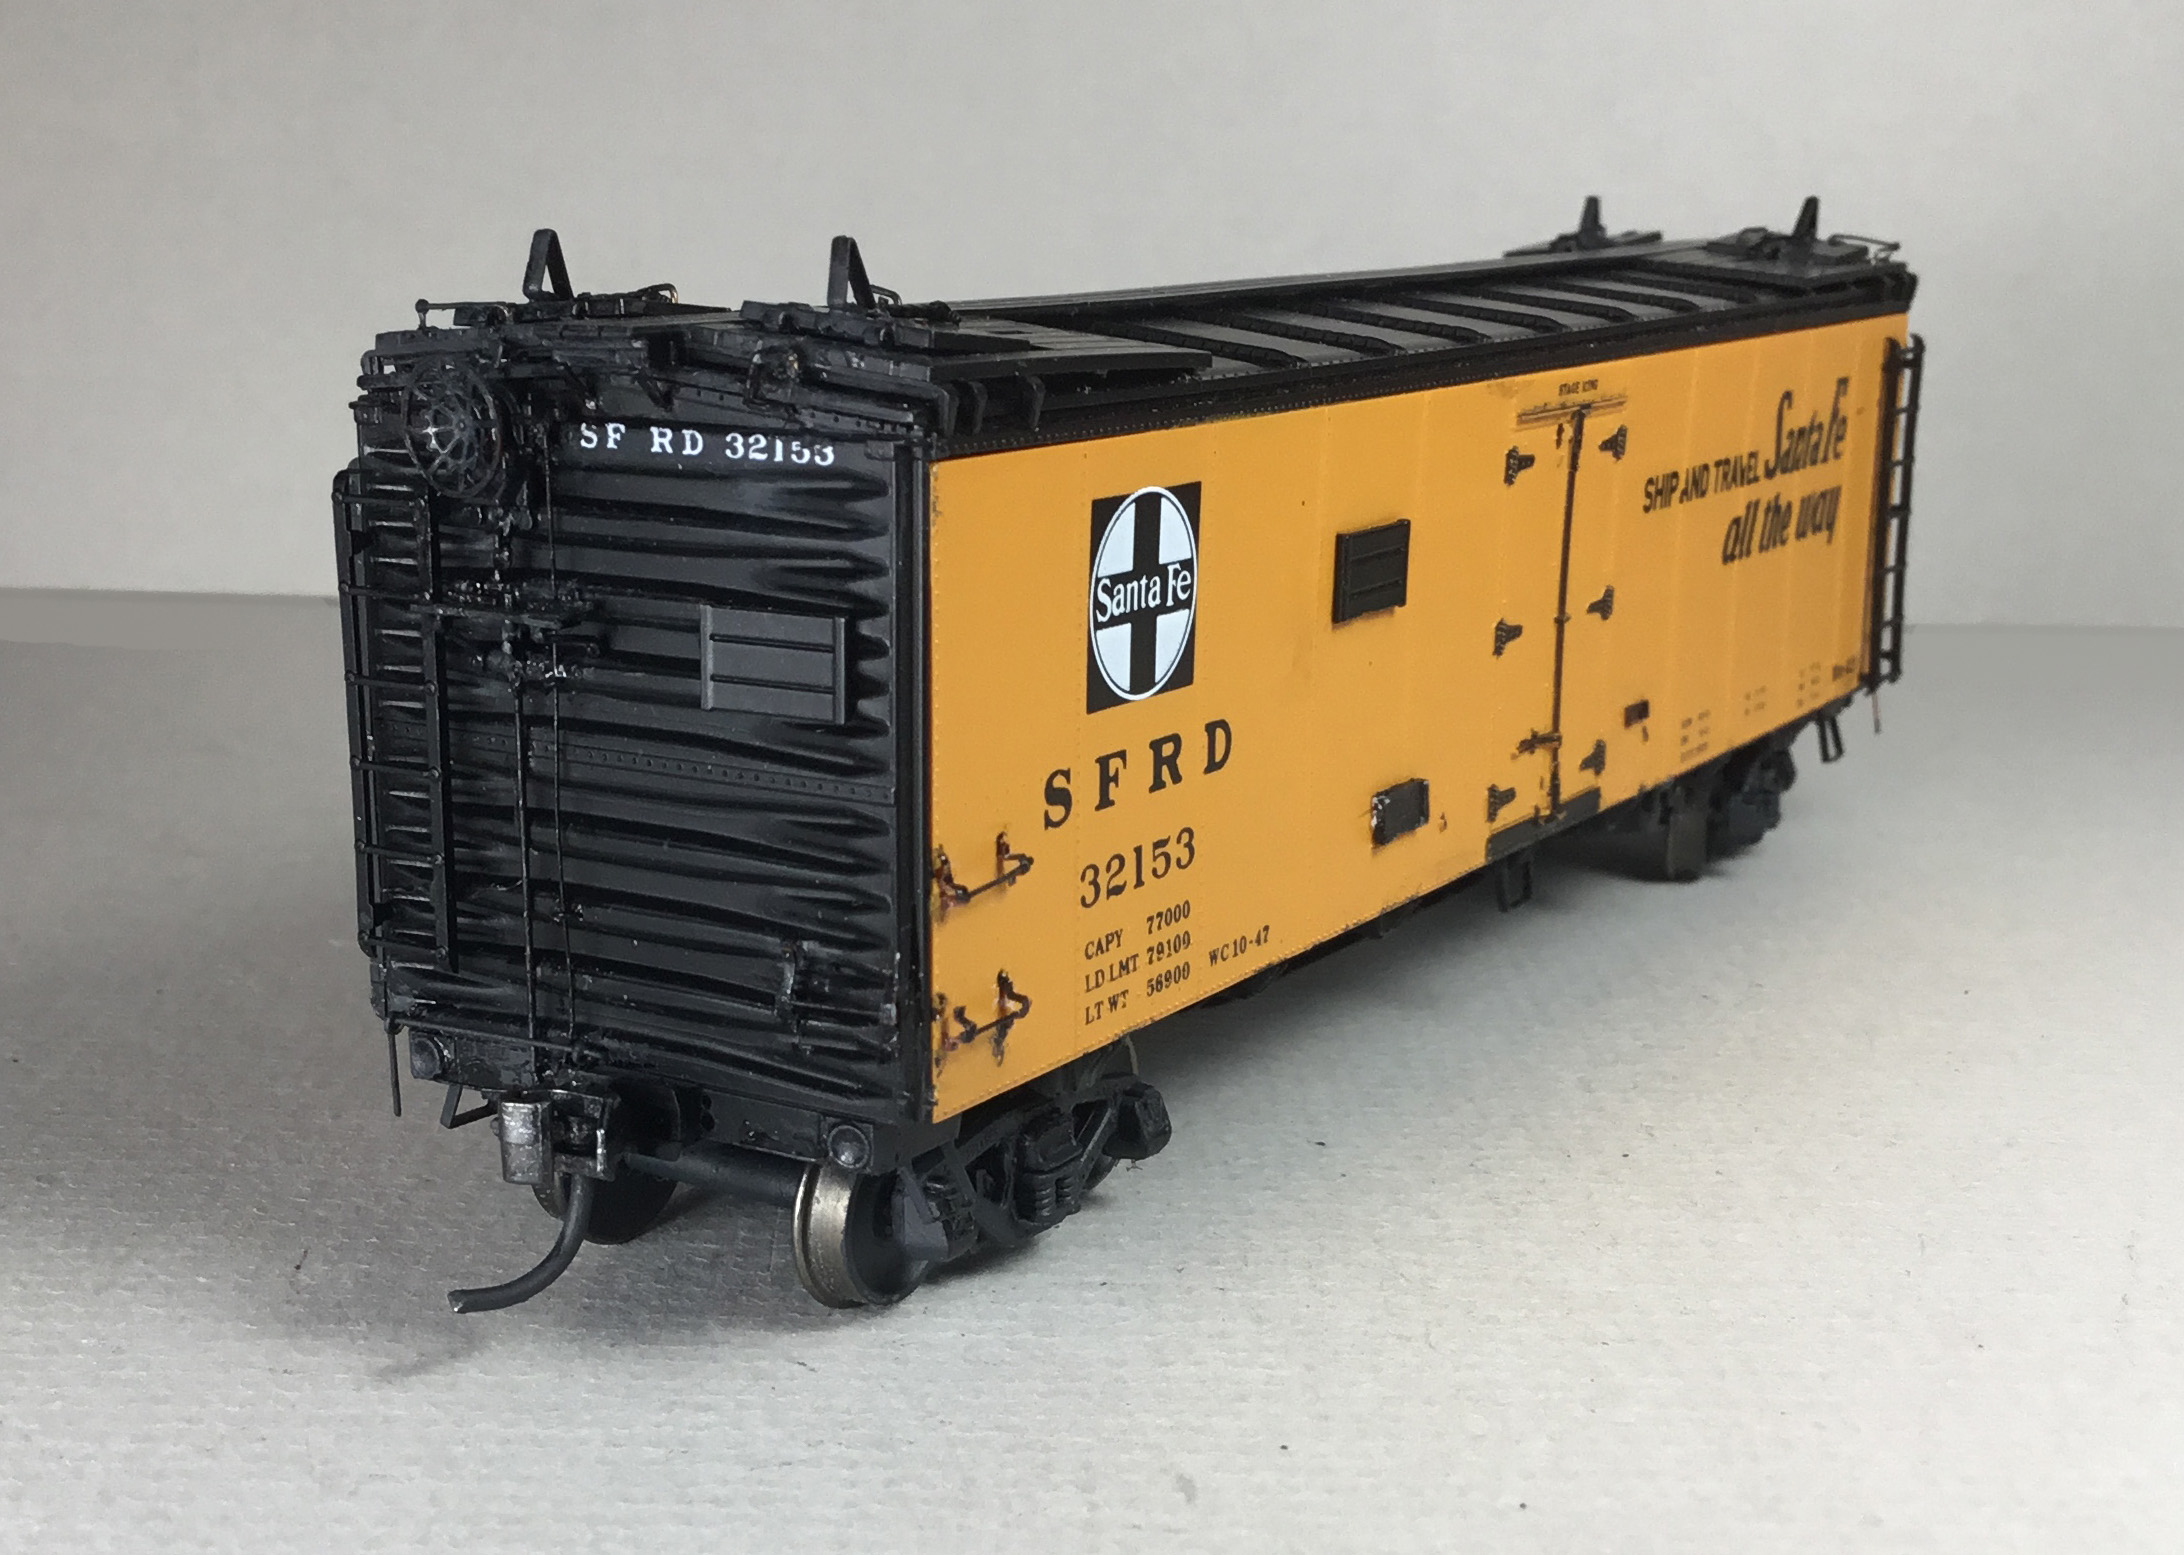 |
| SFRD 32153 |
When I opened the box to start the build I found the floor was missing. My first thought was this is not good since parts are no longer available from InterMountain. I checked the floors I had in the parts box finding none would work. After some thought I came up with a new plan. Maybe I could cast a resin floor using a mold if I could obtain an InterMountain floor for a master. I contacted my friend John Hotvet, a Santa Fe Modeler, to see if he had a kit with the floor I needed. I got lucky; he had the correct InterMountain kit with a floor that would fit. I obtained the floor from my friend and used it for the the master to make a rubber mold.
 |
| InterMountain master, my mold and my resin casting. |
After making a resin casting I fitted it via sanding and installed it into the car body. I found the casting was .040” too thick. “Why,” you ask. The InterMountain plastic floor had a molded rabbet, .040” deep, on each side on the underside to support it when installed. My casting back was flat with no rabbet.
 |
| Casting is not flush with sides or ends. |
 |
| Underside of InterMountain floor with rabbets on each side. |
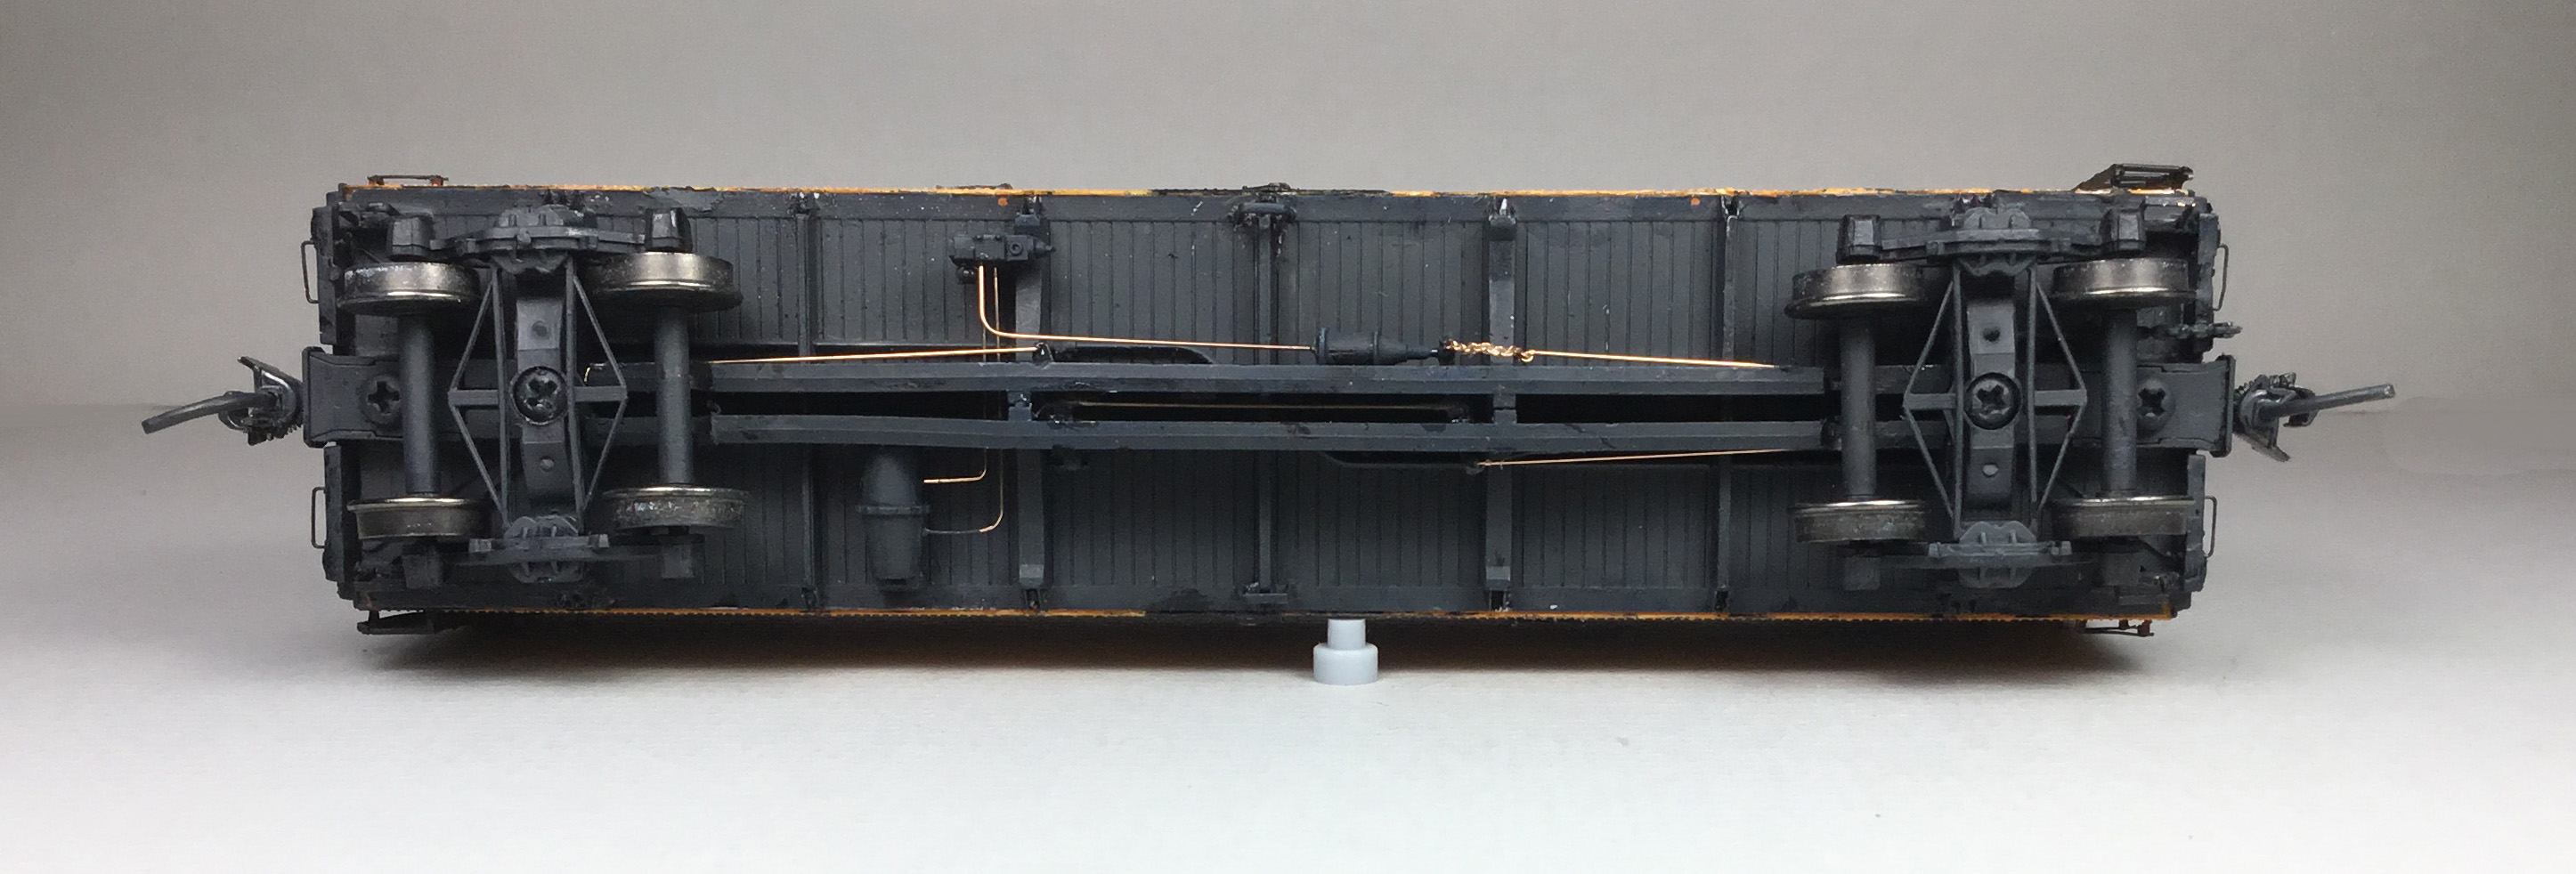
After creating the rabbet on my floor casting by cutting and sanding I was able to get the floor casting to fit flush with the sides and ends of the car body as the plastic InterMountain floor would have. Before installing the floor casting I drilled and tapped the coupler pocket pads and bolster center plates for 2-56 screws. I installed Kadee #262 coupler pockets that had Kadee #148 couplers installed with Fastenal 2-56 x 3/16” screws. Kit trucks with InterMountain 33” metal wheel sets were installed with Fastenal 2-56 x 1/4” screws. Car was weighted to 3.8 ounces with self stick tires weights and installed into the car body.
 |
| Casting flush after rabbet created on underside. Trucks and couplers installed. |
After the underbody (floor) was installed I installed the fish belly center sill, bell crank and chain, brake components and brake levers provided in the kit.
 |
| Center sill and brake components installed. |
Next I installed the kit ladders on the sides and ends. I like to have ladders installed as they help me to judge the location of other detail parts when installing them using prototype photos I may have. After ladder install I moved to the roof and installed the running board, ice hatch platforms and ice hatches.
 |
| Ladders installed on sides and ends. |
I moved on to“B” end work. I installed the brake step brackets and a Plano Morton brake step from Plano set #11322. I cut brass strips from .005” sheet brass for the front edge of the brake step bent downward 90 degrees and the back edge bent 90 degrees upward. Now the kit brake housing and chain from the brake housing to the brake step, kit retainer valve, and kit bell crank clevis for brake rod were installed.
 |
| "B" end brake gear and brake step installed. |
 |
| Top view of brake step and ice hatch platforms and ice hatches. |
I continued with the “B” end work installing detail parts as follows:
- brake rod cut from Tichy Train Group (Tichy) #1102, .015” diameter PBW
- retainer line and brackets fabricated from Tichy #1100, .008” diameter PB
- Kadee #2020 Ajax brake wheel
- Kadee end bracket grab iron
- Sill grab irons bent from Tichy #1101, .010” diameter PBW
- Running board extension bracket is fabricated with Plastruct #90501 3/16” angle and Evergreen #8102, 1 x 2” strip styrene
- MEK fasteners
 |
| "B" end details installed. Note brass front edge on brake step. |
 |
| "B" end details installed. Note brass strips on front and back of brake step. |
I went back to the sides installing Kadee #2251 bracket grab irons, kit placard boards, and sill steps. The side end sill steps are Yarmouth Model Works (YMW) #211 and the center sill step is A-Line #29000.
 |
| Placard boards and sill step installed. Note underframe members showing below sill. |
I added roof details next. I cut off the molded on ice hatch handles and replaced them with wire ones cut and bent from Tichy #1106 .0125” diameter PBW. Hatch rests provided in kit were glued on hatches with MEK. Roof grab irons were fabricated from Tichy #1101, .010” diameter PBW with YMW photo etched eye bolts without shoulder for corner legs and installed. Finally, the hatch holder hooks (square with open corner) that are attached to hatch rests to hold the hatches open were bent from Tichy #1106, .0125” diameter PBW. The hatch holder hook brackets were cut from .005” brass and bent around the hatch holder hooks and glued in place. Making the hatch holder hooks was made possible by a fine photo shared with me by Charles Slater. The hatch holder hooks were the most difficult task in the build of this Santa Fe Refrigerator car.
 |
| Santa Fe Refrigerator 32423 Santa Fe Coach Yard in LA, Dec. 28,1981 Charles Slater Photo and Collection |
 |
| One close view of roof details installed. |
 |
| A better view of ice hatch hooks to attach to ice hatch rests to hold hatch open. |
 |
| Roof details installed. |
I now hand painted all the detail parts installed and the underframe members showing on the side sills Vallejo Model Color Black 70.950. Any wire installed details parts are gone over with a sanding nail file to provide a better surface for paint adhesion.
 |
| All installed detail parts painted. |
 |
| Underframe members showing on sides painted. |
After the hand painting was done I airbrushed the underbody Vallejo Model Color Black Grey 70.862. Once the paint was dry I added the piping and brake rods as follows:
- Pipe from back of brake cylinder to AB valve, Tichy #1106, .0125” diameter PBW
- Piping from air reservoir to AB valve, Tichy #1101, .010” diameter PBW
- Brake rods, Tichy #1106, .0125” diameter PBW
- Brake rod clevises made with MEK Goop
- Chain Precision Scale #48553 34 links per inch
 |
| Piping and brake rods installed. |
 |
| Underbody airbrushed Vallejo Model Color Black Grey. |
Now as on most freight cars I build, the uncoupling levers were bent from Tichy #1106, .0125” PBW and eye bolt brackets bent from #1101 .010” PBW were installed. After install the uncoupling levers were hand painted Vallejo Model Color Black 70.950.
 |
| Uncoupling levers installed. |
 |
| Painted uncoupling lever painted and SFRD 32153 ready for service. |
Santa Fe Refrigerator Department (SFRD) 32153 was ready for service on the Minneapolis & Northland Railroad Company, The Lakeland Route, “Serving today, Shaping tomorrow.” A car card was made for SFRD 32153 the final step to put the a car in service on the Minneapolis & Northland Railroad Company Railroad.
 |
| SFRD 32153 spotted at Food Producers in Randolph, Minn. |
 |
| SFRD 32153 spotted at Food Producers in Randolph, Minn. |
 |
| SFRD 32153 spotted at Food Producers in Randolph, Minn. |
My build of SFRD 32153 would not have been possible without the help of the following individuals. Their time and effort to assist me is greatly appreciated.
A "Thank You" to Peter Aue for the information provided.
A "Thank You" to Ed Hawkins for the information provided.
A "Thank You" to Charles Slater for photo to show and fabricate "B" details.
A "Thank You" to John Hotvet for letting me use the underbody (floor) of an InterMountain kit to make a mold and casting to enable me to build SFRD 32153.
Thank You for taking time to read my blog. You can share a comment in the section below if you choose to do so. Please sign your comment with your name if you choose to leave one. Please share the blog link with other model railroaders.
Lester Breuer
.