Two Walthers plastic 40 foot composite gondola kits, undecorated kit 933-6859, were gifted to me by my friend Bill Pardie, as he had replaced these kits with better cars that have entered the railroad hobby market since these flat kits were produced. I was surprised when I opened the kit boxes as I had forgotten plastic flat kits were produced.
 |
| Walthers kit 933-6859 (click or tap on this or any image to enlarge) |
Upon reviewing the contents of the kits I felt the only usable parts were the sides, ends, Model Die Casting trucks without wheel sets (MDC) and Athearn parts: floor/underbody, underframe and weight. Two sets of ends were in the kit: a composite braced end correct for a Milwaukee Road gondola and a steel end with six corrugations that might work for several railroads.
 |
| End of L&N gondola matching kit end. Bill Pardie Collection |
The composite sides were not correct for a Milwaukee gondola; however, during a later internet search I found a photo in which the sides looked to be correct for a St. Louis-San Francisco (SLSF) composite gondola, Walthers kit 933-6856. And, the underbody and underframe were original Athearn blue box with the underframe having brake components molded in the incorrect location. Therefore, I quickly decided I would add two composite gondolas with solid floor and fixed ends to the Minneapolis & Northland Railroad Company roster. One gondola with steel corrugated fixed ends and the other with the composite braced type ends. The composite gondolas would be a nice addition to the Minneapolis & Northland Railroad Company roster as it currently had only steel gondolas.
The assembly of the plastic flat kit gondolas began as a resin flat kit. An end was glued to a side to create an “L” and the other end was glued to the other side to create a second facing “L”. The two facing “L”s were glued together to form the gondola body. I was surprised to find the Athearn floor fit into the assembled car body perfectly.
 |
| Two "Ls" of a resin flat kit to be glued together to form car body. |
 |
| Underbody fit very well into assembled body. |
 |
| Interior floor, |
The kit weight and underframe with incorrectly located brake components cut off were installed next. Kadee # 148 couplers were installed in the draft gear (coupler boxes) and Athearn metal draft gear covers attached. I tapped the bolster kingpins for 2-56 screws and installed the kit trucks into which I had installed InterMountain 33” metal wheel sets. I had to install .015” brass washers on kingpins to obtain proper coupler height.
 |
| Weight, underframe and trucks installed. |
I thought the look of the underbody could be improved so I removed trucks and underframe. I installed two Evergreen #154, .060 X .080” strip styrene strips on each side of the weight to give the underbody a better look. I installed the brake components I had cut off and pre-drilled for piping in their proper location using Tichy Train Group (Tichy) brackets (set #3013) to mount them on. And, the brake cylinder was drilled with a #76 drill to accept a Tichy brake piston (Tichy set #3013).
 |
| Athearn brake components installed. |
I now had two composite gondolas each with the same type side and a different end type ready for adding details.
 |
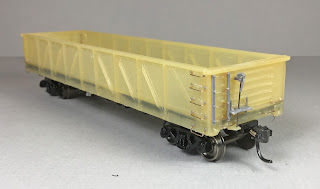
| Side view of completed gondola. |
 |
| Ends ready for adding details. |
I began the detail work on the “B” end of the composite braced end gondola. I installed a brake step and brackets from Tichy set #3013. Next an A-Line #29000 sill step was installed for the brake shaft step. The brake shaft step was bent to allow the brake shaft to rest on it. Now the brake shaft, Tichy # 1102, .015” diameter phosphor bronze wire (PBW) was installed. Later a Cal-Scale brass brake wheel, #190-289, was installed.
 |
| "B" end of composite braced end gondola. |
I set the braced end composite gondola aside and began the detail work on the “B” end of the corrugated end composite gondola. I decided on this gondola I wanted a different end look. Influenced by the prototype photo of L&N corrugated end above and again using Tichy #3013 parts I added the brake step and brackets. Next the brake shaft, Tichy #1102, .015” diameter PBW, was installed. The install of miner handle, Tichy set #3013, followed.
 |
| "B" end of composite corrugated gondola. |
Now the drop grab irons bent from Tichy #1101 .010” diameter PBW were installed on the sides of both gondolas.
 |
| Grab irons, drop type, installed on side. |
Once the install of side grab irons was finished, I installed the grab irons on the ends of the two gondolas. On the corrugated end gondola a Tichy ladder, #3065, was shortened and installed on each end. After install the molded ladder rungs were cut off with a nipper and replaced with wire ladder rungs bent from Tichy #1101, .010” diameter PBW.
 |
| Ladder with wire rung on "B" end of composite corrugated gondola. |
Once the grab irons were finished I installed a resin retainer valve from parts box on both gondola “B” ends followed by a retainer line, Tichy #1100, .008” diameter PBW on each gondola.
 |
| Retainer valve and retainer line installed. |
I went back to the sides to install sill steps, A-Line #29000, on both gondolas. And, once more back to the ends to install uncoupling levers bent from , Tichy #1106. .0125” diameter PBW, in installed brackets bent from Tichy #1101, .010” diameter PBW.
 |
| Side sills and uncoupling levers installed. Note brass brake wheel on braced end gondola. |
With car body details added to both gondolas, the underbody work on both gondolas needed to be finished. The underbody work on both gondolas was completed as follows:
- Brake cylinder (kit) with Tichy piston, set #3013
- Control valve (kit) with Tichy mount, set #3013
- Air reservoir (kit)
- Above brake components were pre-drilled for piping
- Brake cylinder lever, made with Evergreen #8108, 1” x 8” strip styrene
- Brake floating lever, made with Evergreen #8106, 1” x 6” strip styrene
- Brake lever hangers, plastic grab irons from parts box
- Brake piping from air reservoir to control valve, Tichy #1101, .010” dia. PBW
- Brake pipe from brake cylinder to control valve, Tichy #1106, .0125” dia. PBW
- Brake rods, Tichy #1106, .0125” diameter PBW
- Brake rod clevises, MEK Goop
- Chain, A-Line #29219, black 40 links per inch (not in kit)
- Train line, .018’ diameter flora wire (not in kit)
- Dirt collector, resin casting in my M&N Shop
 |
| Detail parts installed on underbody. |
Once underbody work was completed it was off to the paint shop. First, a review of the Minneapolis & Northland Railroad Company roster gondola series 3300 -3390 to choose numbers for the gondolas. Since these were composite gondolas the numbers 3312 and 3322 were chosen from the front end of the series.
Next, the gondolas were cleaned with a cotton swab dipped in isopropyl alcohol. When dry the underbodies were sprayed Vallejo Model Color Black Grey #70.862 and trucks were hand painted the same color.
 |
| Underbody painted. |
Next the exterior and interior car bodies of both gondolas were sprayed Vallejo/MicoMark Model Air Box Car Red #29015X2.
 |
| Side of gondola painted. |
 |
| Interior painted same color as exterior. |
Once dry the car bodies of both gondolas were spayed with Vallejo Gloss Medium 70.470 to provide a gloss decal base. After drying, the following decals were applied:
- Champion Decal Company (Champ) Private name decals for reporting marks
- Champ Private Name numbers and alphas for numbers 3312 and 3322
- Champ Gondola 50 and 70 Ton dimensional data set HD-6
- Hearlds printed for me years back by Gerry Leone on an Alps printer
Decals were soaked off in distilled water and applied to the car body where MicroScale Micro Set had been applied with a brush. After the decal was applied in the Micro Set and positioned the edges had MicroScale Micro Sol applied. Any excess solution was sucked away with the torn edge of a paper towel. Again when dry, car body sprayed with Vallejo Gloss Varnish 70.510 to better hide edges of decals and protect decals during handling. Again when dry, the car body was sprayed with Model Master Flat Clear Acryl, #4636, to protect decals and provide a flat finish for weathering when applied.
 |
| Decals applied to gondolas 3312 and 3322. |
The final step before putting M&N gondolas 3312 and 3322 in service was to weather the car with Artmatic eye shadow and Pan Pastels. An Artmatic eye shadow color like a Dark Box Car Red was applied over entire car body. Pan Pastels used were Paynes Grey Extra Dark 840.1 lightly over safety appliances on car body. The interior sides, ends and floor were brushed with dirty Dio-Sol.
 |
| Lightly weathered gondola 3312. |
M&N composite gondolas 3312 and 3322 were now ready for service on the Minneapolis & Northland Railroad Company, The Lakeland Route, “Serving today, Shaping tomorrow.” Car cards were made for M&N gondolas 3312 and 3322, the final step to put the cars in service on the Minneapolis & Northland Railroad Company Railroad.
 |
| M&N composite gondolas 3312 and 3322 sitting on CGW Interchange to be delivered to McGregor Yard in Northfield, Minnesota for service. |
 |
| M&N composite gondolas 3312 and 3322 sitting on CGW Interchange to be delivered to McGregor Yard in Northfield, Minnesota for service. |
A “Thank You” to Bill Pardie for gifting me the gondola kits. Another “Thank You” to Bill for the prototype "B" end photo of L&N gondola to help with build of these cars and for permission to use a photo from their collection in this blog post.
Thank You for taking time to read my blog. You can share a comment in the section below if you choose to do so. Please sign your comment with your name if you choose to leave one. Please share the blog link with other model railroaders.
Lester Breuer
Les I am in awe of what you can accomplish with old kits many would throw out.
ReplyDeleteThank You Ken. Appreciated.
ReplyDelete