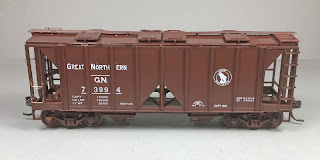
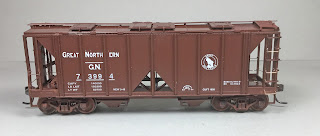
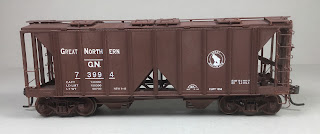
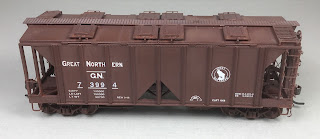
While looking in my cabinet containing unbuilt kits for a plastic covered hopper to build, I found a Bowser plastic kit, #55681, I had purchased in in 1997. A Great Northern 70 Ton two bay covered hopper, number 73994, class LO, open side, I should have built long ago. Yet, as an old saying goes, " better late then never."
The prototype built by American Car & Foundry in 1946 (Lot 2966) was assigned to series 73970-73994. Photos with side and “B” end view of 73976 can be found in Railway Prototype Cyclopedia RP CYC 27 (RP CYC Publishing 2013). The caption for the photos describes features as follows: “ACF-built 1,958 cu. ft. 70-Ton covered hoppers came with Murphy flat-panel roofs, Type 3 hatch covers and locking bars, Universal power hand brakes, Apex Tri-lok running boards and brake steps, and A.S.F. A-3 Ride-Control trucks.” And, cars were painted mineral red paint over entire car including trucks.
The Bowser model has most of these features; however, the hatch covers are Type 1. In addition, the lettering does match the photos in RP CYC 27. I built the kit following instructions making changes I felt improved the fine model. On the roof I cut the off the latitudinal running boards with molded on roof grab irons and replaced them with ones cut off a Kadee Apex running board. Prior to installing the roof I installed the kit and tire weights to bring the car weight to 3.8 ounces.
On the “B” end changes included:
- Piping from the AB valve to the air reservoir, Tichy Train Group (Tichy ) #110 .010” diameter phosphor bronze wire (PBW) installed.
- Piping from AB valve to brake cylinder, Tichy #1106 .0125” diameter PBW installed.
- Piping should be done before installing the underframe
- Resin retainer valve from parts box
- Retainer line, Tichy #1100 .008” diameter PBW installed
- Brake step, molded one cut off and replaced with brake step fabricated from Kadee Apex latitudinal running board
- Brake wheel, Kadee #2023 Universal installed.
- Grab irons, molded removed and wire grab irons bent from Tichy #1101, PBW installed.
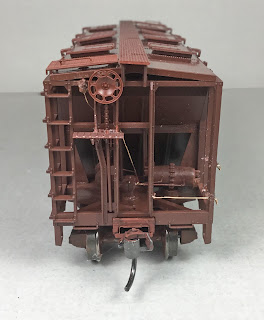 |
| "B" with details installed. (Click on this or any image to enlarge) |
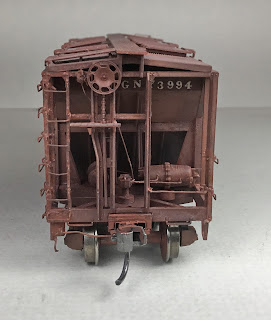
A final step in the build on the "B" end was to add uncoupling levers bent from Tichy #1106, .0125” diameter PBW installed with eye bolt brackets bent from Tichy #1101, .010” diameter PBW. The eye blots brackets were installed in small plates attached to the end sill. The plates were made with scrap styrene.
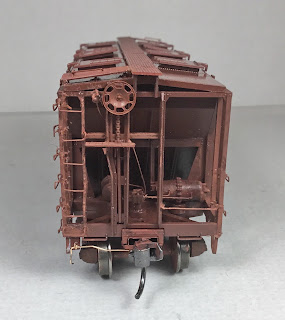 |
| Uncoupling levers installed. |
Changes on the side and ends included installing wire grab irons and ladder rungs. Molded on drop grab irons were cut off with side cutter and wire drop grab irons bent from Tichy #1101, .010” PBW were installed.
 |
| Grab irons, drop type, installed. |
 |
| Grab irons installed. |
After molded on ladder rungs were cut off, wire drop grabs bent from Tichy #1101, .010” diameter PBW were installed. The area around each rung end had to cleaned up with single edge razor blade, chisel, and sanding stick. And, molded on sill steps were cut off and A-Line #29002, style C sill steps were installed in #76 drilled holes.
 |
| Ladder rungs, drop type, and sill steps installed. |
 |
| Ladder rungs and sill steps installed. |
Ladders rungs take time, patience and care when drilling holes for the rungs. It is very easy to break a style when drilling the holes for rungs. I used a #80 drill mounted in a Dremel 4866 chuck installed on a Model 8050 Dremel Tool to drill the ladder rung holes. Holes for grab irons had been drilled the same way.
To prevent breakage of ladder stiles when drilling I start by doing every other rung first and then fill in the others.
 |
| Ladder has every rung installed and others to follow to prevent ladder stile breakage. |
Work on the under body included:
- Truck kingpins tapped for 2-56 screws
- Trucks, kit, with Intermountain 33” metal wheels installed, were installed
- Couplers, Kadee No. 5 as #148 whisker did not perform well in this draft gear
- Brake levers, resin ones from parts box
- Brake rod, Tichy #1106, .0125” PBW
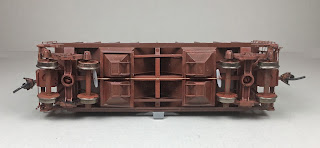 |
| Brake levers and brake rod installed. |
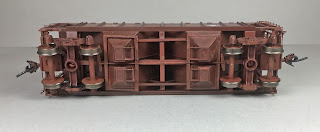 |
| Underbody details painted. |
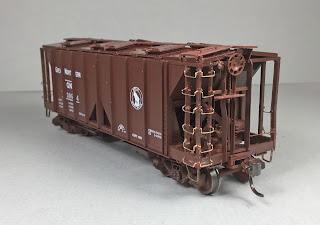
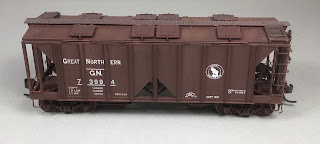
The GN covered hopper 73944 was ready for remaining paint and lettering. The added details were hand painted with a Vallejo Model Color mix of Mahogany Brown 70.346 and a touch of Burnt Red 70.814. I made the end decals for the car using Clove House dry transfers applied to decal paper and coated with MicroScale Liquid Decal Film. On the ends, the reporting marks and number were made with Railroad Roman Medium - White #9601-11 as this was the only style I had on hand.
Decals were soaked off in distilled water and applied to the car body where MicroScale Micro Set had been applied with a brush. After the decal was applied in the Micro Set and positioned the edges had MicroScale Micro Sol applied. Any excess solution was sucked away with the torn edge of a paper towel. When dry, car body was sprayed with Model Master Flat Clear Acryl, #4636, to protect decals and provide a flat finish for weathering when applied.
 |
| End decals applied. |
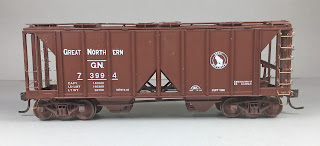
Car was weathered with Artmatic eye shadow applied with eye makeup sponge tipped applicators and micro applicators. An Artmatic eye shadow color like a Dark Box Car Red was applied over entire car body. A silver color was used on the running boards and brake step to have metal showing. And, a black was applied lightly over roof, side ribs and safety appliances on car body.
 |
| Note the weathering to show metal running boards. |
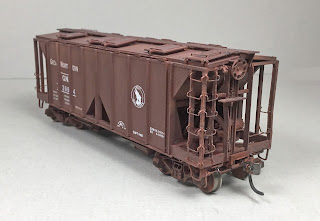 |
| GN 73994 weathered. |
Great Northern covered hopper 73994 was ready for service on the Minneapolis & Northland Railroad Company, The Lakeland Route, “Serving today, Shaping tomorrow.” A car card was made for Great Northern 73994, the final step to put the cars in service on the Minneapolis & Northland Railroad Company Railroad.
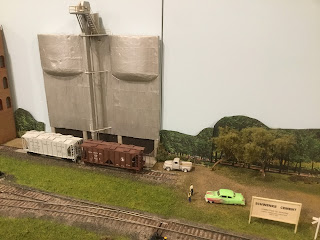 |
| GN hopper 73994 spotted at Schwenke Cement in Minneapolis, Minnesota |
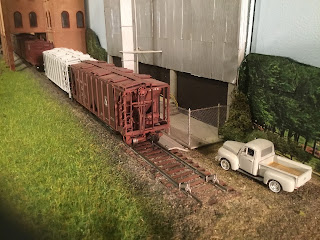 |
| GN hopper 73994 spotted at Schwenke Cement in Minneapolis, Minnesota |
 |
| GN hopper 73994 spotted at Schwenke Cement in Minneapolis, Minnesota |
Looking at the roof in the model and prototype photos I realized I had not removed the molded on grab irons on the hatches. Therefore, back to the roof where molded on hatch grab irons were carved off . Wire hatch grab irons were bent from Tichy #1101, .010" diameter PBW and installed.
 |
| Wire grab irons installed on roof hatches. |
 |
| Wire grab irons installed on roof hatches. |
Thank You for taking time to read my blog. You can share a comment in the section below if you choose to do so. Please sign your comment with your name if you choose to leave one. Please share the blog link with other model railroaders.
Lester Breuer
Nice effort, Lester! I did the same thing to two Bowser cars about 10-12 years ago. Your effort took a lot of time but it's worth it, and the car looks great on the nice layout too. I appreciate the technique of drilling and installing grabs on every other rung to preserve the strength of the post--that's smart. That GN paint job on covered hoppers has always been a favorite of mine. Like you I've always thought the Bowser tooling is excellent, and with the addition of wire grabs they make stand-out models. Thank you for the effort and Merry Christmas!
ReplyDeleteJohn Thank You for the kind words and you have a very Merry Christmas as well.
DeleteNicely done, thanks for sharing the build and the building tips.
ReplyDeleteThank You Ken. Sharing helps all of us become better modelers.
Delete