 |
| Ray Breyer Photo Collection (Click or tap on photos to enlarge) |
 |
| Ray Breyer Photo Collection |
I assembled the car kit adding electrical outlet box punch outs for weights to bring the car weight to 3.8 ounces; however, the underbody with Kadee #148 couplers and InterMountain 33 inch metal wheels installed in the Accurail trucks was not glued into the car body at this time to allow removal for the car body rework. In addition, the longitudinal running board was also not glued to the car body for the same reason.
 |
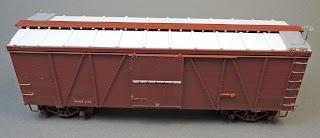
| Assembled Accurail CGW box car before rework into GTW. (click or tap on this or any photo to enlarge) |
 |
| Assembled underbody with no changes. |
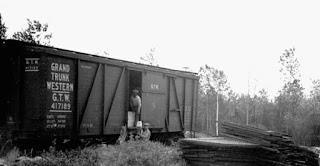
I began the Grand Trunk Western Box Car rework based on the chart of features for a GTW box car included in the article. The features for the GTW car included the following: two post ends rather than the four post ends, a steel roof rather than wood roof, latitudinal running boards and a door brace. Before starting to add these and other features, I removed all lettering from the car body except for the build date with a nylon scratch brush. The lettering on the car could not be removed without also removing the paint below due to the very thin coat of original factory paint. I carved off all grab irons and ladder on the sides. No need to carve off the ladder rungs on the ends as the end would be replaced with a new resin end.
 |
| Lettering, molded on grab irons and ladder rungs removed. Areas where lettering removed were brushed with a matching Vallejo paint mix. |
I removed the underbody before starting the change of the “B” end from a four post to a two post end. With the underbody removed, I cut out the the portion of the “B” end with the four posts with a Umm saw and glued in a new two post resin end I cast from resin using a Westerfield Fowler Car end from kit 1501 as a master.
After letting the car body with the new end set overnight to allow glue to completely setup I added “B” end details. First I drilled all the holes using a #79 drill for grab irons and ladder rungs to be installed later. Once drilling of holes was complete, I installed a Tichy Train Group (Tichy) brake step and brackets from Tichy set #3013. Next I installed the brake shaft step using an A-Line #29000 sill step. A Sunshine Models retainer valve from the parts box was installed next followed by a retainer line, Tichy, #1100, .008" diameter PBW and brackets fabricated from Tichy, #1101, .010” diameter phosphor bronze wire (PBW). Now the brake shaft, Tichy #11026, .015” diameter PBW with a Tichy brake wheel, from set #3010, was installed. The longitudinal running board extension brackets, Evergreen,#8102, 1x2” strip styrene were attached. The grab irons and ladder rungs bent from Tichy, #1101, .010” diameter PBW ( see “bending grab irons”under “labels “ on this blog) were installed next. Finally, the uncoupling levers, Tichy, #1106, .0125" diameter PBW (see "bending uncoupling levers" under "labels" on this blog) with eyebolts bent from Ticy, #1101, .010" PBW for brackets were installed to complete the “B” end. Grab irons, ladder rungs and uncoupling lever and brackets on the “A” end we’re installed next.
Now I added the side details: grab iron and ladder rungs bent from Tichy, #1101, .010” diameter PBW, A-Line, #29000, sill steps bent to the shape based on GTW photo, a door brace, Evergreen, 1x3” strip styrene with fasteners made with MEK Goop, and a door handle bent from Tichy, #1101, .010” diameter PBW.
The roof changes needed were next. I removed the longitudinal running board and set it aside to reinstall later. I decided to leave the existing roof saddles and add new steel roof panels to each side of the roof saddles. I cut the new steel roof panels from Evergreen, #9010, .010” sheet styrene and laminated them to the existing wood roof with MEK. Based on the GTW photos, I made a story stick to lay out the ribs I spaced 3 feet 3 inches apart. The spacing of the ribs was laid out using the center of the door for a starting point. Using the story stick (card), I transferred the rib placement lines to the roof.
I cut the needed ribs made from Evergreen, #8204, 2x4” strip styrene, with a NorthWest Short Line chopper and installed them with MEK. After installing the ribs I was pleased to see their location was very close to the prototype when I compared them to GTW photos. With the new steel roof installed the existing running board saddles were too short. Therefore, I cut additional saddles, Evergreen, # 8103, 1x3” strip, and glued them to the existing saddles to raise them. The longitudinal running board was now installed.
Next new latitudinal running boards, resin ones from the parts box, were prepared for install. I drilled holes for the corner grab irons with a #79 drill. I made and glued mounting brackets from .005 x .046” flat brass strip stock to the back of the lateral running boards allowing an extension on the back side for gluing under the longitudinal running board and on the front for bending the portion of the bracket that goes over the roof edge. Grab irons bent from Tichy, #1101, .010” diameter PBW wire with Yarmouth Model Works, #356, eyebolts with shoulder, for corner bracket were installed. The finished latitudinal running boards were installed completing the new roof rework.
The reworked car was ready for the paint shop. The new resin ends and styrene roof were wiped with cotton swabs dipped in 91% alcohol to clean for painting. A Vallejo mix of 30 drops Model Air Brown RLM26 with one drop of Model Color, 70.862, Black Grey was sprayed on the new ends and roof. The areas on the sides where grab irons and ladder rungs had been removed and where lettering removal removed not only lettering but paint were brushed with the same mix. After drying overnight, the car body was sprayed with Model Master 4638 Gloss Clear Acryl to provide a base for decal application.
The lettering and numbers for GTW box car 417150 were done with Westerfield Models decal set, D4354 for a GTW 36’ Fowler Box Car with 6’ door. Decals after removed from backing by soaking in distilled water were applied using Microscale Set and Sol. Once decals were dry the car body was sprayed with Model Master Clear Flat Acryl to protect decals during handling. After drying once more, car weathered with Pan Pastels.
 |
| Grand Trunk Western 417150 sitting in McGregor yard. |
 |
| Grand Trunk Western 417150 sitting in McGregor yard. |
The Grand Trunk Western Fowler Box Car 417150 is now in service on the Minneapolis & Northland Railroad Company Railroad. Without the help of Eric Hansmann for the information obtained from his blog and to Ray Breyer for photos and articles on the Fowler Car on Eric’s blog this build would not have been possible. A big “ Thank You “ to you both.
Thank You for taking time to read my blog. You can share a comment in the section below if you choose to do so. Please share the blog link with other model railroaders.
Lester Breuer


No comments:
Post a Comment