 |
| Clark Propst Photo Collection (click or tap on this or any other photo to enlarge) |
 |
| Photo in Sunshine Models Prototype Data Sheet #91A |
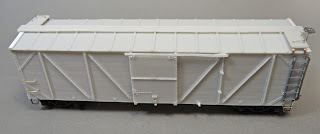
To start the car body detailing, I installed the longitudinal running board using super glue. I used super to attach all other parts as well. Next I installed the side and end ladders. The side ladders are installed first to allow the end ladder rungs to line up with the side ladder rungs. Prior to install, the kit provided seven rung ladders were shortened to six rung and the ends ends of the ladder stiles were rounded using MEK Goop ( plastic melted in MEK) to match the prototype. Ladder fasteners were also made with MEK Goop.
I continued the detailing by adding the “B” end detail. The longitudinal running extension supports, cut from the 1”x3” strip styrene in the kit, were added to finish the longitudinal running board install on the “B” end and on the “A” end. Next the kit brake step and brackets cut from Evergreen #8102 1”x2” strip styrene were installed. A Precision Scale retainer valve, #31796, and retainer line fabricated from .008” diameter brass wire in kit were added next. A brake shaft step bent from an ordinary wire staple in the shape of the prototype was installed. Now the brake shaft, .015” diameter brass wire in the kit, could be installed with the bottom resting on the bent brake step. The kit provided brake wheel followed. To show the Murphy metal clad roof on the ends, .005” x .066“ pieces glued along roof edges were cut from .005” sheet styrene with rivets added with a R.B. Productions rivet tool. And, the grab irons in the kit were installed here and on the ”A” end as well. Finally, top mounted uncoupling levers bent from Tichy, #1106, .0125” diameter PBW were installed with kit provided Detail Associates, Sys #2206, eyebolts for brackets to finish the ends detailing.
Doors, grab irons and sill steps, all kit provided, were installed on the sides. Molded on door handles were carved off and replaced with ones bent from .010” diameter brass wire.
Now to finish the roof. Latitudinal running board supports were cut from .005” x .040” etched brass and bent on one end to go around the edge of the roof on one end and glued into place. I used the resin cast pieces in the kit for a pattern to make the bends. The kit latitudinal running boards with corner grab irons, Yarmouth Models, YMW #356, eyebolts for the corner leg, were installed prior to being glued to the already installed supports. To show the Murphy metal clad roof cap on the end roof panel .005” x .066“ pieces glued along roof edges were cut from .005” sheet styrene with rivets added with a R.B. Productions rivet tool.
I now added the the underbody detail. First, the AB brake system components, a resin cast control valve and Cal-Scale brake cylinder, both in the kit, and a Tichy Train Group (Tichy) air reservoir, set #3013, were installed. Cut-off plastic sill steps from plastic cars were used for mounting brackets on the air reservoir. Tichy, #1101, .010” diameter phosphor bronze wire (PBW) wire was used to make the piping between the control valve and the air reservoir. The pipe from the brake cylinder to control valve was bent from Tichy, #1106, .0125” diameter PBW. Kit provided Cal-Scale brake levers and the third brake lever fashioned from Evergreen,#8106, 1”x6” were installed. The third brake lever is mounted at a 45 degree angle. All brake rodding was fabricated from Tichy, #1106, .0125” diameter PBW with Tichy, #8021, turnbuckles for clevises were installed. Chain is A-Line, #29219, 40 links per inch. A train line, .018” floral wire, was installed in holes drilled with a 4” drill made from piano wire. A dirt collector from Tichy, set #3013, was added. It was connected to the train line with a tee made from MEK Goop.
With detailing complete, paint and lettering came next. I sprayed the underbody Vallejo Model Air, 71.054, Dark Grey Blue. Once dry I placed the car in my painting jig ( described on my blog, under “labels” click on "jig" or “painting") and sprayed the car body Vallejo Model Color, 70.940, Saddle Brown. Again when dry, I sprayed the car body Model Master 4638 Clear Gloss Acryl for a decal base. After drying kit decals applied using Microscale Micro Set and Micro Sol. After decals were allowed to dry overnight, car body was sprayed with Model Master Flat Clear Acryl.
I waited a week or so before adding weathering. The car was weathered using Pan Pastels and eye shadow makeup. Tools used to apply weathering were Pan Pastel sponges and disposable mico applicators. A white Prismacolor pencil, PC938, was used to create the hint of disappearing chalk marks.
I waited a week or so before adding weathering. The car was weathered using Pan Pastels and eye shadow makeup. Tools used to apply weathering were Pan Pastel sponges and disposable mico applicators. A white Prismacolor pencil, PC938, was used to create the hint of disappearing chalk marks.
I want to say, "Thank You" to Joe Binish, Clark Propst, and Bill Welch for data and photos assisting me with the build.
Thank You for taking time to read my blog. You can share a comment in the section below if you choose to do so. Please share the blog link with other model railroaders.


No comments:
Post a Comment