Tuesday, August 25, 2020

Expansion - Randolph Industries, Part I

With the Randolph expansion benchwork, track work and basic scenery done, I began working on replacing cardboard rectangles representing industries with the final industries.  I began with the easy one first - the Wildung Team Track.  The remaining industries are kit bashed or modified kit structures.
I said the Wildung team track is easy as in Randolph no dock required so only fine shifted sand from a local road in my area and some sifted grey black dirt ( shifted black dirt from a local park baseball field home plate area) both applied with wet water ( Elmers white glue 25%,  tap water 75% and a few drops of liquid dish washing soap).  I put down the wet water from the Elmer’s glue bottle and use a throw away brush to to spread it in the area I will cover with the sand and dirt.  I first apply the sand with a coffee strainer and tea strainer and then a little dirt here and there with the only tea strainer.  I added Woodland Scenics blended grass and a few bushes at end of track to complete the scene for now.  I will put down static grass such as on the left side of the photo below at a later time.


Wildung Team Track
( click on this or any photo to enlarge)


Tools for adding basic scenery


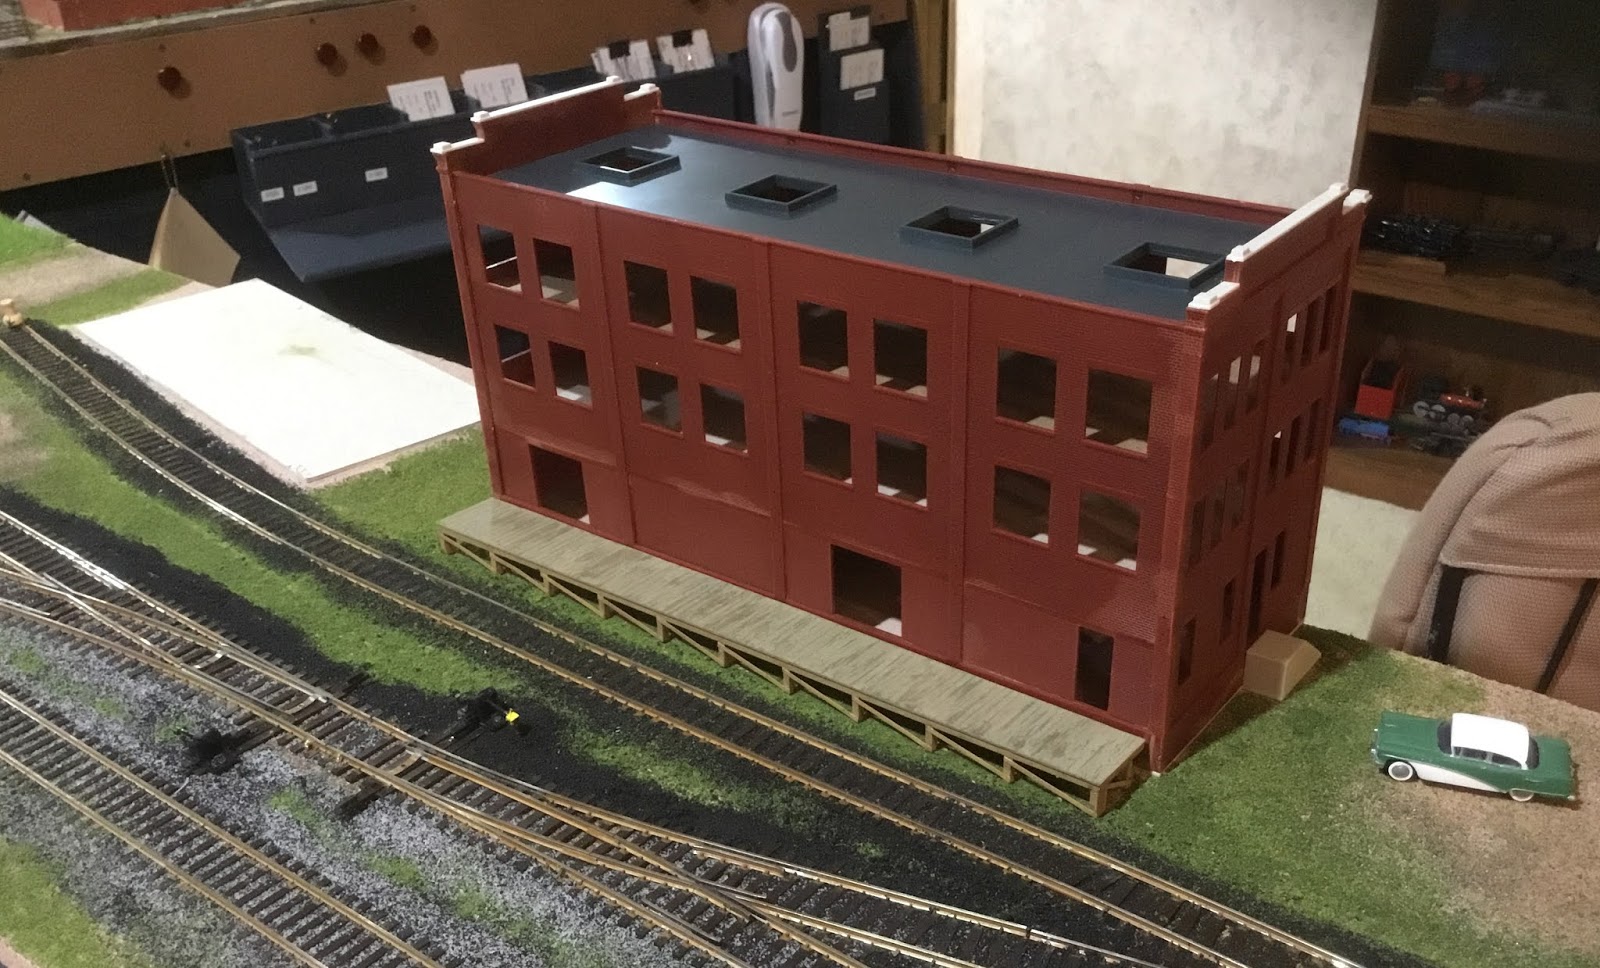
The next industry, Food Producers, a little more difficult as a structure was needed for customer to occupy.  I chose the Walthers Cornerstone Trackside Post Office, kit 933-4063, for the structure.   I first assembled the dock.  I removed the boards that enclosed the bottom and added strip wood bracing to the posts.  The dock being plastic was hand painted with PollyScale Depot Buff.  Once dry the dock was brushed with Floquil Oak (S123) Flo-Stain.  Again once dry, a coat of dirty thinner gunk, the residue that collects on the bottom of the bottle filled with Dio-Sol ( I mix my own as Dio-Sol is out of production) used to clean brushes after using Floquil or other solvent based paint, was applied.  The basic building was assembled per instructions with the exception of exchanging the front and rear wall for the orientation I wanted on the railroad.


Walthers kit used for Food Producers.


Food Producers basic building and dock


At this point, I moved on to getting the basic structure in place for Randolph Anchor Glass Plant.   I chose the Walthers Cornerstone Kraft Mill, kit 933-3902, for the materials to kit bash the Anchor Glass Plant.   The  prototype for the kit bash was the Shakopee Anchor Glass Plant just outside of Shakopee in the industrial park where I grew up.  Of course, my Randolph space required using selective compression and using only the key features of the prototype.


Aerial view of Anchor Glass Plant in Shakopee
Industrial Park


Walthers kit used for Anchor Glass Plant kit bash.


 I cut, fitted and glued together the kit walls or parts of kit walls to get the basic structure.  Evergreen strip styrene was used where roof support was needed.  I did add a freight car loading entrance not on the prototype.  Just a feature I added as I wanted to have one building on the railroad that allowed spotting of freight cars inside.


Anchor Glass Plant kit bashed basic building.


Basic building  of Randolph Anchor Glass Plant.


Next I installed removable roofs on Randolph Anchor Glass Plant.  I now could proceed to complete work on the two buildings.  In this case, it was nice to have the two buildings to work on at the same time as when I tired of work on one or I was waiting for glue, etc. to set I could work on the other.  I went back to the Food Producers building and added removable interior floors and walls that I made using heavy cardboard.  The middle floors are cut/split in the middle to allow removal after doors and windows were installed.


Randolph Anchor Glass Plant roofs installed.


Food Producers interior floors


I painted the doors and windows attached to cardboard with masking tape with a rattle can using Rust-Oleum Gloss Protective Enamel.   Once dry the windows were installed and the kit window glazing was installed using Formula 560 Canopy glue.  On the exterior the window lintels were hand painted Polly Scale Depot Buff.  


Food Producers windows spray painted 


With windows installed, the roof was covered with black #320 wet/dry sandpaper, fitted and installed.    I did not like the roof sky lights on this building so I added roof details I liked and thought were more appropriate.   I scratchbuilt the “dog house” from Pikestuff wall parts  left over from another project to allow access to other roof mechanical items.  The other roof items came from Walthers Cornerstone Roof Details kit, #933-3733.


Food Producers roof with kit sky lites.


Food Producers with changes made to roof.


Now the building was ready for its exterior finish.  I applied a coat of hydrocal tinted with dry tempera paint pigment.  When dry, I added the kit roof dock which was hand painted Model Master #1780 steel.  A color I am going to miss with Testors removing Model Master paints from the market.


Food Producers with colored hydrocal finish applied.


Time to get back to the Anchor Glass Plant details.  A nice prototype feature was that many of the details were on individual concrete slabs sitting on a concrete slab the length of the building allowing me to build the side details as modules.


Shakopee Anchor Glass Plant with various details
on individual bases. 


First, a unloading grate for unloading sand in hoppers was installed in the track and the canopy was built from some trusses from the parts box, Evergreen #274 I-Beam and sheet styrene, and kit sprues for posts and base posts are attached to.  The furnace stacks were made using marker portion for the bottom and the lower barrel from a ball point pen turned upside down for the exhaust stack with an Evergreen styrene tube connecting the two pieces. Next, the air exhaust blower module next to it was built with styrene tubes and the blade hub from an helicopter model for the blower.


Unloading canopy and furnace stack started.


Basic furnace stacks and exhaust pipes with blower and
AHM door and concrete dock added under canopy.


I installed the small windows in the tower next.  The small windows came from my left over windows and doors parts box.  Following window install, I built the gable roof portion behind the furnace stacks of the glass plant to add character to the model.  I added the maintenance platforms to the furnace stacks.  The remaining details on scratch built styrene stands were made from parts in the Walthers Cornerstone Roof Details kit, Walthers Styrene Steps & Ladders kit, #1602 and below on concrete slab AHM detail parts.  Finally I added the section of the Randolph Anchor Glass Plant to the left of this building.


Small windows installed on tower of  Anchor Glass Plant.


All details including platform railings, ladders and unit next to dock
door under canopy for the side of Anchor Glass Plant completed.


Randolph Anchor Glass Plant windows
 and  additional section added.

The Anchor Glass Plant still has details that I want to add such as the leg on the roof, weathering and the maybe the unit on the gable roof section if there before 1955.  I will add these when I need another break from building freight cars.  And, I need to add the photo backdrop behind the plant and other structures.  That, will happen when I will go back next spring to photograph and use the photos to create.

The last structure for Randolph will be General Tire And Rubber I will cover in Part II.  And, I will also cover adding  a backdrop for the new Randolph expansion in Part II.


General Tire And Rubber building  will replace the
last cardboard rectangle on the siding beyond
Food Producers.  


Thank You for taking time to read my blog.  You can share a comment in the section below if you choose to do so.  Please sign your comment with your name if you choose to leave one.  Please share the blog link with other model railroaders.
Lester Breuer


Wednesday, July 29, 2020

M&N Expansion - Randolph Benchwork And Trackwork

Time to take a break from building freight cars to work on an expansion to the Minneapolis & Northland Railroad Company (M&N).  The expansion began with the changes to Tunnel City, Phase One and Two,  I described in a prior published blog.  The major change in the first expansion was adding a  mainline to be able to reach  the new town of Randolph.  The benchwork for Randolph was  Phase Three and the track work with minimal scenery Phase four.

At the end of Phase Two I showed a plan for the future Randolph expansion.  The expansion to Randolph was to have benchwork six feet long, fourteen inches wide, with a possible future flip-up section one foot long.  I continued to review the plan to see if there might be a better way to layout the location of the new industries and Chicago Great Western interchange.  I finally decided it was better to swap the location of the Chicago Great Western interchange and team track.


Original and modified track plan.
(Click on this or any image to enlarge)

With a plan for Randolph ready, I purchased the lumber, number two pine and one side finished 5/8” plywood, for the benchwork at my local lumber yard.  The homasote for the expansion was obtained from a friend, Jeff Rundgren.  The new benchwork, six feet long and fourteen inches wide, is old school L-Girder construction.  I like the L-Girder construction as it is stable, has excellent noise level and the short L-Girders can easily be moved at any time during or after construction is complete.  The reason being the short L-Girders are secured in place with only two coarse thread drywall screws from the lower long L-Girder and are only holding the plywood and homasote town base with two coarse threaded drywall screws that can easily be removed.  The homasote was attached to the plywood base with nails driven at various angles to prevent future movement of the homasote.  A storage shelf added to the benchwork also provides benchwork stability.


L-Girder benchwork with shelf being added.


The new Randolph benchwork was built to be movable on removable furniture moving sliders to allow moving the benchwork to another storage location after an operating session.  Therefore, construction of the Randolph benchwork, completed in another area of the railroad area, was moved to its location during an operating session using the removable furniture sliders purchased at a home improvement store.  The benchwork once in position is secured to the existing railroad with clamps placed on the legs.


Randolph benchwork moved to location for operating session.
Note the furniture sliders next to base of legs.


Now the track work could begin.  I began placing a mix Shinohara code 100 and Walthers code 83 nickel sliver track on the benchwork according to the plan.  I marked track centers to draw layout lines to locate cork roadbed and track location directly on the homasote.


Layout of the track begins.


The layout of the track work and the industries, currently cardboard rectangles, progressed rapidly. 


Track layout progress quickly.


With layout lines drawn, I proceeded to put down the cork roadbed with small finishing nails.  The HO scale cork roadbed was placed under mainline (track one from edge) and track two under the CGW interchange and Wildung team track ( truck near it) on the other end.  If I had N scale cork roadbed on hand I would have used it under track two to make the transition to industry tracks located directly on the homasote easier.  The transition to the industry track was done with cork cut from sheet cork and cardboard.  Ties on turnouts had to be cut and track slightly bent to make a smooth transition. 


Cork roadbed is installed.


Transition from cork roadbed to homasote.


Following the install of cork roadbed, the track was spiked in place on the cork roadbed or homasote.  I use spikes, installed in every sixth tie, to attach commercial track.  Yes, spiking the track does add time to putting the track down; however, in my opinion well worth the time, to provide excellent operation for years to come.  I do not use glue as track nails allow easy pull up and reuse of track for relocation if necessary.  Holes in the ties for track spikes are drilled in every sixth tie using a drill bit mounted in #8050 Dremel tool.  I find it amazing how many track gauges and tools one can use to install cork roadbed and track.


The number of tools used can be amazing.


After track was put down any missing ties were installed.  Next the rail sides were hand painted with Floquil Rail Brown, R7, paint.  Once track painting was done and dry Caboose Industries ground throws provided by Gary Wildung were installed.  Finally, the gaps are cut in the track with a cutting disk mounted in a Dremel tool.  Later the gaps are filled with styrene filler and 5 minute epoxy. After epoxy is set styrene filler is filed to track profile.


Track work is ready for wiring and ballast.  Note the back industry
track was curved to allow more space at Wildung Team Track.


With the track work done I began the wiring.  The wiring provides the least fun for me when adding new trackage to the railroad.  Before I start to add wires,  I attach shower curtain rings to the long L-Girder with Romex plastic wire staples to hold the bus wire, any other wires for lighting, etc. and Digitrax Loconet cables.  I use shower curtain rings to hold the wires as they can be opened and closed to add additional wires at any time.  The bus wire was run, holes drilled for track feeders and track feeder wires were added.  Track feeders are soldered to the track and bus wire.  Yes, soldering is slower than wire connectors; however, for me reliable on other track work on the railroad since 1974.


Track wiring is held in shower curtain rings.
Note clamps on legs holding Randolph in place
 for work sessions and operating sessions.


Once wiring is installed the testing of the wiring and track is done with my “Cleaner” train.  The “Cleaner” consists of locomotive, box car and caboose have track cleaning sliders made of Masonite mounted on them that will catch on any track work gaps or turnout frogs that are not smooth.  If the gap or turnout gap is not smooth, a file is used to make it smooth.  Of course, if wiring is not correct the train stops running and wiring has to be corrected.  Well, it could be a power routing turnout not thrown correctly.


"Cleaner" train is run to check track is smooth running.
Cleaning pads should not catch on electrical gaps or frogs.


Once wiring and track is tested the homasote is painted with a tan latex paint to seal the homasote to prepare it for scenery.  Next the benchwork is painted with a latex black to seal the wood.  Finally a five inch fascia is added that may or may not be painted.


Homasote painted with a tan latex.


Painting of benchwork has begun.


Fascia installed and benchwork painting finished.


I consider track ballasting an element of scenery.  The mainline ballast I use is a mix of new and used foundry sand obtained for me by a friend who works at a Minneapolis foundry. The new foundry sand color is white and used foundry sand color is black.  Siding tracks are ballasted with the black foundry sand to represent cinder ballast.  I use wet water, a mix of 25% white glue, 75% water, and a few drops of dish soap added, to secure the ballast.  I like this method of attaching the ballast because it is very easy to remove via wetting if removal is necessary.


Randolph track laid, ballasted and some ground cover added.


During the ballasting process I also have a cooking spice shaker filled with Woodland Scenics blended turf to cover grass areas between tracks.  The grass may be the final scenery or the base for static grass to be added later.


Ballast in coffee cans, wet water in Elmers glue container
and ground foam shaker are on shelf below benchwork.


Now the fun provided by running trains on the Randolph trackage can be had in future operating sessions.  Yet there is more work to be done and that of course is the addition of other scenery including ground cover, backdrop and structures.  The addition of structures, the home of future customers as Food Producers and Randolph Anchor Glass Plant to be served by the Minneapolis & Northland Railroad Company, The Lakeland Route, “Serving Today, Shaping tomorrow.”   I will cover the addition of the remaining items in Phase Five blog.


Randolph benchwork, track and basic scenery finished.


I want to say, “Thank You.” to Jeff Rundgren and Gary Wildung for their help with the Randolph expansion. 


Thank You for taking time to read my blog.  You can share a comment in the section below if you choose to do so.  Please sign your comment with your name if you choose to leave one.  Please share the blog link with other model railroaders.
Lester Breuer


Wednesday, July 1, 2020

Union Refrigerator Transit Lines 50293 leased to Soo Line

With the Minneapolis & Northland Railroad Company needing another refrigerator car to serve customers, I added a refrigerator car to the fleet.  In the to build cabinet no resin reefer kits, only two Branchline Trains and several Accurail kits available.  Of the two Branchline Trains kits I picked Union Refrigerator Transit Lines (URTX) 50293, kit #1224, purchased at the Carr’s Hobby (now out business) shop in 2003.  I purchased the car because it had the Soo Line  herald showing the UTLX refrigerator car was leased to the Soo Line.

The prototype 40-foot, 2 inch refrigerator built in 1924 by American Car & Foundry had wood side and ends.  The URTX 50293 was assigned to series 40950 to 50699 with Association Of American Railroads Class designating letters “RS”.  The cars were painted yellow orange with red ends and roof.  A black and white photo from Bob’s Photo of car URTX 50057 showing this 1940 lettering paint scheme can be found in Soo Line Freight and Equipment and Cabooses by Kenneth J. Soroos (Soo Line Historical and Technical Society, 2014).


Bob's Photo, Ken Sooros Collection.
(click or tap on this or any image to enlarge)


The build of 50293  was the same as for 95503.  If you are interested in the build of this car please go to the build of Union Refrigerator Transit Lines 95503 on my blog.  The painting of the UTLX 50293 was almost the same as 95503 and easier than 95503 as no herald to correct.  The underbody and trucks were painted Vallejo Model Color Black Grey 70.862.  The ends and roof added parts I painted Vallejo Model Color Burnt Red 70.814.  On the sides I used a mix of 1/3 Model Color Light Orange 70.911 and 2/3 Model Color Flat Yellow 70.957.  After paint was dry the car body was sprayed with Vallejo Matt Varnish 70.520 , to protect cars during handling and to provide a weathering base. 


URTX 50293 painted and ready for service.


URTX 50293 painted.


URTX 50293 painted underbody.


Once the clear coat was dry the car was weathered with Pan Pastels and Artmatic eye shadow makeup.  Pan Pastels used to weather URTX 50293 were as follows: Payne’s Grey Extra Dark 840.1  on roof, underbody and very lightly on car body, Red Oxide Extra Dark 380.1, on ends and over lettering on ends to tone it down and Burnt Sienna Shade 740.3  on couplers and trucks.  Artmatic eye shadow makeup was also used lightly on the side and ends.  Weathering applied with makeup brushes, sponge applicators, micro brushes and Q-tips for blending and final finishing.


URTX 50293 weathered.


URTX weathered.


After weathering with Pan Pastels and a car card made, URTX 50293 was ready for service on the Minneapolis & Northland Railroad Company, the Lakeland Route,  “Serving today, Shaping tomorrow.”


UTLX 50293 and UTLX 95503 sitting on Dawkins Siding.


UTLX 50293 delivered to Little Chicago
Minneapolis & Northland Railroad Company Team Track.


A  “Thank You” to Ken Sooros for photo to help with build of this car and for permission to use in this blog post.


Thank You for taking time to read my blog.  You can share a comment in the section below if you choose to do so.  Please sign your comment with your name if you choose to leave one.  Please share the blog link with other model railroaders.
Lester Breuer