At a local flea market in January of this year I purchased three Detail Associates plastic kits, #201, that were released in the late 1980’s. The Detail Associates history data sheet tells the modeler the kits are for a general service composite (wood & steel) side gondola that represents the version built for the Southern Pacific and Union Pacific Railroads. The data sheet also tells us cars of similar design were also found on the Illinois Central , Great Northern, Milwaukee, Northern Pacific, Denver & Rio Grande Western Pacific, Spokane Portland & Seattle and Western Pacific. From these choices I chose to build a Union Pacific (UP) general service gondola I numbered 64190 (a number found in the Champ Decal set). This GS gondola number was in Union Pacific GS gondola series 64000 to 64999, UP class G-50-11. A composite gondola built in 1943 that the UP replaced the wood sides with steel in 1951. And, an Illinois Central (IC) composite gondola I numbered 83886 was in Illinois Central GS gondola series 82720 to 83992.
 |
| Detail Associates kit box and contents. (Click or tap on this or any image to enlarge) |
The prototype General Service composite gondola classification for these cars was “GS”. The “G” stands for Gondola and the “S” indicates a Drop Bottom type. The GS class car has an open top, fixed sides and ends with drop bottom doors hinged at center sill to dump outside of rails. Often built with an inside length of 41 feet; however, 41 feet 6 inches was also common. The fixed ends on these cars were steel dreadnaught type. The sides had a truss steel sideframe consisting of vertical and diagonal steel ribs with wood boards. Some railroads as the UP replaced the wood with steel in later years. Car sides interior height varied from 4 feet 3 inches to 5 feet 4 inches. Enterprise fittings as the door hardware and operating levers were used. And, the GS type gondola featured eight drop bottom doors that operated in two groups of four with and operating lever at each end of the car.
Excellent articles available for reference for this type gondola can be found in Model Railroading, September and October 1987, and in Mainline Modeler, February 1964. Both articles include photos of this type gondola. The Mainline Modeler article contains an excellent B end photo and car diagram.
 |
| Union Pacific GS Gondola Model Railroading, September 1987 Dr. Frank Peacock photo. |
 |
| Illinois Central GS Gondola Tim O'Conner Collection |
 |
| Mainline Modeler, February 1964 Drawn by Armitage |
Onto the build that began following instructions with Dreadnaught ends glued to the frame followed by the steel truss sideframes using MEK. MEK was the adhesive used to glue all plastic to plastic parts to build the subject gondolas. If you choose to use MEK, you should have the work area well ventilated. The kit contains two sets of ends of which the dreadnaught ends are used for both the IC and UP gondola build.
 |
| Ends and steel truss sideframes glued to frame. |
Once the glue had set you glue the plastic wood sides, .030 thick, in the kit, into the steel truss sideframe portion of the sides for the IC composite gondola.
 |
| Wood sides installed in steel truss sideframe. |
For the UP all steel gondola the wood sides in the kit are used as a master that is laid on Evergreen sheet styrene .010” thick, traced, and styrene cut to obtain two steel sides. The styrene sides provided the master to cut two matching sides from .020 sheet lead. The styrene side was laminated to the sheet lead side with Formula 560 canopy glue. When the glue had set the laminated .030 sides were glued into the steel truss sideframe.
 |
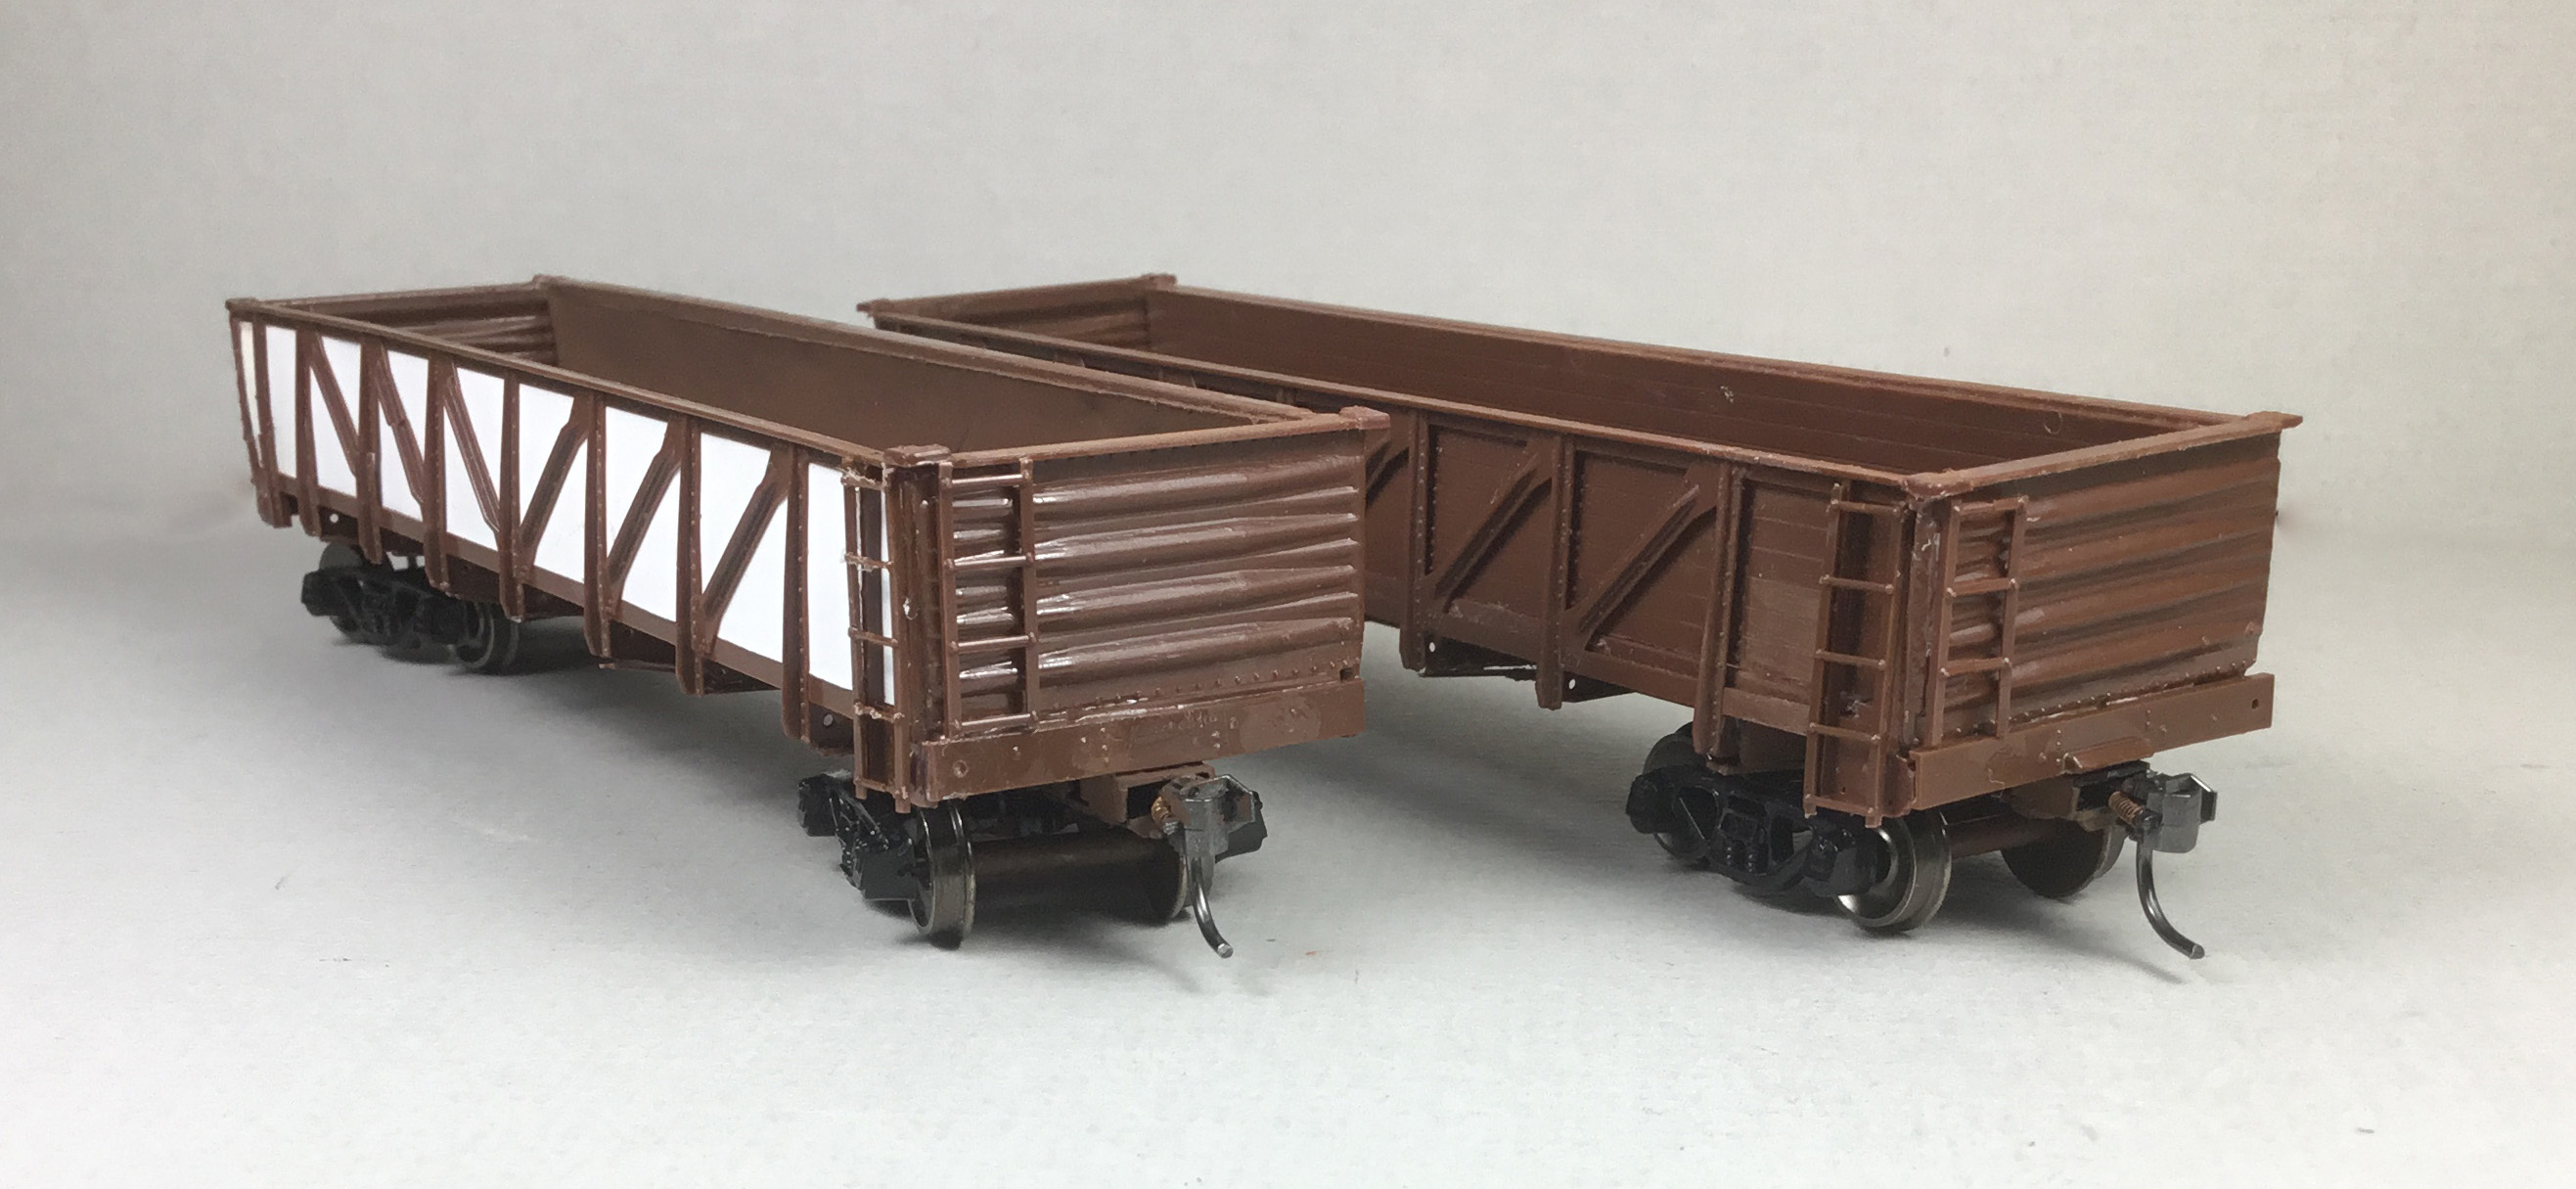
| Steel sides installed in steel truss sideframe. |
 |
| Steel side interior of steel gondola. |
With the assembly of the car body done, work on the under body work was started.
 |
| Assembled car bodies. |
On the under body I chose not to follow instructions. Not wanting the dreadnaught drop doors to open, I glued them in the closed position in the frame opening. The kit does include both dreadnaught and steel plate drop type doors of which the former is used for both IC and Up GS gondolas.
 |
| Dreadnaught Drop Doors Installed. |
Installing the doors in this manner and at this point in the build required a modification to the two piece center sill to be installed next. On the center sill, starting from the end, the tabs that would be above the doors were the tabs removed with a fine teeth per inch (tpi) saw blade installed in a Dremel tool.
 |
| Center sill parts. Top before, Bottom after tabs over wheels removed. |
 |
| Saw blade used to remove sill tabs. |
Once the two sill parts were modified they were installed. Next following kit instructions, the cross members were installed. After install, not liking the kit coupler box portion, the coupler pockets were cut off and Kadee #5 coupler boxes were installed.
 |
| Cross members and Kadee coupler box installed. |
To add weight to the car sheet lead .020 thick was used to cut strips to fill center sill to add some weight to the gondola. Both cars with the center sill filled with sheet lead and the UP with additional sheet lead sides weighted only 1.6 and 1.8 ounces. If you model a later period you could add additional weight by adding a sheet lead floor to represent a fixed floor installed over the drop door floor as many railroads did to end maintenance on the drop doors. After sheet lead in the center sill was installed the install of the cross member cover plates began.
 |
| Center sill with sheet lead and cross member plate cover being installed. |
At this point the added items were hand painted Vallejo Model Color Flat Brown #70.984. The Flat Brown is one of the new Vallejo Colors.
 |
| Added underbody parts hand painted. |
To give the underbody paint adequate time to dry, I installed the kit ladders on the sides and on the “B” end.
 |
| Kit ladders installed. |
After ladders were installed on the “B” end I continued adding the “B” end details as follows:
- Brake step (platform) cut from Kadee running board laterals.
- Brake step brackets bent, Tichy Train Group (Tichy) .008 diameter PBW #1100.
- Brake wheel housing (kit).
- Brake wheel housing chain, InterMountain plastic
- Brake rod, Tichy #1102 .015 diameter brass wire (kit)
- Brake rod clevis to attach to bell crank, Tichy turnbuckle #8021
- Bell crank, Tichy #8021
- Retainer valve (kit)
- Retainer line Tichy .008 diameter phosphor bronze wire (PBW).
- Retainer line bracket bent using .008 diameter PBW.
 |
| B end parts install in progress. |
Next, a Kadee Ajax brake wheel, #2020 was installed. Grab irons install, bent using .010 diameter bass wire (manufacturer unknown) followed. After the grab irons were installed I decided the molded on ladder rungs had to replaced. Therefore, molded on ladder rungs on ends cut off with a micro scalpel and replaced with wire ladder rungs bent from Tichy #1101, .010 PBW. And, when end ladders rungs install was finished it was back to the sides to replace the molded on ladder rungs with wire ones bent from Tichy #1101, .010 PBW.
 |
| Grab irons installed as new wire ladder rungs. |
 |
| Grab irons on sides replaced with wire ones. |
 |
| Grab irons on replaced with wire ones. |
With the car body work done except for uncoupling levers and door end ratchet mechanism, it was back to the underbody where the train line bent using Tichy #1114, .020 PBW was installed.
 |
| Train line installed. |
Staying on the underbody, the AB brake components and mounting brackets provided in the kit were installed. The kit mounting brackets are used as the brackets are specifically molded to mount to the center sill due to the drop doors. Next the kit provided brake levers were installed. The brake lever hangers are plastic grab irons from the parts box.
 |
| AB brake components installed. |
Since I believed it best to let the brake components glue to fully cure for a day or two due to install on the sill, I began the install of the most time consuming step (several afternoons) in the build of these two gondolas. The install of the Enterprise Drop Chain rod and drop chains. The drop chain rod provided in the kit is a .028 brass wire provided in the kit that is inserted from the end on each side of the gondola through the end and the bolster holes. As the rod is inserted two drop chains provided in the kit are added for each door. The drop chains of which there are 32 on each car as molded would not slide onto the drop chain rod. I found the hole in each had to be enlarged with #67 .032 drill. I first attempted enlarging the hole with a #69 .0292 drill; however, for whatever reason the hole was still too small.
 |
| Enterprise Drop Chain Rod and drop chains installed. |
With the drop chain rod and drop chains installed the door end ratchet mechanisms provided in the kit were installed on the car ends covering the holes to insert the drop chain road.
 |
| Door end ratchet mechanisms installed. |
Back to the underbody to finish the install of dirt collector, brake piping, brake rods and uncoupling lever brackets done as follows:
- Dirt collector, kit
- Dirt collector pipe, Tichy #1106, .0125 diameter PBW
- Piping AB valve to air reservoir, Tichy #1101, .010 diameter PBW.
- Brake cylinder pipe to AB valve, Tichy #1106, .0125 diameter PBW.
- Brake rods, Tichy #1106, .0125 diameter PBW
- Brake rod clevises, made with MEK Goop
- Brake rod chain, A-Line #29219 black 40 links per inch
- Uncoupling lever bracket, scrap styrene from bits box and kit eye bolt
 |
| Dirt Collector, brake piping and rods installed. |
Now the uncoupling levers were installed in the previously made brackets. The uncoupling levers were bent from Tichy #1026, .0125 diameter PBW and installed. Uncoupling levers are provided in the kit; however, they were too short for mounting the way I choose to mount uncoupling levers.
 |
| Uncoupling levers installed. |
The builds of Illinois Central and Union Pacific GS gondolas were finished enabling move to the paint shop.
 |
| Built gondolas ready for paint shop. |
In the paint shop the car bodies were cleaned with makeup cotton swabs dipped in 91% isopropyl alcohol, mounted on a paint stand for painting with trucks removed and couplers taped with blue painters tape. Both underbodies and car bodies were airbrushed Vallejo Model Color Flat Brown #70.984.
 |
| Car bodies airbrushed Flat Brown. |
 |
| Gondola underbody airbrushed. |
While the car bodies were drying the trucks were hand painted Vallejo Model Color Flat Brown #70.984.
When paint on the gondola car bodies was dry the car bodies were airbrushed with Vallejo Gloss Medium 70.470 to provide a gloss base for decals. After drying overnight, decals were applied. For the UP GS gondola, Champ Decal set HG-118 Union Pacific Gondola was used to letter and number 64190. Due to the age of the Champ decal set is was first coated with Microscale Liquid Decal Film. For the IC GS gondola, K-4 Decal set for a 40 foot steel box car, K4-IC-40-87A, was used to letter and number 83886. I used above photos for decal location with the exception of the reporting marks and number on the IC GS gondola. If you are lettering a built IC GS gondola you may choose to move the reporting marks and number one panel to the right.
Decals were soaked off in distilled water and applied to the car body where MicroScale Micro Set had been applied with a brush. After the decal was applied in the Micro Set and positioned the edges had MicroScale Micro Sol applied. Any excess solution was sucked away with the torn edge of a paper towel.
 |
| Decals applied to gondolas. |
 |
| UP GS Gondola 64190. |
 |
| IC GS Gondola 83886. |
Again when dry, car body sprayed with Vallejo Gloss Varnish 70.510 to better hide edges of decals and protect decals during handling. Again when dry, the car body was sprayed with Mig Ammo Ultra-Matt Lucky Varnish, AMIG 2054, to protect decals and provide a flat finish for weathering when applied.
 |
| UP 64190 and IC 83886 ready for weathering. |
One more step before putting UP 64190 and IC 83886 in service was to weather the GS gondolas with Artmatic eye shadow makeup and Pan Pastels. An Artmatic eye shadow color Light Brown was applied over entire car body with a makeup brush. Pan Pastels Paynes Grey Extra Dark 840.1 was used on car body as well as the underbody followed by Orange Extra Dark for rust.
 |
| Gondolas weathered. |
 |
| Gondolas weathered. |
 |
| Gondolas weathered showing rust. |
Union Pacific 64190 and Illinois Central 83886 GS gondolas were ready for service on the Minneapolis & Northland Railroad Company, The Lakeland Route, “Serving today, Shaping tomorrow.” A car card was made for each, to put the GS Gondolas in service on the Minneapolis & Northland Railroad Company Railroad.
 |
| IC gondola with sand load being setout at McGregor Yard sand house in Northfield, Minn. |
 |
| IC gondola with sand load being setout at McGregor Yard sand house in Northfield, Minn. |
 |
| UP 64190 with scrap load setout at Leone Foundry in Eureka Center, Minn. |
 | |
|
 |
| UP 64190 with scrap load setout at Leone Foundry in Eureka Center, Minn. |
I want to say, “Thank You” to Tim O’Connor for providing photo help for location of lettering on the Illinois Central GS gondola.
Thank You for taking time to read my blog. You can share a comment in the section below if you choose to do so. Please sign your comment with your name if you choose to leave one. All comments are reviewed and approved before they appear. Please share the blog link with other model railroaders.
Lester Breuer
.