For this build I removed an InterMountain Railway Company (IM), kit 42999, an Atchison, Topeka And Santa Fe (ATSF) (Santa Fe) stock car from my to build inventory. I chose this kit as I really enjoyed building Santa Fe Reefer 32153 written up in my July post. The build and upgrade of Santa Fe Stock Car, Santa Fe class Sk-T, I numbered 60347, proved again to provide hours of enjoyable time at the modeling bench.
The kit came with K brakes which I chose to build with AB brakes as my Minneapolis & Northland Railroad Company is set in spring of 1955. In January 1953 when the mandate for replacement of KC brakes became final, stock car 60347 was called in for replacement. An InterMountain kit 42998 was produced with AB brakes which would eliminate some of the work I had to do to build a class Sk-T stock car. Either of the IM kits can be built as a single deck or double deck car. I chose to build a single deck car.
The prototype 500 stock cars were built by the Pennsylvania Car Company in 1929. These stock cars, class Sk-T, assigned to series 60002 - 60501, were one of five classes built as stock cars. The Sunshine Models Prototype Data Sheet #56A (PDS) provides the following design criteria for these cars: steel “Z” braced side truss, wood side slats, solid reinforced ends, metal clad roof, and straight center sill. Running boards were wood. Ajax power hand brakes. Bottom mounted uncoupling levers (cut) were used. Inspection doors, for checking the condition of animals, at the top on both ends and two “toe holes” were used for reaching the doors. The cars were painted Mineral Brown. The cars rode on ARA style cast side frame trucks.
 |
| ATSF 60463 (Click on this or any image to enlarge) |
 |
| ATSF 60463 Sunshine Models Prototype Date Sheet #56A After Richard's passing his photo collection went to the California State Railroad Museum. |
For my build of 60347 I used prototype photos of cars in Santa Fe class Sk-T found in Sunshine Models Prototype Data Sheet #56A (PDS). The PDS contains excellent side and “B” end views of stock car 60463. Another resource I used was “Livestock Operation on Model Railroad with an emphasis on the ATSF” (On-Line Resources, revised February 2, 2013) written by Steve Sandifer. There are photos of stock cars 60033 and 60209, class Sk-T, and a photo and plan of Santa Fe 68745 adjustable double-deck stock car can be found in Stock Car Cyclopedia Vol. 1 (Hundman Publising Incorporated, 2007).
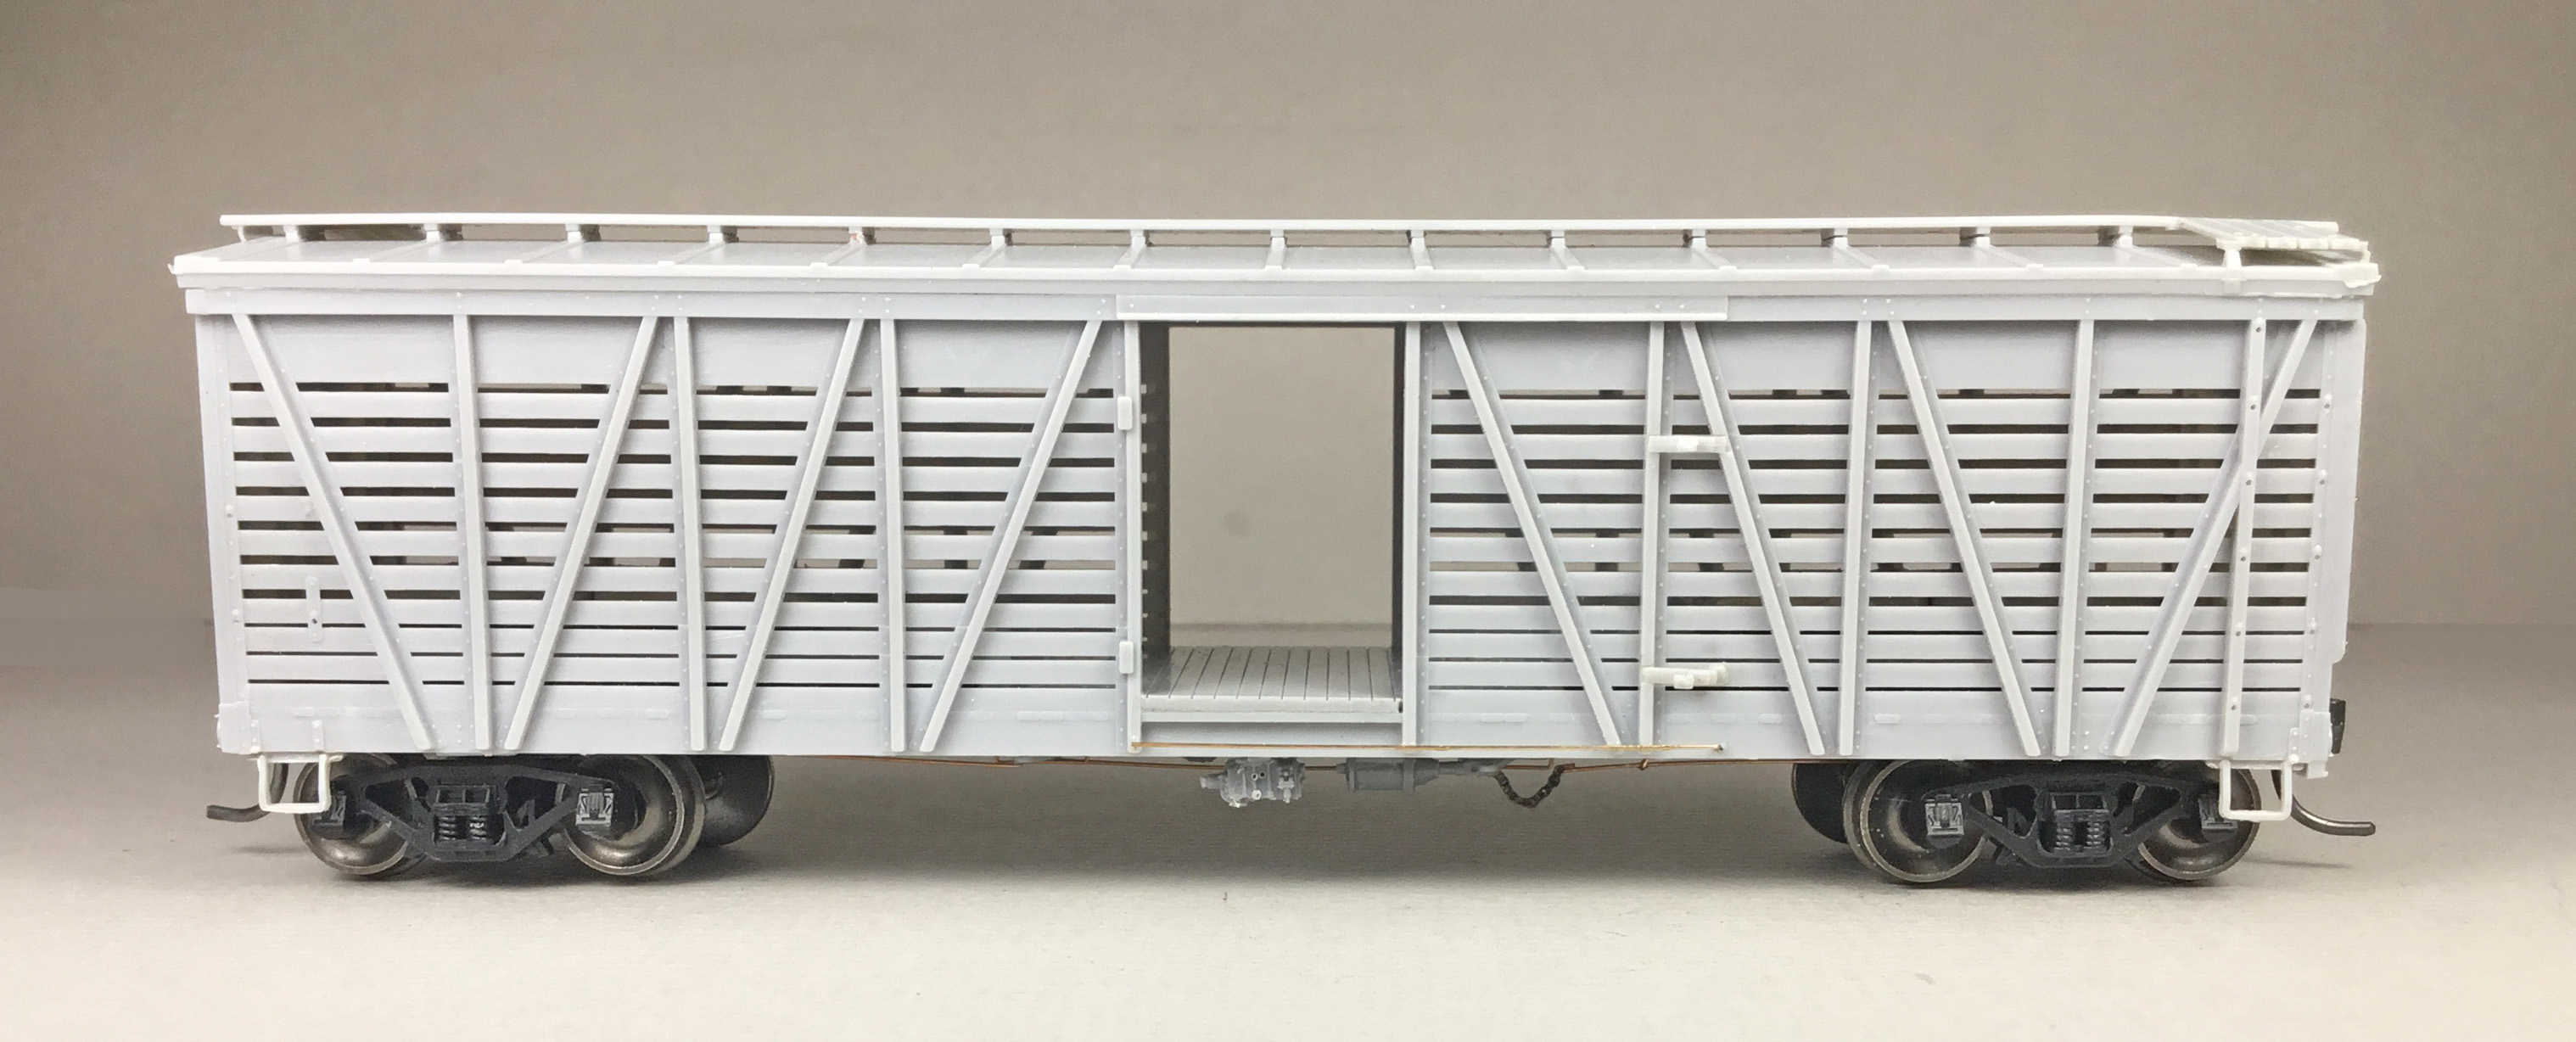
I began the build by gluing the kit sides to the underbody with the ends molded attached to create the basic “box.” The kit floor for a single deck stock car was installed. After I installed the kit running boards to the roof, the roof was installed; however, not glued until later after car weights were added. I cut off the molded on sill steps as alternate kit steps and again metal sill steps would be added later.
 |
| Basic carbody assembled. |
I moved onto the underbody basic work. When looking at the underbody I was impressed to find not only a molded train line but a molded “tee” in the train line for connecting the dirt collector pipe. It is the only kit I have eve built with the molded dirt collector “tee.”
I installed the kit underframe. I drilled and tapped coupler pocket pads and bolster kingpins for 2-56 screws. Kadee coupler #262 boxes with Kadee #148 couplers inserted and kit trucks with InterMountain 33” metal wheel sets were installed with Fastenal 2-56 x 316” screws for coupler pockets and 2-56 x 1/4” screws for trucks. Tichy Train Group (Tichy) brake components from Tichy set #3013 and kit brake levers were installed. Brackets used for mounting the brake components were as follows: cut off plastic sill steps from other cars for the air reservoir, Sunshine Models resin cast bracket from the parts box for the brake cylinder and a Tichy part from AB set #3013 for the AB valve. The install of kit brake brake cylinder and floating brake lever followed. And, the bell crank, Tichy set #3013, for attaching brake rod on “B” end was installed.
 |
| Brake components installed. Note the "tee" in the train line on the AB valve side. |
To weight the car to 3.8 ounces, stick on tire weights were added to the inside of the underbody above the trucks and a bead of Formula 560 canopy glue. The roof was now glued to the car body and kit end brackets installed on the ends with MEK (styrene melted in MEK).
 |
| Roof installed. |
I now began the “B” end work. I first installed a Tichy brake step, set #3013, and brackets from parts box. With the brake step in place I marked the location of the toe holds to access the inspection doors. I drilled two holes side by side of the center line of the toe holes location with a #56 .0465 drill. The remaining material was removed with a scalpel blade, broach and small round file. And, finished with a sanding stick to complete the toe holds. An Ajax brake housing, chain and brake rod clevis, Tichy set #3013, were installed with CA. A brake rod was cut from Detail Associates #2505 .015” diameter brass wire and installed. MEK Goop was used to make the top fastener to attach the brake rod to chain.
 |
| "B" end brake gear and toe holes made. |
I continued to work on the “B” end. I installed a retainer valve, Tichy set #3013, and retainer line, Tichy #1100, .008” diameter PBW per prototype photo. I installed the kit inspection doors with kit inspection door handles installed earlier, ladder rungs and straight and drop type grab irons bent from Tichy #1100 .010” diameter PBW.
 |
| "B" end details including retainer valve and line installed based on photo below. |
 |
| Photo showing one location of the retainer valve. Steve Sandifer Collection |
I went back to the work on the sides. On the sides the kit provided alternate sill steps were installed. Later these were cut off and replaced with A-Line #29000 wire ones bent to shape. A kit provided wire lower door guide was installed.
 |
| Door guide and alternate sill steps installed. |
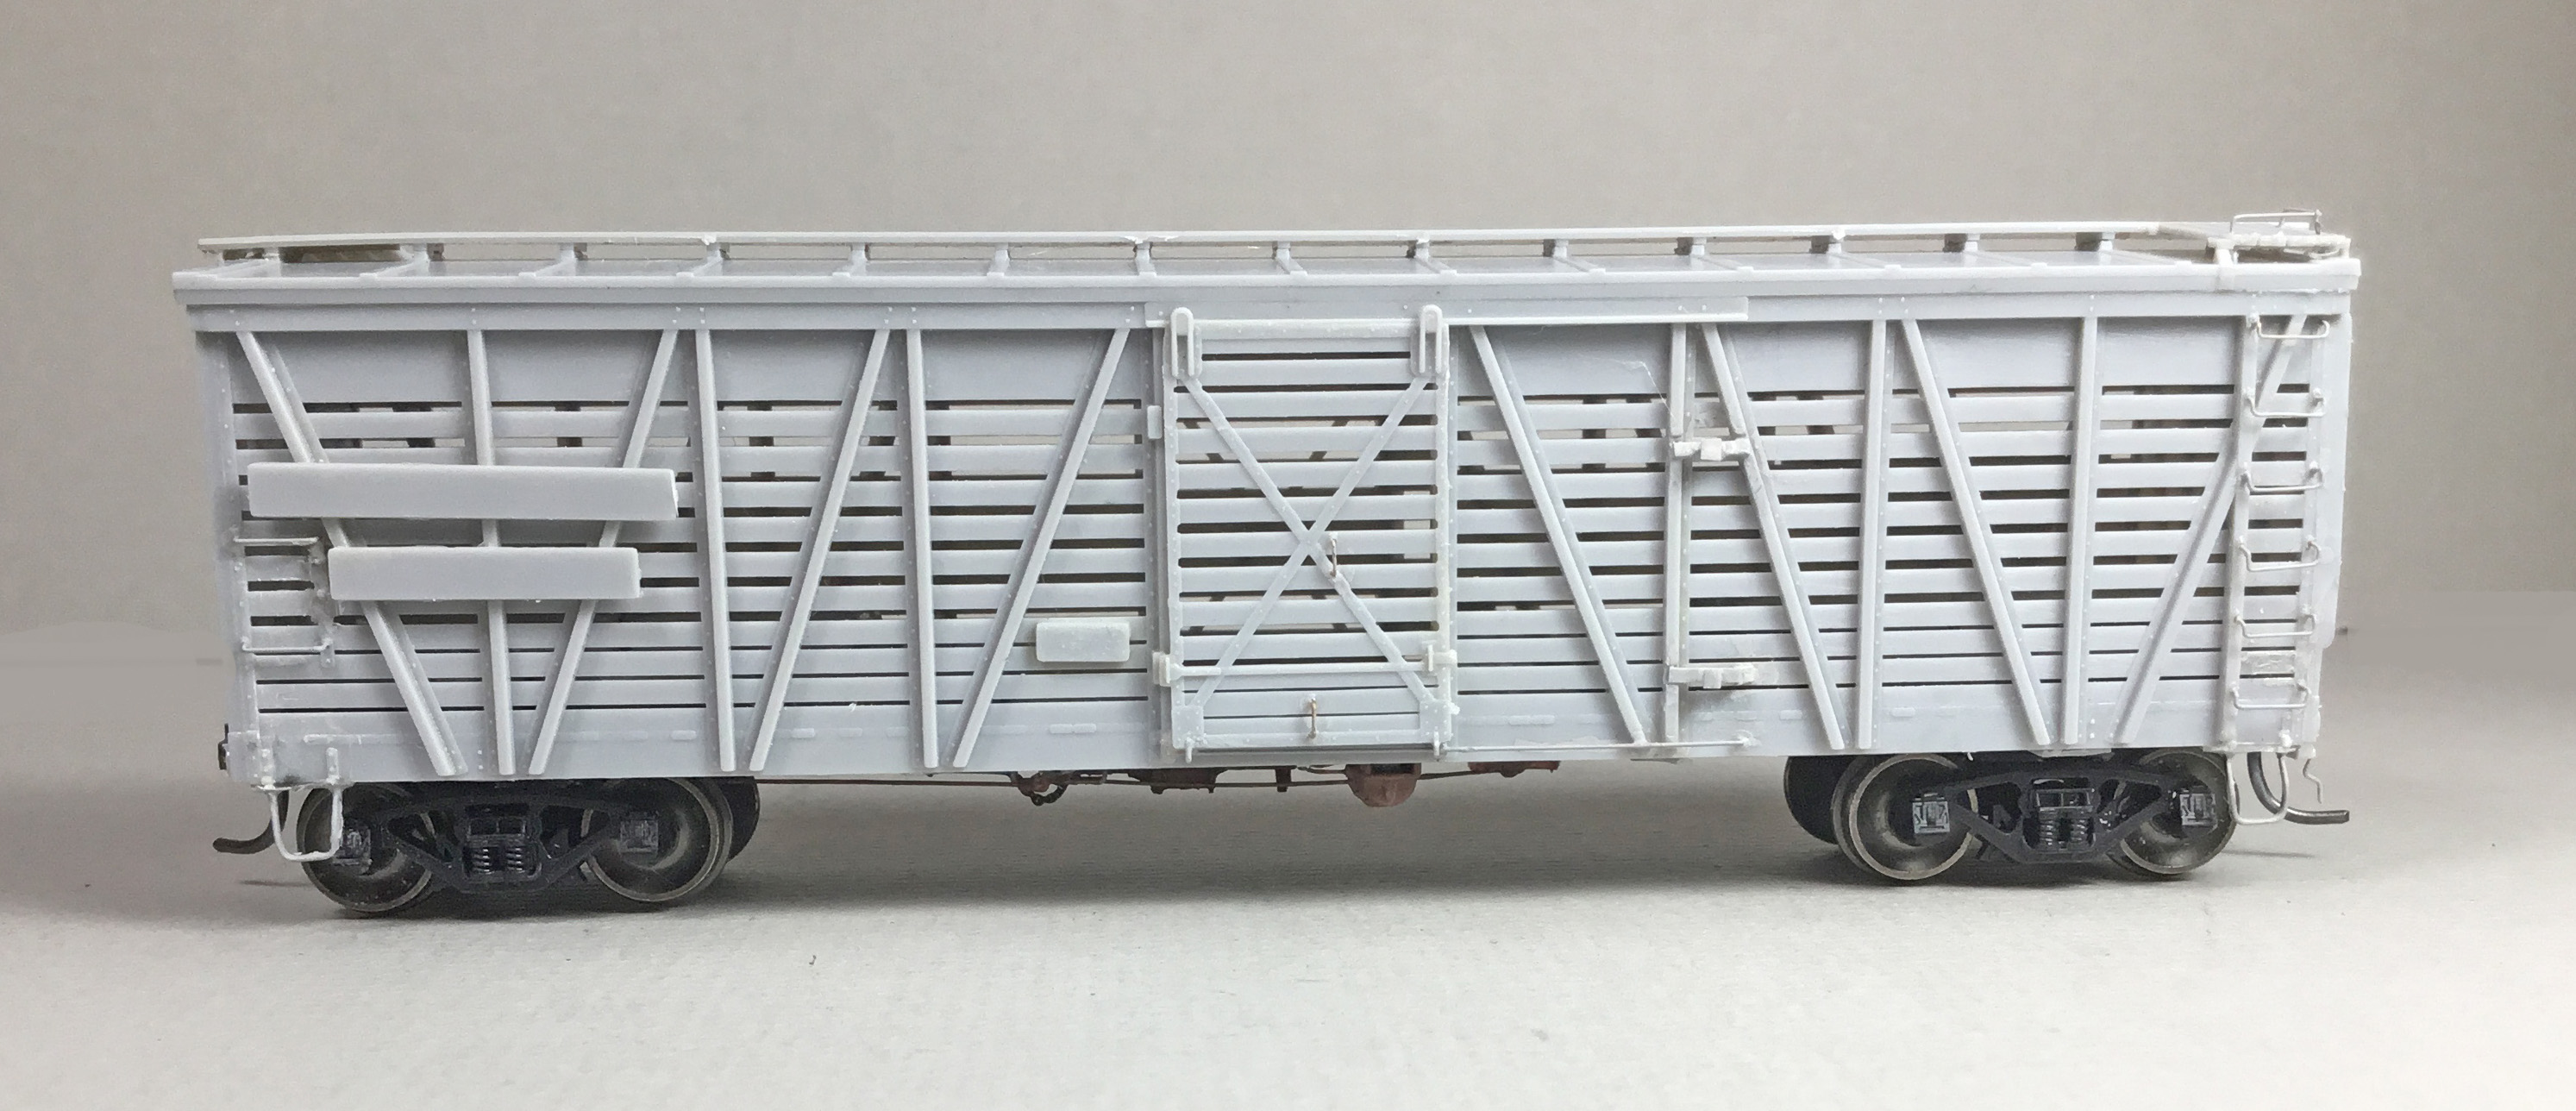
With lower door guide in place, the doors with prior installed kit door handles were installed. Drop type ladder rungs and grab irons bent from Tichy #1101, .010" diameter PBW were installed. On the left side of the car the grab irons on the prototype are mounted on a board attached to the car. Since this detail was not molded on the car, I cut boards for the car from a saved piece of large resin flash and added fasteners made with MEK Goop.
 |
| Door, grab irons and ladder rungs added. |
I moved back to the roof to install the roof grab irons. Roof grab irons were bent from Tichy #1101 .010” diameter PBW and installed with Yarmouth Model Works photo etched eye bolts without shoulder for corner legs.
 |
| Roof Grab irons installed. |
Back to the “B” end to complete work needed there. A Kadee Ajax brake wheel was installed. Uncoupling levers were bent from Tichy #1106 .0125” diameter PBW. The uncoupling levers brackets were molded into the corner plate with poling pocket as on the prototype. The molded on uncoupling lever bracket was another unusual feature of this kit.
 |
| Brake wheel and uncoupling lever installed. |
Back to the sides where I cut off the alternate installed sill steps as they were just too thick. New sill steps, A-Line # 29000 bent to prototype shape and installed.
 |
| Metal sill step installed. |
With the carbody details added, I moved to the underbody to finish adding details needed there. Underbody details were added as follows:
- Universal slack adjuster, parts box
- Brake levers, kit (installed earlier)
- Brake lever hangers, kit
- Brake piping from air reservoir to control valve, Tichy #1101, .010” diameter phosphor bronze wire (PBW)
- Brake pipe from brake cylinder to control valve, Tichy #1106, .0125” dia. PBW
- Brake rods, kit
- Brake rod clevises, made with MEK Goop
- Chain, A-Line #29219, black 40 links per inch
- Dirt collector, Tichy set #3013,
- Dirt collector pipe to train line, Tichy #1106, .0125” diameter PBW
- Bell crank, Tichy set #3013
 |
| Underbody piping, brake rods and slack adjuster installed. |
Once I had the underbody detail parts added I went back to the sides and installed the letter boards. Next, I hand painted all the added detail parts PollyScale Undercoat Light Grey F414134.
 |
| Letter boards installed and car painted grey. |
 |
| Car body painted grey. |
Santa Fe Stock car 60347 was ready for paint. I checked the Model Railroad Hobbiest paint conversion chart for Vallejo color suggested for Santa Fe Mineral Brown. The suggested color was Vallejo Model Air Rust 71.080 when applied to a part on the underbody I thought did not look right. It did not look brown enough, to my eye. Therefore, I created a Vallejo Santa Fe Mineral Brown airbrush mix: Model Air Rust 71.080, 30 drops (57%), Model Color Cavalry 70.982, 3 drops (5%) and custom mixed thinner 20 drops (38%). My custom thinner mix is 50% distilled water, 25 % Vallejo airbrush thinner 71.161 and 25% Vallejo Flow Improver 71.562. I tested the mix by hand brushing the brake components on the underbody.
 |
| Mix tested on brake components. |
Once dry I felt the color had enough brown to use for Santa Fe Mineral Brown. I first airbrushed the underbody. After it was dry I still thought the color was acceptable and I airbrushed the car body.
 |
| Underbody airbrushed Santa Fe Mineral Brown. |
 |
| Car side airbrushed Santa Fe Mineral Brown. |
 |
| Car end airbrushed Santa Fe Mineral Brown. |
Once the paint was dry, the car body was sprayed Model Master Gloss Clear Acryl, #4638, to have a gloss base for decal application. While the gloss finish was drying I reviewed the Speedwitch Media decal set D101 to choose car number 60347. The decal set is now available from National Scale Car with the same decal set number D101. After gloss finish was dry, decals were soaked off in distilled water and applied to the car body where MicroScale Micro Set had been applied with a brush.
After decals were applied in the Micro Set and positioned the edges had MicroScale Micro Sol applied. Any excess solution was sucked away with the torn edge of a paper towel. When dry, car body was sprayed with Model Master Gloss Clear Acryl #4638, to better hide decals edges. Finally, the car body was sprayed with Model Master Flat Clear Acryl, #4636, flat to protect decals and provide a flat finish for weathering when applied.
 |
| Decals applied to car side. |
 |
| Decals applied to ends. |
One more step before putting Santa Fe 60347 in service was to weather the car with Pan Pastels and Artmatic eye shadow. Pan Pastels Paynes Grey Extra Dark 840.1 was used on the roof and lightly over safety appliances on car body with a small 1/4 inch wide makeup brush. Along the sill area and on the underbody of the car an Artmatic eye shadow light dirt brown color was applied with the same small makeup brush.
 |
| Car side weathered. |
 |
| Roof weathered. |
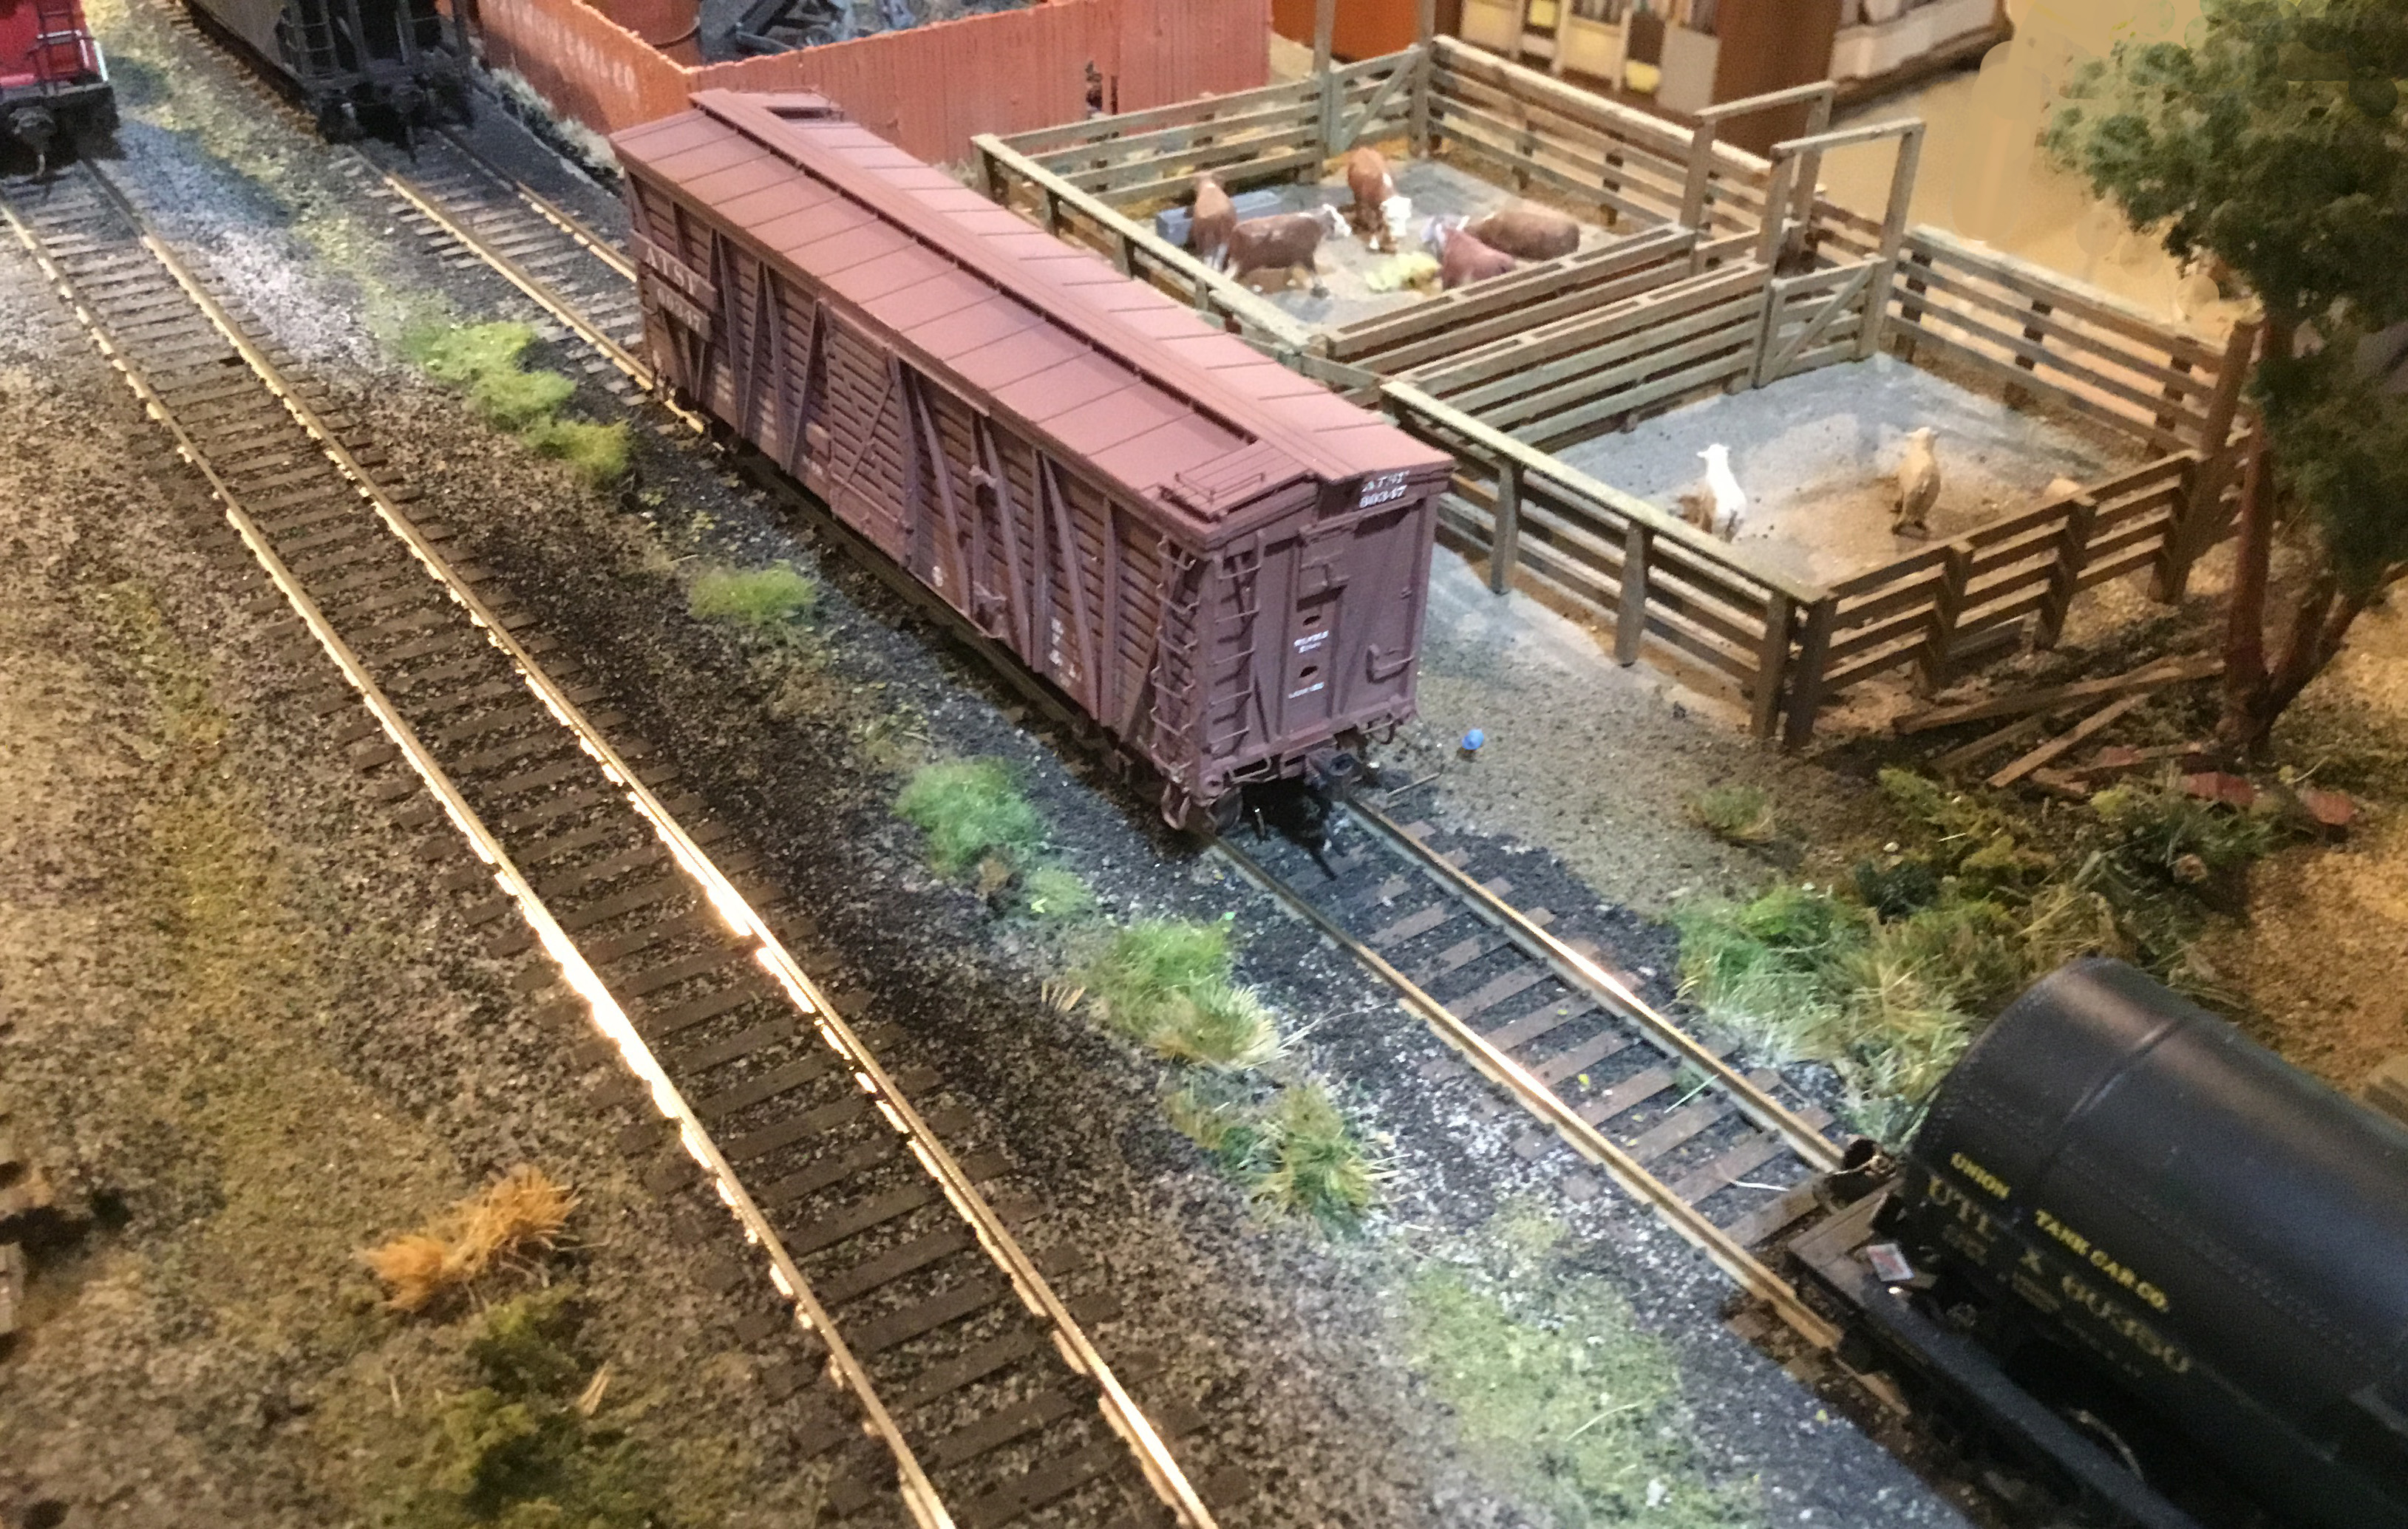
Santa Fe 60347 was ready for service on the Minneapolis & Northland Railroad Company, “Serving today, Shaping tomorrow.” A car card was made for Santa Fe 60347, the final step to put the cars in service on the Minneapolis & Northland Railroad Company Railroad.
 |
| Santa Fe 60347 spotted a Bumsteer Stock Pen in Little Chicago, Minn. |
 |
| Santa Fe 60347 spotted a Bumsteer Stock Pen in Little Chicago, Minn. |
 |
| Santa Fe 60347 spotted a Bumsteer Stock Pen in Little Chicago, Minn. |
 |
| Santa Fe 60347 spotted a Bumsteer Stock Pen in Little Chicago, Minn. |
I want to say, “Thank You” to several individuals that provided information and photo help with this build and upgrade. Definitely appreciated as without their help this build would not have happened.
A “Thank You,” to Steve Sandifer, Peter Aue, Rich Christe, Andy Cich, Jared Harper, Bill Pardie, and George Toman.
Thank You for taking time to read my blog. You can share a comment in the section below if you choose to do so. Please sign your comment with your name if you choose to leave one. Please share the blog link with other model railroaders.
Lester Breuer
.
No comments:
Post a Comment