Monday, November 26, 2018

Dental Tools Or “Picks”

At almost every train show I attend, a tool vendor is there.  Being a tool collector, I have to see if they have a new tool I can obtain to make my modeling easier.  Among my favorite modeling tools I have purchased from the various tool vendors are dental tools or “picks.”   I have also obtained used dental picks from my dentist for a great price - free.   My son Michael, who passed recently, helped me to build a fairly large collection.  To my surprise, when he was in elementary school, he told his dentist his father was a model railroader in need of used modeling tools which resulted in him bringing home an envelope of ten or more each visit for several years.


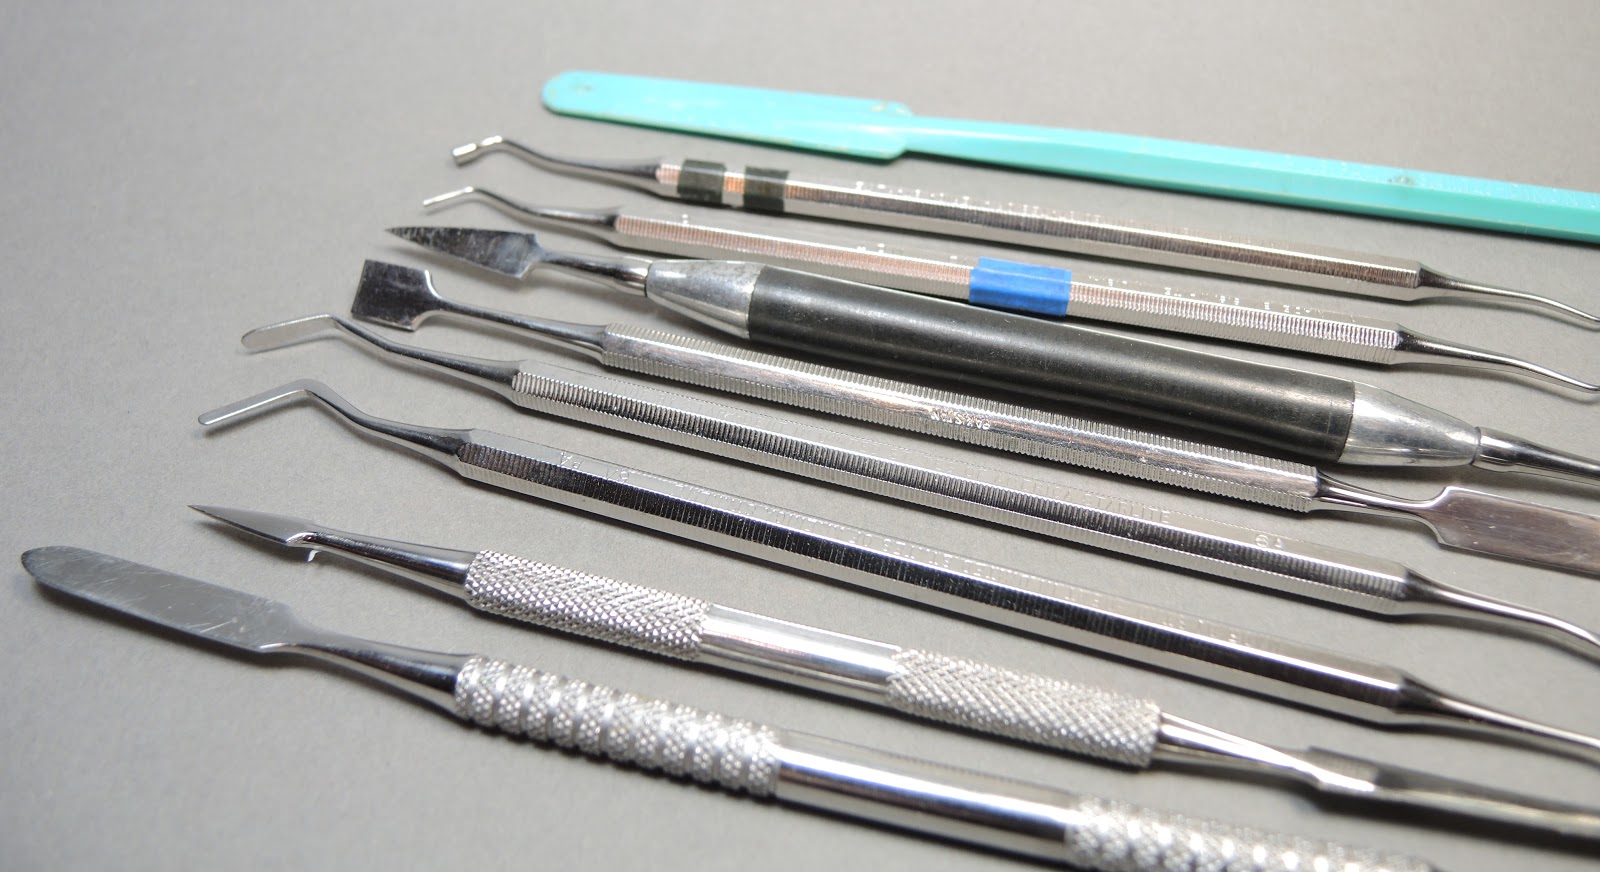
Dental picks collection.
(click or tap on photos to enlarge)

I use dental picks to help build every freight car I work on.  At first glance, the dental picks all look alike; however, that is not the case.  As you look close at various dental picks made from high quality steel, you can see dental picks come in various handle sizes with various ends.  I will share with you several of my favorites.  I do not know the specific name a dentist uses to identify each dental pick type I will share here; therefore, I will identify them with names I use.

The first dental tool I want to share with you is one with a simple straight or slightly curved tapered tip. I use this tool in a model session if I need to open a closed tip on a CA glue bottle or cement tube.  Being made of a high quality steel, it is strong enough to quickly open a closed tip without bending or breaking.  The tip on the pick with the yellow band in the following photo, I attempted to straighten with a pliers.


A strong tip to reopen closed tips on CA bottles.


 Another very useful dental pick type has ends shaped like hooks.  A dental tool with this tip I like to use to help grab wire to assist treading it on a model such as the train line through underframe members on a freight car.  In addition, this dental pick with hook is very handy for pulling out an underbody or floor assembly pressed too far into a freight car body during assembly, especially on plastic freight cars.   The thin hook goes in easy under the underbody or floor to pull it out.


Dental picks with curved tips

I have used the dental pick with hooks to make uncoupling tools .  I combined the dental pick with a hook with a pen barrel and added a screw eye for hanging.  The dental tool with hook works very well to hook trip pins on Kadee and other coupler types to uncouple them during operation sessions.
  

Uncoupling or load removal shop made tools


Screw eye for hanging for easy access.


Another neat use for a dental pick with hook is to remove loads from freight cars like coal loads from hoppers.  I have drilled a tiny hole in the corner on one end of each load through which the hook passes easily to slip under the load to pull the load out of the freight car.


Coal load being removed with dental pick.


When I scratch build a model or upgrade a plastic freight car  I almost always use a scriber.  On a plastic wood sheathed freight car I will use it to scribe grooves between boards back in the area where I have removed molded on detail such as grab irons or ladder rungs.  Here you see ones I made using dental picks.  I ground a 60 degree angle on each side of the tip.  The scriber cuts a fine curl as it should when pulled across material such as styrene plastic.

Note the curl a sharp correctly ground scriber should produce.


Dental picks shown below have different tips I use to apply putty for fillings flaws that need filling.  For example,  on a resin freight car there are times a tiny gap may occur after gluing a car end to side or when roof is glued to the basic freight box of car side and ends.  The dental tools shown here are excellent for the task.

Dental picks with good tips for use with fillers.


Dental picks in this photo have different scraping tips.  I use this type of scraper to clean up areas on cars I have carved off grab irons and ladder rungs and to clean off burrs in an area where I used a scriber.  I use them to clean off glue.  Another time I will use them is to help level putty that was applied to an area.


Dental picks with tips I like for scraping.


Finally, dental picks with another type tip I use for scraping and shaping areas.   I like the smaller tips on these dental picks to get into areas where the above tips do not fit well.  In addition,  I use a dental tool with this type tip to shape putty or MEK Goop, (plastic melted in Methyl Ethyl Ketone) applied to model areas.


Dental picks with smaller tips for scraping and shaping.


I have shared with you some of my favorite dental picks in my dental tool "picks" collection.  And, I have tried to provide a use I have for a particular tool with a particular end.  I hope I have peaked your interest in dental tools to give their use in your modeling a try.


Thank You for taking time to read my blog.  You can share a comment in the section below if you choose to do so.  Please share the blog link with other model railroaders.
Lester Breuer

Sunday, November 4, 2018

NP 64109 52 FT Flat Car

After upgrading several plastic refrigerator cars I pulled Speedwitch Media, resin kit K119, Northern Pacific (NP) 52 ft. flat car from the unbuilt kits cabinet.  The prototype steel, straight sill flat car, with sides only 13 inches high, a wood deck, and large fish belly center sill underframe was built in the Northern Pacific  Brainerd Shops to the standard NP straight sill 1936 design.  The Speedwitch Media decal instruction sheet  history states the NP built at least three series to this design; 60250-60499 built in 1936 in NP Como Shops, MN, 63000-63379 built in 1937 by Bethlehem Steel  and 64000-64195 built in 1949 in NP Brainerd Shops, MN.  The 1948-1949  built cars had wood decks that extended over the side sills with notches at the stake pockets.  After reviewing the numbers available on the decal set for this kit I decided on number 64109, series 64000-64195, built in 1949. An excellent builders photo of NP 60450 is in the kit instructions.  A photo of 63263 is in the NP Color Guide to Freight and Passenger Equipment  by Todd Sullivan (Morning Sun Books, 1995). A photo of NP 64058 built in 1947 is in the collection of Gary Wildung purchased from Jay Williams & Big Four Graphics.

NP 64058  from Gary Wildung collection.

I began the build by cleaning the flash from the center sill section and frame except for the stake pockets.  Next I glued the center sill section to the frame creating a false bottom under the floor to add a weight.  I cut a weight to fit the false bottom area from .040” sheet lead.  In addition, I cut .040” sheet lead strips to fit in the center sill, three fit side by side, and glued them into the open center sill in a vertical position leaving open the areas where brakes levers will pass through center sill.  Placing the strips in a vertical position not only adds additional weight, it also keeps the resin deck added later and car from flexing.  The sheet lead weights brought the weight of the car to 2.8 ounces.

Sheet lead cut weight installed.
(click or tap on all photos to enlarge)


Sheet lead cut strip weight installed in vertical position.

  
Once center sill weights were installed I cleaned the flash from the stake pockets on the frame using broaches.  A broach is a cutting instrument that cuts on the back stroke ( to see photo and other uses click on Broach under Labels).

Flash has been removed from stake pockets.

Next I installed the underframe center sill  flanges to which are attached the flanges for other frame members and the brake component mounting brackets included in the kit resin parts per kit instructions.  I now drilled and tapped the coupler pockets and bolsters for 2-56 screws.  The coupler pocket covers with Kadee #148 whisker couplers installed were installed with Accurail #150 2-56 x 3/16” pan head screws.  The Accurail #164 ARA cast steel with spring plank trucks with InterMountain 33” metal wheels were installed with Athearn #29002 2-56 x 1/4” round head screws.

Under body ready for brake components and other detail.

The excellent kit instructions have you cement the deck to the frame next.  I did not do this as I did not want to attach the deck until the deck was stained and the car had been painted and decals applied.  Keeping them separate I feel makes it easier to finish each and no taping is necessary.  Therefore, my next step was to add the under body detail.  First, Tichy Train Group (Tichy), #3010, brake components with holes drilled for piping were installed on the brackets already installed for each.  The Tichy, # 3013 set, and wire for piping and rodding was not included in the kit.  Piping from the air reservoir to the control valve was done with Tichy, #1101, .010” diameter phosphor bronze wire (PBW).  Pipe from the brake cylinder is Tichy, #1106, .0125” diameter PBW. Brake levers are made from Evergreen #8108 1x8” and #8106 1x6” strip styrene. Brake rodding is Tichy #1106, .0125” diameter PBW, with Tichy #8021 turnbuckles used for clevises to attach brake rods to brake levers. Chain from brake rod to brake cylinder lever is A-Line, #29219, 40 links per inch.

Deck not glued in place at this time.


Under body detail installed.


A closer look at under body detail.


Next I added the “B” end and “A” end detail.   For the “B” end I cleaned the flash from the kit provided brake shaft bracket and brake step and glued them on.  A square brake shaft, a really neat feature of this car, was cut from a piece of square wire gifted to me by Bill Welch at the 2017 Chicagoland RPM and installed followed by a Tichy brake wheel  from set #3013.   Uncoupling levers installed on both ends were custom bent  from Tichy, #1106, .0125” diameter PBW with a bracket eyebolt bent from Detail Associates, #2503, .010” diameter brass wire.  Finally the grab irons custom bent from Tichy, #1101, .010” diameter PBW were installed on both ends.

Note the square brake shaft.


Time to complete the work on the sides. I installed custom bent grab irons using Tichy, #1101, .010”diameter PBW.  And, A-Line, #29000, style A, sill steps were installed.  With side detail added the car was moved to the paint shop.


NP flat is ready for paint shop.


In the paint shop the under body was sprayed Vallejo Model Air, #71.054, Dark Grey Blue.   I sprayed the flat car body Vallejo Model Color, #70.950, Black.  Once dry the car body was sprayed with Model Master, 4638, Gloss Clear Acryl to provide a gloss surface for a decal base.  After drying overnight, Speedwitch Media Decal set D106 was used to apply the decals.  Enlarged photos of decal lettering applied on the car are included in the kit instructions to help choose and locate hard to read decals on the decal sheet.  Once dry a coat of Vallejo Matt Varnish, 70.520, was sprayed over the car body to protect the decals before weathering.

NP 64109 out of paint shop.

Note the one tiny decal to right of coupler.


Next the resin deck needed to be dealt with.  At this point in the build the resin deck is still not cemented to the frame.   I brushed the deck with Floquil Depot Buff, R87.  Yes that is an old, old bottle of paint.  I would have used Floquil Foundation if I had any left.  I let the Depot Buff dry and applied a coat of  Red Oak stain using Minwax Wood Finish stain marker #215.  Again I let if dry.  If I wanted a new looking deck I would have stopped here; however, I wanted a weathered looking deck so I applied a wash, really more of a sludge, made using Scalecoat thinner and Floquil, F110013, Grimy Black paint.  I do not know the ratios of the mix I used.   Once I was satisfied with the weathered deck look I glued it to the flat car frame.


Deck glued to frame after finishing.


I enjoyed building this kit.  If you are one who does not apply under body detail this is, in my opinion, an easy resin kit to build.  Northern Pacific flat car 64109 is now in service on the Minneapolis & Northland Railroad Company.

NP 64109 on GN Interchange waiting pickup.

NP 64109 on GN Interchange another day waiting pickup.

NP 64109 on GN Interchange.


I wish to thank Gary Wildung for his help with photos and Bill Welch for his gift of square wire to properly fabricate the brake shaft.


Thank You for taking time to read my blog.  You can share a comment in the section below if you choose to do so.  Please share the blog link with other model railroaders.
Lester Breuer

Thursday, November 1, 2018

Broach - A Special Cutting Tool

Most modelers give me a puzzled look when  I mention I used a broach to enlarge or shape a hole.  And, I am immediately asked, “What is a broach?” A broach is a cutting tool with a pointed or tapered  tip with teeth that cut on the back stroke.  A broach is used to remove material from the resin or  plastic material to shape an outside surface or a hole.  So what are some uses I have for a broach.


A fine and very fine broach set.
(click or tap on photo to enlarge)


A closeup view of the broaches cutting edges.


A broach is my tool of choice to cleanup flash from flat car stake pockets.   It is also a great tool to help cleanup flash between boards on stock cars.  I like to use a broach to cleanup brake shaft bracket holes through which the brake shaft must pass through or to open a brake shaft step that was molded closed on a plastic freight car.  Yet, another time I use a broach is to shape or enlarge a brake lever slot in a fish belly center sill on a model freight car, especially on a scratch-built fishbelly center sill.  These are just a few examples where I like to use a broach.

Where do you buy a broach?  I purchased a set of fine and very fine broaches from MicroMark, set #81847.   The broaches come with nice plastic storage tubes for storing the broaches and keeping the cutting edges protected when in my tool drawer among other reamers and files.

If you do not have this tool in your tool collection for working on freight cars I urge to order at least one and give it a try.


Thank You for taking time to read my blog.  You can share a comment in the section below if you choose to do so.  Please share the blog link with other model railroaders.
Lester Breuer