Showing posts with label double-sheathed. Show all posts

Saturday, April 25, 2026

Minneapolis & STL USRA Box Car 51372

 A Duluth South Shore & Atlantic (DSS&A) USRA double sheathed Box Car kit produced for the  Soo Line Historical & Technical Society by Accurail had been in my unbuilt kits cabinet since November 2000.  The kit with car body assembled in 2001, sat in the unbuilt kits cabinet all these years as the the car was painted yellow with red lettering and lettered for merchandise service.   A car that I could upgrade and place in the display case; however, that is full.  Therefore, I decided I would finally finish the started build; however, paint and letter it for a USRA box car that could run on my Minneapolis & Northland Railroad Company (M&N) railroad with a time period of late spring 1955.   After review of reference materials and searching decals I had available, I decided the double sheathed box car would become a Minneapolis & St Louis (M&STL) USRA double sheathed Box Car even if by my time period only one or two were left on the M&STL roster.


The prototype car I chose to model and number 51372 was from one of the USRA additional groups purchased after having received the original group, series 22000-22598.  Specifically, the additional group was one of 250 cars purchased in 1940 from Hyman-Michaels and placed in series 51000-51398.   The USRA design, USRA Specification Number 1003-B, 40 ton double sheathed composite box car features included double sheathed wood sides, six foot side door opening with wood doors, 5/5/5 steel stamped ends, metal  roof, and steel fish belly center sill underframe.  The  cars rode on Andrews trucks.


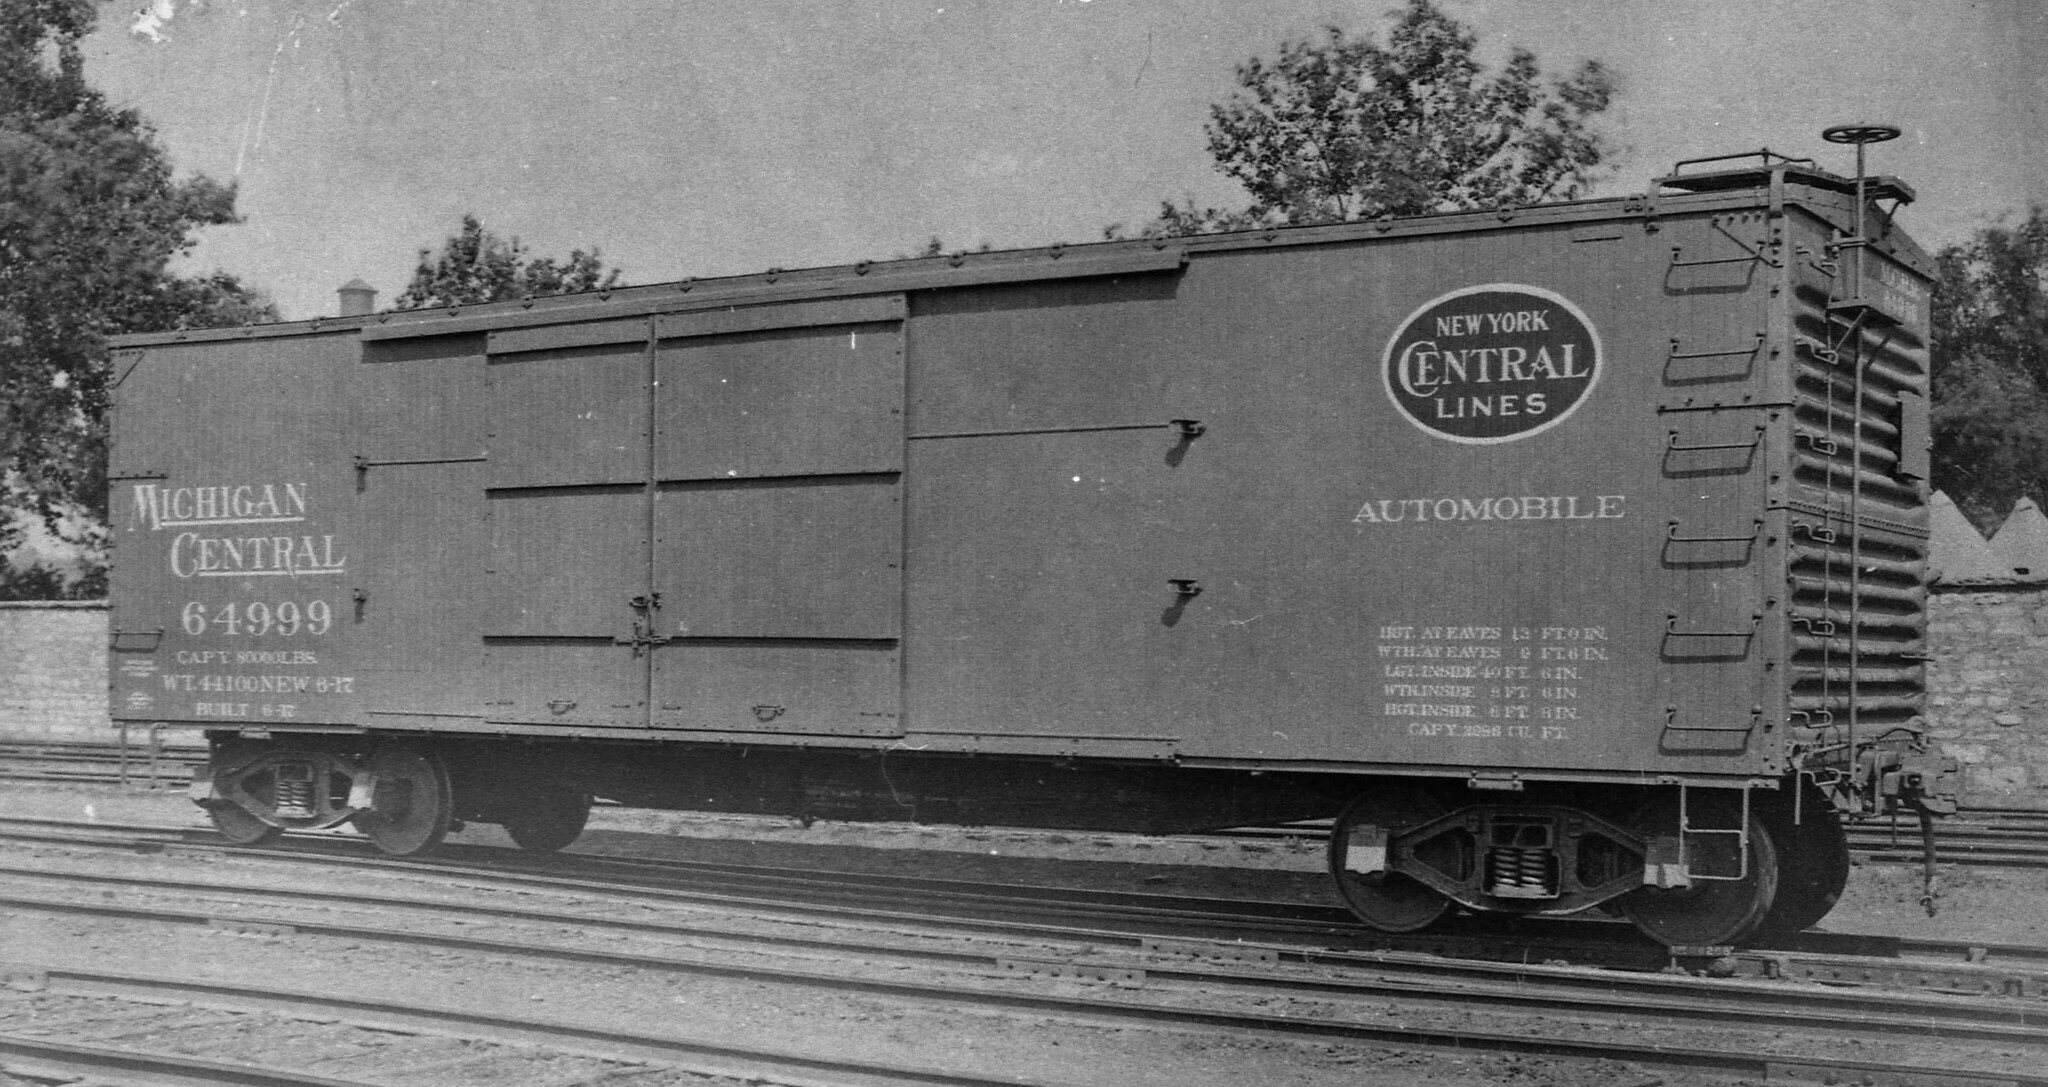
As for prototype photos, I used a photo of M&STL 25538 for my build.  The photo is one I took of the photo in  Steam Era Freight Cars Reference Manual Volume One: Box &Automobile Cars (Speedwitch Media, 2006. 2007).  M&STL 25538 built in 1940 by Hyman-Michaels was placed in series 25300-25898, the additional group of purchased cars prior to group I chose.   The photo I took is included here with permission to use obtained from Ted Culotta.


M&ST L 25538    Courtesy of Ted Culotta 
(Click on this or any image to enlarge)


In addition to M&STL 25538 photo, I used the car drawing of a USRA Double Sheathed Box Car in Mainline Modeler (March/April 1980).


USRA Double Sheathed Box Car Drawing


The build of the kit began back in 2001 when the car body was assembled.  The underbody frame coupler pockets and truck kingpins were drilled and tapped to accept 2-56 screws.  Kadee #148 couplers were inserted into coupler pockets and coupler pocket covers were installed with Walthers #947-1032, 2-56 x 3/16 inch screws.  Temporary Accurail ARA Cast Steel with spring plank trucks with InterMountain 33 inch metal wheels were installed with Athearn #99002, 2-56 x 1/4 inch screws.  A car weight was cut from .040 sheet lead and installed on the underbody floor side with Permatex Clear Silicone Adhesive.   With the sheet lead weight added the car weight was 3.8 ounces.  Kit brake components were installed.  The underbody was airbrushed in 2001 with Floquil  Black #F110013 (no longer manufactured) and installed in the car body.


Underbody installed in car body.


On the assembled car body lettering removal was done first.  Using a scratch brush with nylon bristles and 91% isopropyl alcohol the red lettering including DSS&A herald, reporting marks, number 10085 and words “merchandise service” were removed.


Car body lettering removed.


Once lettering was removed, all molded on grab irons and drop grab iron ladders were carved off.   On the B end the brake step, brake shaft and brake wheel installed in 2001 and painted Floquil Rail Box Yellow #R33 ( no longer manufactured) were left undisturbed.


Molded on grab irons and
 grab iron ladders removed.


New drop grab irons and drop grab irons for ladders bent from Tichy Train Group (Tichy)  #1101, .010 diameter phosphor bronze wire (PBW) were installed.  


Wire drop grab irons and 
drop grab grab iron ladders installed.


After grab iron and drop iron ladder install on the B end, the molded on longitudinal running board brackets were cut off and replaced with Yarmouth Model Works #220, etched running board braces.  Brake step brackets and a retainer valve from Tichy AB set #3013, were installed.  A retainer line and brackets, Tichy #1100, .008 diameter PBW, install followed.


B end upgrade parts installed.


B end upgrade parts installed.


Now on the roof, the removed lateral running board grab irons were replaced with wire ones bent from Tichy #1101, .010 diameter PBW.   For roof corner grab iron legs, Yarmouth Model Works etched eye bolts without shoulder were used.


Roof grab irons installed.


Next, the molded sill steps were cut off.   New sill steps were bent from Detail Associates #2524 brass flat .010 x .030 bar stock and installed in #76 drilled holes.


Brass sill steps installed. 


Brass sill steps installed. 


Brass sill steps installed. 


The install of sill steps completed the car body upgrade except for uncoupling levers so into the paint shop the car went.  In the paint shop the car body was airbrushed Vallejo/MicroMark Model Air Box Car Red X29015X2.  When paint was dry the car body was airbrushed with Vallejo Gloss Varnish 70.510 to provide a gloss decal base.


Car body airbrushed Box Car Red.


Car body airbrushed Box Car Red.

Once paint was dry the upgrade of the underbody, normally completed prior to being placed into the paint shop, was done.  On the underbody the install of detail parts was done as follows:


  • Brake cylinder lever, made from Evergreen 1 x 8 strip styrene
  • Floating lever, made from Evergreen 1 x 6 strip styrene
  • Piping from air reservoir to control valve, Tichy #1101 .010” PBW
  • Piping from brake cylinder to control valve, Tichy #1106, .0125” diameter PBW
  • Brake rods, Tichy #1106 .0125” PBW
  • Brake rod clevises, MEK Goop (plastic melted in MEK)
  • Chain, Tichy #8334, black 40 links per inch
  • Train line, Tichy #1103, .020 diameter PBW
  • Dirt collector, scrap plastic rod, reworked


Under body upgrade details installed.


To finish the underbody, the underbody and all added detail parts were brush painted Vallejo/MicroMark Tarnished Black X29022X2.


Under body brush painted.


With the underbody finished it was back to the car body to apply decals.   Decals used  to letter the car came from a M&STL Mark Vaughan set made for him by Rail Graphics (no longer available).


Decals were soaked off in distilled water and applied to the car body where MicroScale Micro Set had been applied with a brush.   After the decal was applied in the Micro Set and positioned the edges had MicroScale Micro Sol applied.  Any excess solution was sucked away with the torn edge of a paper towel.  Again when dry, car body sprayed with Vallejo Gloss Varnish 70.510 to better hide edges of decals and protect decals during handling.  Again when dry, the car body was sprayed with Model Master Acryl, #4636, flat to protect decals and provide a flat finish for weathering when applied.


Decals applied.


Decals applied.


Once underbody detail parts install was finished, install of uncoupling levers was done.   Uncoupling levers were bent from Tichy #1106, .0125 diameter PBW.  Uncoupling lever brackets used were eye bolts bent from Tichy #1101 .010 diameter PBW.  In the photos below the uncoupling lever after initial install had too drastic angle. It was changed later.


Uncoupling lever installed.


Uncoupling lever install changed.


Before weathering was done, trucks were changed.   Accurail ARA cast steel with spring plank #164 trucks were removed and Accurail Andrews #166 trucks were installed.  Trucks prior to install were brush painted with Vallejo/MicroMark Model Air Tarnished Black X29022X2.


Andrews Trucks installed.


Before putting M&STL 51372 in service on the M&N, the car was weathered with Pan Pastels.  Paynes Grey Extra Dark 840.1  was applied with a large makeup brush on the entire car body and underbody.  Burnt Sienna Shade 740.3 was applied to the springs with sponge tip.


Car weathered with Pan Pastels.


Car weathered with Pan Pastels.


Car weathered with Pan Pastels.


Minneapolis & St Louis USRA design double sheathed box car 51372 was ready for service on the Minneapolis & Northland Railroad Company, The Lakeland Route, “Serving today, Shaping tomorrow.”  A car card was made for M&STL 51372, the final step to put the a car in service on the Minneapolis & Northland Railroad Company Railroad.


M&STL 51372 spotted at Anchor Glass


M&STL 51372 spotted at Anchor Glass


M&STL 51372 spotted at Anchor Glass


M&STL 51372 spotted at Anchor Glass


 I want to say, “Thank You”, to Ted Culotta for letting me use a photo I took of photo of M&STL double sheathed USRA Box Car 25538 in Steam ERa Freight Cars Reference Manual Volume One: Box &Automobile Cars (Speedwitch Media, 2006. 2007) on this blog.


Thank You for taking time to read my blog.  You can share a comment in the section below if you choose to do so.  Please sign your comment with your name if you choose to leave one.  All comments are reviewed and approved before they appear.  Please share the blog link with other model railroaders.


Lester Breuer

Plymouth, Minn.


.

Sunday, April 27, 2025

Nickel Plate Double Sheathed Box Car 21241

A Nickel Plate Road (NKP) box car came to me from a friend.  A resin Westerfield Kit, No. 10158, a 1916 double sheathed (DS) 40 foot wood box car.  The underbody with a fish belly center sill had been added to the one piece body and the body had some grab irons installed.  My friend also had installed Kadee #158 couplers with coupler pocket covers glued on.  The kit box label was for a Minneapolis & St. Louis car as were the decals inside the box; however, the kit instructions in the box were for a New York Central (NYC) 1916 DS automobile box car.  Immediate confusion, causing me to believe I had the wrong kit instructions as car body had only a single door.  While I began my research of the kit car body I did finish adding missing wire grab irons and added brake platform.


Car from a friend.
(Click on this or any image to enlarge)

Using my resources I was able to determine the car was a NYC design.   Per the kit instructions the cars appeared to be the 1914 design 36 foot design stretched to 40 foot by the inclusion of a 4 foot second door.  In addition, the instruction sheet history did tell me a photo and plan appeared in the 1922 edition of the The Car Builders Cyclopedia which were of an automobile car.  Having a CD copy of the 1922 Car Builders Cyclopedia I was able to view the photo of Michigan Central 62475.  A better photo of the Michigan Central car except for number was  provided by Ray Breyer.


Michigan Central 64999      Ray Breyer Collection


The only DS car body photos with single wood door like the kit car body I was able to find was that of Rutland 8222 In Steam Era Freight Cars Reference Manual Volume One: Box & Automobile Cars (Speedwitch Media, 2006,2007); however, the Murphy corrugated ends were 6/8 rather than 7/7 as on the kit car body.  And, of NKP 10580 of the 36 foot car design with similar features. 


NKP 10580    Nickle Plate Road
 Nickle Plate Road Archives


Therefore to gather data and possible prototype photos regarding this car, I posted a photo of car kit in early build stage on RealSTMFC and Resin Freight Car Builders website with a guess as to NYC car series. 


Photo of car progress when posted
 to RealSTMC requesting help.


A quick response from Ben Hom making me aware my guess of this NYC series was incorrect as NYC series was for USRA box cars that the kit box car was not.  A response from Ray Breyer provided knowledge of the car kit and prototype history.   Ray’s response, “That model is definitely one of the Westerfield 10107 series kits… of rebuilds of cars represented by the 10101 series kits.  The 10101 series model represents 10,750 double sheathed auto boxcars built by the NYCL between 1916 and 1922, plus another 1,000 cars for the NKP, and another 500 for the Rutland (different ends).  As built each road had small appliance differences”.


NKP 18219 as built.           Ray Breyer Collection


Car diagram                  Ray Breyer Collection


Ray’s response continued, “The 10107 series kits are 6 foot single door cars, and represent Depression-era rebuilds.   The NKP had the most of these with 600 converted (including cars with Youngstown doors).  The DSS&A and M&StL bought used cars from the NYC (or resellers) and also converted them to plain boxcars with 6 foot doors.  None of these cars were ever converted to single door by the NYC.”


DSSA rebuild.


NKP Car Diagram for rebuild.
Ray Breyer Collection.


Based on the knowledge gained regarding the kit car, I decided since the NKP had the most of these converted cars I would letter the built kit car for the Nickel Plate Road with a number in the 21000-21299 series using the NKP 10580 car photo for lettering guide.   A check of a 1949 ORER showed there were still 5 cars in the series still on the NKP freight car roster and a 1953 ORER showed none of the cars remained on the roster.   Therefore, my late spring 1955 Minneapolis & Northland Railroad Company time period will have NKP 21241 on the fright car roster even if these cars had dropped off the NKP freight car roster prior to early 1955 time period.


Now realizing the New York Central 1916-24 car kit instructions were correct,  the kit instructions were used for the car build.  First, the resin longitudinal running board provided in the kit after flash was removed was installed with Formula 560 Canopy Glue.   The end brackets were cut from 1 x 3 strip styrene provided in the kit and installed with Zap CA  (cyanoacrylate, super glue) used to attach all installed parts unless another adhesive is specified.  The latitudinal running boards (laterals, corner walks, end walks) were installed on brackets made from brass strips provided in the kit.  Grab irons on laterals had been installed by my friend.


Running boards installed.


When running board Formula 560 Canopy glue was set, work on the B end began.   The retainer line, Tichy Train Group (Tichy) #1100, .008 diameter phosphor bronze wire (PBW) and brackets, Tichy #1101, .010 diameter PBW, were installed.   A Tichy brake shaft step from Tichy K brake set in kit was drilled to accept a brass wire .015 diameter brake shaft and installed on the end sill.   A brake shaft bracket for the vertical brake shaft, a kit supplied eye bolt, was installed on the fascia.  The brake shaft, brass wire .015 diameter in the kit was cut to size and installed followed by a Tichy brake wheel, Tichy K brake set in kit, install.


B end with retainer line and brake shaft installed.


Sill steps were installed next.   Resin cast kit sill steps were replaced using etched Yarmouth Model Works double sill step, YMW #228, on the B end and YMW #211, straight leg sill step on the A end.  You have to be very careful when folding the etched double brake step as etching very fragile.


Sill steps installed.


Sill steps installed.


Back to the B end to install uncoupling levers.  Top mounted uncoupling levers and eye bolt brackets were bent from .012 diameter brass wire in the kit as installed.


Uncoupling levers installed.


Uncoupling levers installed.


With car body work complete, onto to the underbody work.   The brake components were drilled to accept piping with #79 drill and were installed with other parts as follows:


  • Brake cylinder lever, cut from Evergreen #8108 strip styrene
  • Floating (cut) lever, cut from Evergreen #8106 strip styrene
  • Brake cylinder, kit
  • Brake cylinder piston, Tichy, #3013 AB set, installed in .038 diameter drilled hole
  • Brake cylinder bracket, Sunshine Models from parts box
  • Control Valve (AB), resin in kit
  • Control Valve bracket, Tichy in kit
  • Air reservoir, Tichy AB set #3013 not in kit
  • Air reservoir shim to mount level, scrap plastic


Brake components installed.


After setting overnight for CA to fully set, piping and brake rods were installed as follows:


  • Train line, Tichy #1114, .020 diameter phosphor bronze wire (PBW)
  • Piping control valve to air reservoir, Tichy #1101, .010 diameter PBW
  • Pipe from brake cylinder to control valve, brass wire .012 diameter, kit
  • Brake rods, brass wire .012 diameter, kit
  • Brake rod clevises, MEK Goop (plastic melted in MEK)
  • Dirt collector, Tichy AB set #3013 
  • Dirt collector pipe to train line, scrap plastic rod
  • Chain, A-Line black 40 links per inch


Train line, dirt collector, piping and brake rods installed. 


Nickel Plate Road double sheathed box car was was ready for paint and lettering.  Before the car color was applied in the paint shop, all unpainted parts installed on NKP box car were hand painted with Model Air Vallejo/MicroMark Undercoat Light Gray, X29013X2 for a primer coat at the work desk.   While the primer coat was drying the trucks were hand painted Vallejo Model Color Mahogany Brown 70.846.


Added detail parts hand painted.


Added detail parts hand painted.


Added detail parts hand painted.


When primer coat was dry the NKP DS box car was ready for paint color.  The car body was cleaned with makeup cotton swabs dipped in 91% isopropyl alcohol and mounted on paint stand for painting.  After couplers were taped with blue painters tape, the car was moved to the paint booth where the paint color chosen via a later period NKP box car color photo was applied.


In the paint booth NKP DS box car body and underbody were airbrushed with  a mix of Vallejo Model Color Mahogany Brown 70.846, 80% and Vallejo Model Color Red Leather 70.818, 20%.   To get the paint to dry quickly a hair dryer was used.  And,  both car body and underbody were airbrushed again with Vallejo Model Color Mahogany Brown 70.818.  After airbrushed Mahogany Brown was air dried, the car body was airbrushed with Vallejo Gloss Medium 70.470 for a gloss decal base.


Car airbrushed Mahogany Brown.


Car airbrushed Mahogany Brown.


Car airbrushed Mahogany Brown.


Car underbody airbrushed Mahogany Brown.


After drying for several days waiting for decals, NKP K-4 decal set was used to letter the car.   NKP K-4 decal set was reviewed to choose a number for the NKP DS 21241 box car.   Number 21241 was chosen because it allowed using 20241 in the set.  The zero in 20241 was removed and replaced with a one (1) from the extra numbers.


I used photo of NKP box car 10580 as a guide to apply decals.  Decals were soaked off in distilled water and applied to the car body where MicroScale Micro Set had been applied with a brush.   After the decal was applied in the Micro Set and positioned the edges had MicroScale Micro Sol applied.  Any excess solution was sucked away with the torn edge of a paper towel.


After setting overnight to dry (air dried), car body was airbrushed with Vallejo Gloss Varnish, 70.510,  to better hide edges of decals and protect decals during handling.


Car body airbrushed with Gloss Varnish.


Car body airbrushed with Gloss Varnish.


Again when air dried, the car body was airbrushed with Model Master Acryl Flat Clear, #4636, to protect decals and provide a flat finish for weathering when applied.


Car airbrushed Flat Clear.


Car airbrushed Flat Clear.


Car airbrushed Flat Clear.


One more step before putting NKP DS box car 21241 in service was to weather the car with Pan Pastels.  Pan Pastels Paynes Grey Extra Dark 840.1  was used on the roof and lightly over safety appliances on car body.


NKP 21241 left side weathered.


NKP 21241 B end weathered.


NKP 21241 Right side weathered.


Nickel Plate Road Double Sheathed  DS b box car 21241 was ready for service on the Minneapolis & Northland Railroad Company, The Lakeland Route, “Serving today, Shaping tomorrow.”  A car card was made for NKP DS box car 21241, the final step to put the a car in service on the Minneapolis & Northland Railroad Company Railroad.


NKP 21241 spotted at Sawhorse Millwork in
Tunnel City, Minnesota


NKP 21241 spotted at Sawhorse Millwork in
Tunnel City, Minnesota


NKP 21241 spotted at Sawhorse Millwork in
Tunnel City, Minnesota


I want to say, “Thank You”, to Ray Breyer for data, photos and car diagrams of Nickel Plate Road DS box cars to make this build of NKP DS box car 21241 possible.


I want to say, “Thank You”, Ben Hom, Alan Smith, Michael Brilliot for their response with data, photo, and research websites to my request for help with data and photos for this build.


Thank You for taking time to read my blog.  You can share a comment in the section below if you choose to do so.  Please sign your comment with your name if you choose to leave one.  All comments are reviewed and approved before they appear.  Please share the blog link with other model railroaders.


Lester Breuer


.