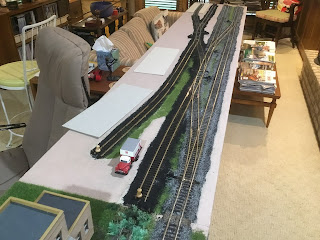
Time to take a break from building freight cars to work on an expansion to the Minneapolis & Northland Railroad Company (M&N). The expansion began with the changes to Tunnel City, Phase One and Two, I described in a prior published blog. The major change in the first expansion was adding a mainline to be able to reach the new town of Randolph. The benchwork for Randolph was Phase Three and the track work with minimal scenery Phase four.
At the end of Phase Two I showed a plan for the future Randolph expansion. The expansion to Randolph was to have benchwork six feet long, fourteen inches wide, with a possible future flip-up section one foot long. I continued to review the plan to see if there might be a better way to layout the location of the new industries and Chicago Great Western interchange. I finally decided it was better to swap the location of the Chicago Great Western interchange and team track.
With a plan for Randolph ready, I purchased the lumber, number two pine and one side finished 5/8” plywood, for the benchwork at my local lumber yard. The homasote for the expansion was obtained from a friend, Jeff Rundgren. The new benchwork, six feet long and fourteen inches wide, is old school L-Girder construction. I like the L-Girder construction as it is stable, has excellent noise level and the short L-Girders can easily be moved at any time during or after construction is complete. The reason being the short L-Girders are secured in place with only two coarse thread drywall screws from the lower long L-Girder and are only holding the plywood and homasote town base with two coarse threaded drywall screws that can easily be removed. The homasote was attached to the plywood base with nails driven at various angles to prevent future movement of the homasote. A storage shelf added to the benchwork also provides benchwork stability.
The new Randolph benchwork was built to be movable on removable furniture moving sliders to allow moving the benchwork to another storage location after an operating session. Therefore, construction of the Randolph benchwork, completed in another area of the railroad area, was moved to its location during an operating session using the removable furniture sliders purchased at a home improvement store. The benchwork once in position is secured to the existing railroad with clamps placed on the legs.
 |
| Randolph benchwork moved to location for operating session. Note the furniture sliders next to base of legs. |
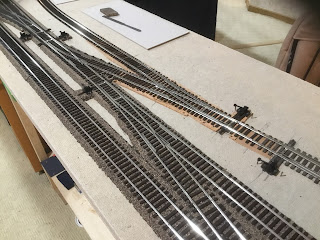
Now the track work could begin. I began placing a mix Shinohara code 100 and Walthers code 83 nickel sliver track on the benchwork according to the plan. I marked track centers to draw layout lines to locate cork roadbed and track location directly on the homasote.
The layout of the track work and the industries, currently cardboard rectangles, progressed rapidly.
With layout lines drawn, I proceeded to put down the cork roadbed with small finishing nails. The HO scale cork roadbed was placed under mainline (track one from edge) and track two under the CGW interchange and Wildung team track ( truck near it) on the other end. If I had N scale cork roadbed on hand I would have used it under track two to make the transition to industry tracks located directly on the homasote easier. The transition to the industry track was done with cork cut from sheet cork and cardboard. Ties on turnouts had to be cut and track slightly bent to make a smooth transition.
Following the install of cork roadbed, the track was spiked in place on the cork roadbed or homasote. I use spikes, installed in every sixth tie, to attach commercial track. Yes, spiking the track does add time to putting the track down; however, in my opinion well worth the time, to provide excellent operation for years to come. I do not use glue as track nails allow easy pull up and reuse of track for relocation if necessary. Holes in the ties for track spikes are drilled in every sixth tie using a drill bit mounted in #8050 Dremel tool. I find it amazing how many track gauges and tools one can use to install cork roadbed and track.
After track was put down any missing ties were installed. Next the rail sides were hand painted with Floquil Rail Brown, R7, paint. Once track painting was done and dry Caboose Industries ground throws provided by Gary Wildung were installed. Finally, the gaps are cut in the track with a cutting disk mounted in a Dremel tool. Later the gaps are filled with styrene filler and 5 minute epoxy. After epoxy is set styrene filler is filed to track profile.
With the track work done I began the wiring. The wiring provides the least fun for me when adding new trackage to the railroad. Before I start to add wires, I attach shower curtain rings to the long L-Girder with Romex plastic wire staples to hold the bus wire, any other wires for lighting, etc. and Digitrax Loconet cables. I use shower curtain rings to hold the wires as they can be opened and closed to add additional wires at any time. The bus wire was run, holes drilled for track feeders and track feeder wires were added. Track feeders are soldered to the track and bus wire. Yes, soldering is slower than wire connectors; however, for me reliable on other track work on the railroad since 1974.
 |
| Track work is ready for wiring and ballast. Note the back industry track was curved to allow more space at Wildung Team Track. |
With the track work done I began the wiring. The wiring provides the least fun for me when adding new trackage to the railroad. Before I start to add wires, I attach shower curtain rings to the long L-Girder with Romex plastic wire staples to hold the bus wire, any other wires for lighting, etc. and Digitrax Loconet cables. I use shower curtain rings to hold the wires as they can be opened and closed to add additional wires at any time. The bus wire was run, holes drilled for track feeders and track feeder wires were added. Track feeders are soldered to the track and bus wire. Yes, soldering is slower than wire connectors; however, for me reliable on other track work on the railroad since 1974.
 |
| Track wiring is held in shower curtain rings. Note clamps on legs holding Randolph in place for work sessions and operating sessions. |
Once wiring is installed the testing of the wiring and track is done with my “Cleaner” train. The “Cleaner” consists of locomotive, box car and caboose have track cleaning sliders made of Masonite mounted on them that will catch on any track work gaps or turnout frogs that are not smooth. If the gap or turnout gap is not smooth, a file is used to make it smooth. Of course, if wiring is not correct the train stops running and wiring has to be corrected. Well, it could be a power routing turnout not thrown correctly.
 |
| "Cleaner" train is run to check track is smooth running. Cleaning pads should not catch on electrical gaps or frogs. |
Once wiring and track is tested the homasote is painted with a tan latex paint to seal the homasote to prepare it for scenery. Next the benchwork is painted with a latex black to seal the wood. Finally a five inch fascia is added that may or may not be painted.
I consider track ballasting an element of scenery. The mainline ballast I use is a mix of new and used foundry sand obtained for me by a friend who works at a Minneapolis foundry. The new foundry sand color is white and used foundry sand color is black. Siding tracks are ballasted with the black foundry sand to represent cinder ballast. I use wet water, a mix of 25% white glue, 75% water, and a few drops of dish soap added, to secure the ballast. I like this method of attaching the ballast because it is very easy to remove via wetting if removal is necessary.
 |
| Homasote painted with a tan latex. |
 |
| Painting of benchwork has begun. |
 |
| Fascia installed and benchwork painting finished. |
I consider track ballasting an element of scenery. The mainline ballast I use is a mix of new and used foundry sand obtained for me by a friend who works at a Minneapolis foundry. The new foundry sand color is white and used foundry sand color is black. Siding tracks are ballasted with the black foundry sand to represent cinder ballast. I use wet water, a mix of 25% white glue, 75% water, and a few drops of dish soap added, to secure the ballast. I like this method of attaching the ballast because it is very easy to remove via wetting if removal is necessary.
During the ballasting process I also have a cooking spice shaker filled with Woodland Scenics blended turf to cover grass areas between tracks. The grass may be the final scenery or the base for static grass to be added later.
 |
| Ballast in coffee cans, wet water in Elmers glue container and ground foam shaker are on shelf below benchwork. |
Now the fun provided by running trains on the Randolph trackage can be had in future operating sessions. Yet there is more work to be done and that of course is the addition of other scenery including ground cover, backdrop and structures. The addition of structures, the home of future customers as Food Producers and Randolph Anchor Glass Plant to be served by the Minneapolis & Northland Railroad Company, The Lakeland Route, “Serving Today, Shaping tomorrow.” I will cover the addition of the remaining items in Phase Five blog.
I want to say, “Thank You.” to Jeff Rundgren and Gary Wildung for their help with the Randolph expansion.
Thank You for taking time to read my blog. You can share a comment in the section below if you choose to do so. Please sign your comment with your name if you choose to leave one. Please share the blog link with other model railroaders.
Lester Breuer


Looks very sharp! I like the idea of using shower curtain rings to hang wire. That's less permanent than the staples I use.
ReplyDelete