Saturday, October 7, 2023

New York Central Box Car 157118

 After looking at tables and photos in the book The Postwar Freight Car Fleet (National Model Railroad Association 2006)  by Kline and Culotta I discovered that my fleet was lacking New York Central (NYC) cars.  A table in the book showing the number of boxcars owned by the top twenty boxcar owners on December 30,1950 has the top five and car totals as NYC 67,608, PRR 64,432, ATSF 35,764, SP, T&NO 35,763, and MILW 31,547.  When comparing this list to my fleet I found over the years I had added a good number of cars for each of these roads and well as those in the remaining top fifteen (15) except for the New York Central (NYC).  It was time to add more NYC cars to the fleet.

I contacted a friend with a large collection of freight cars, RTR and kits, to see if he had any car kits of the NYC he would like to part with.  My friend prefers to have RTR cars and purchases them to replace kits he may have purchased.  Therefore, he did have several kits with a RTR replacement, one Red Caboose NYC 1937 box car and other Red Caboose and InterMountain kits that could become NYC cars.


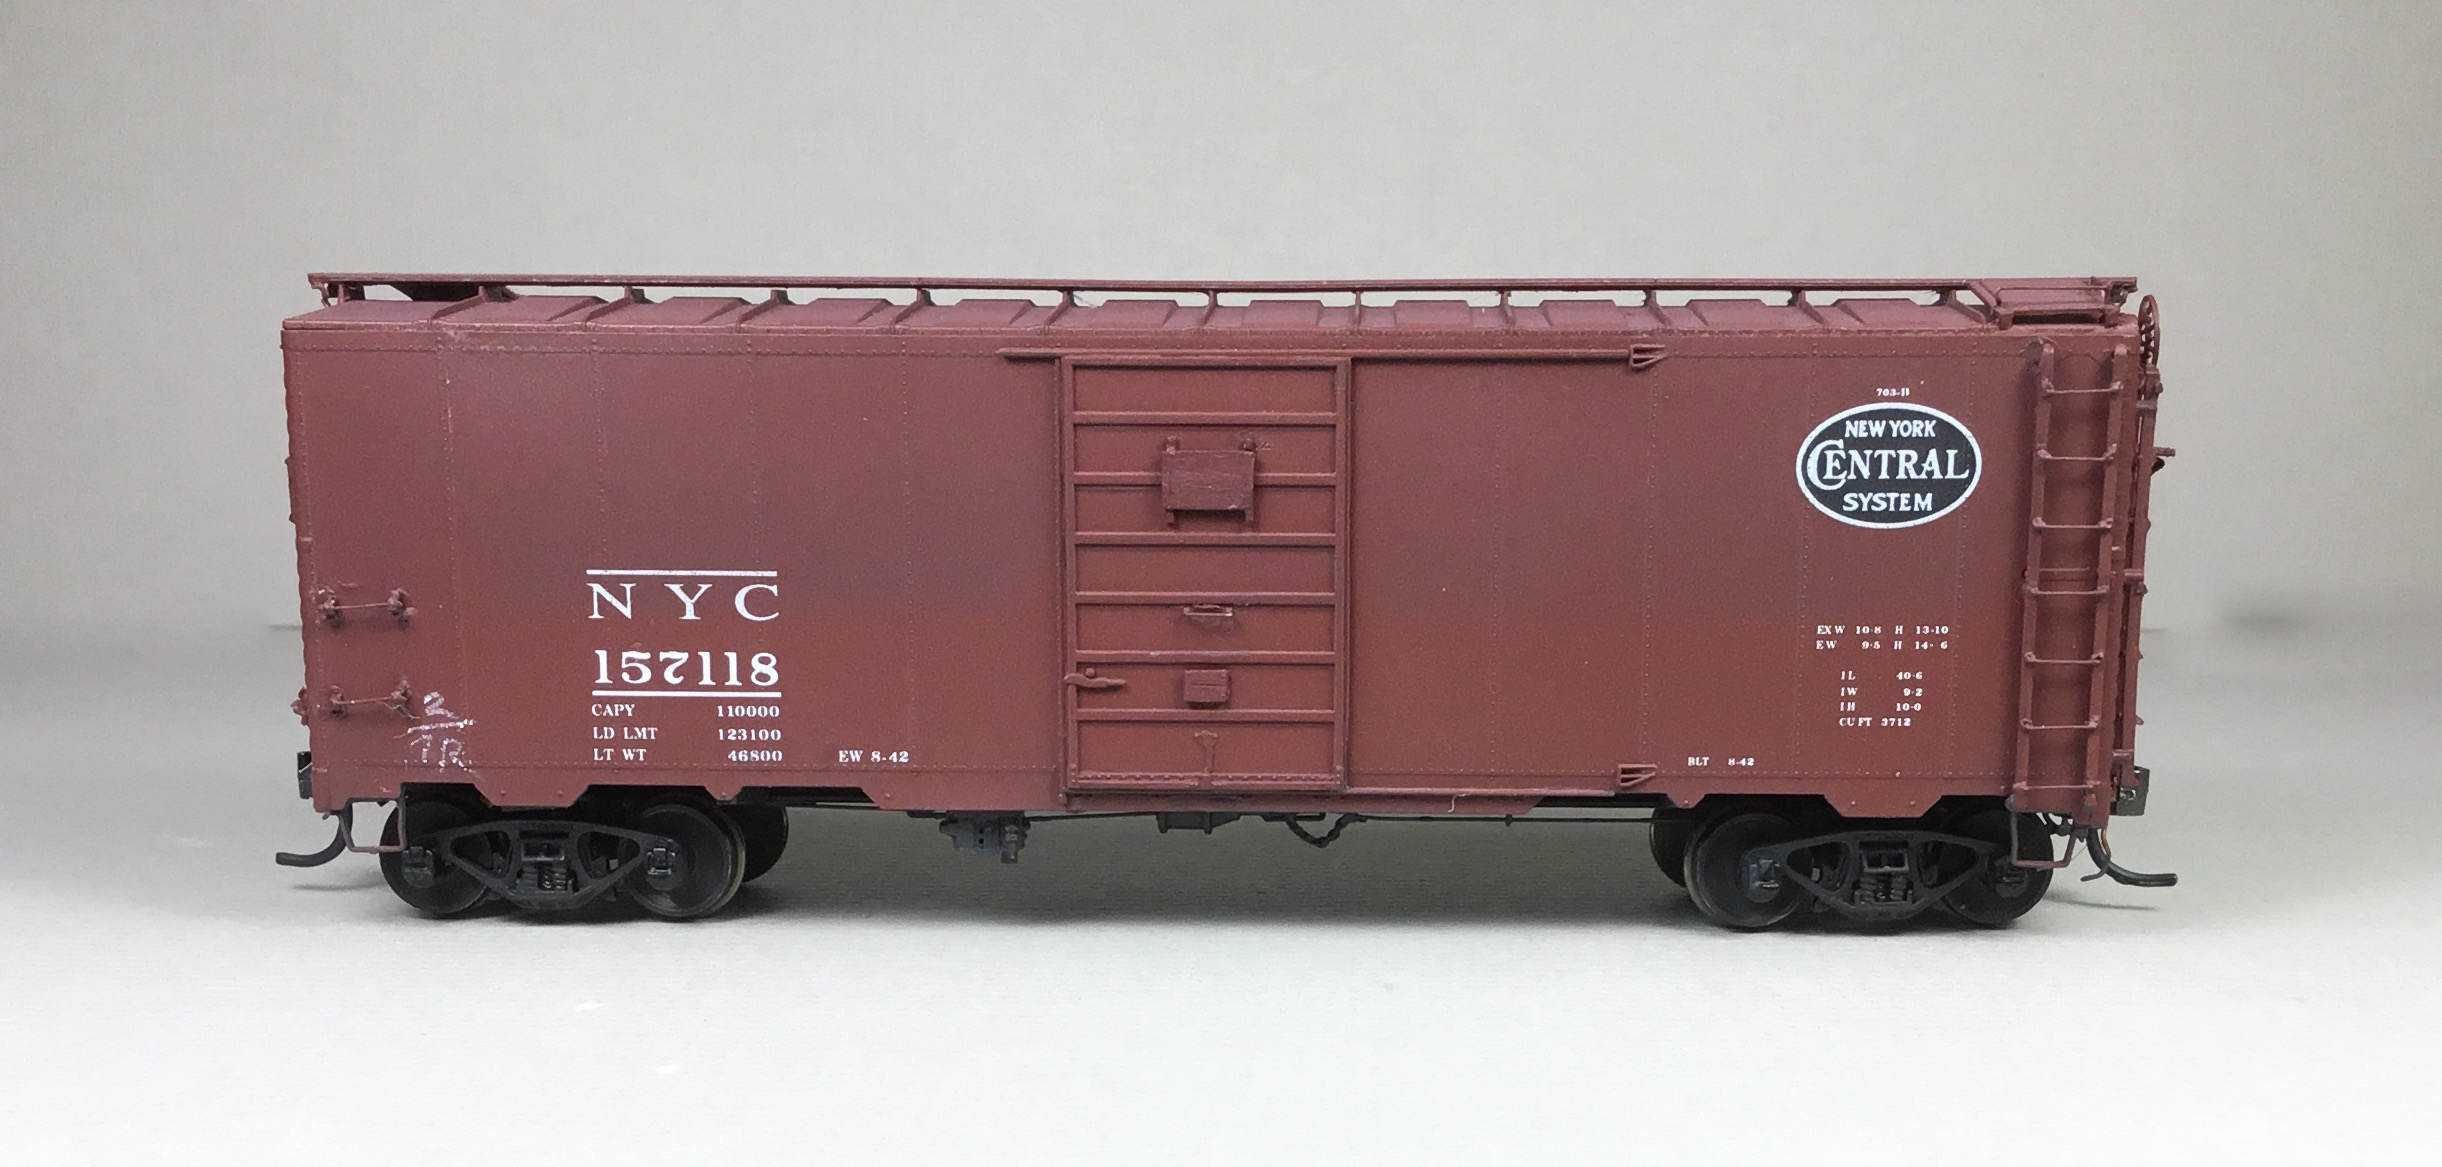
Of the kits purchased,  the first car kit I selected to build was Red Caboose kit, RC-8026-11, a 1937 design steel box car with 4/5 dreadnaught ends lettered for the New York Central numbered 157118.  The kit was a good match for the NYC box cars of the 1937 AAR design in their series 157000-158072.  The prototype of this design built 1936-1947, had the following basic features:  ten (10) foot Inside Height (IH), 4/5 dreadnaught ends, 10 panel riveted steel sides (differences exist), standard 6 foot single door opening and a rectangular raised panel roof.  Additional data for the New York Central cars from the table of 1937 AAR 40” 6” Box Cars, built 1936-1947, complied by Ed Hawkins for NYC cars in series 157000-157299 shows 300 cars built 8-42 by Despatch Shops, Inc. (DSI), Lot 703-B,  had 7 panel Superior Doors, round end corners (termed W-section), Murphy Panel roof, Ajax hand brake, wood running boards, Morton brake step, roping staples, and rode on AAR with spring planks trucks.  Another source states the trucks these cars had was Barber S-2.  The NYC series 157300-158072 cars had the same features except for Youngstown doors with Camel fixtures and the last 73 cars has an Equipco hand brake.  Excellent photos of side and B end of NYC cars in this series can be found on the New York Central Historical Society website.


Photo of NYC 157201 in various collections.
(Click on this or other image to enlarge)


Photo of NYC 157747
 in various collections.


The build of NYC 157118 began with some work on the underbody.  After brake component molded on mounts were removed from the underbody the underframe was installed.  Coupler pocket pads and truck kingpins were drilled and tapped for 2-56 screws.  Kit air reservoir and brake cylinder were installed.   A resin Sunshine Models AB valve (control) was installed.  All brake components had holes drilled with a #79 drill for piping prior to install.   Holes in center sill were filled with styrene rod.   If you are not using the plastic kit piping for your build, it can be used to fill the holes.  Coupler boxes with Kadee #148 couplers were installed with Fastenal 2-56 - 3/16” screws.   Kit provided trucks with installed InterMountain 33” metal wheels were installed with 2-56 - 1/4” screws.


Couplers, trucks and brake components installed.


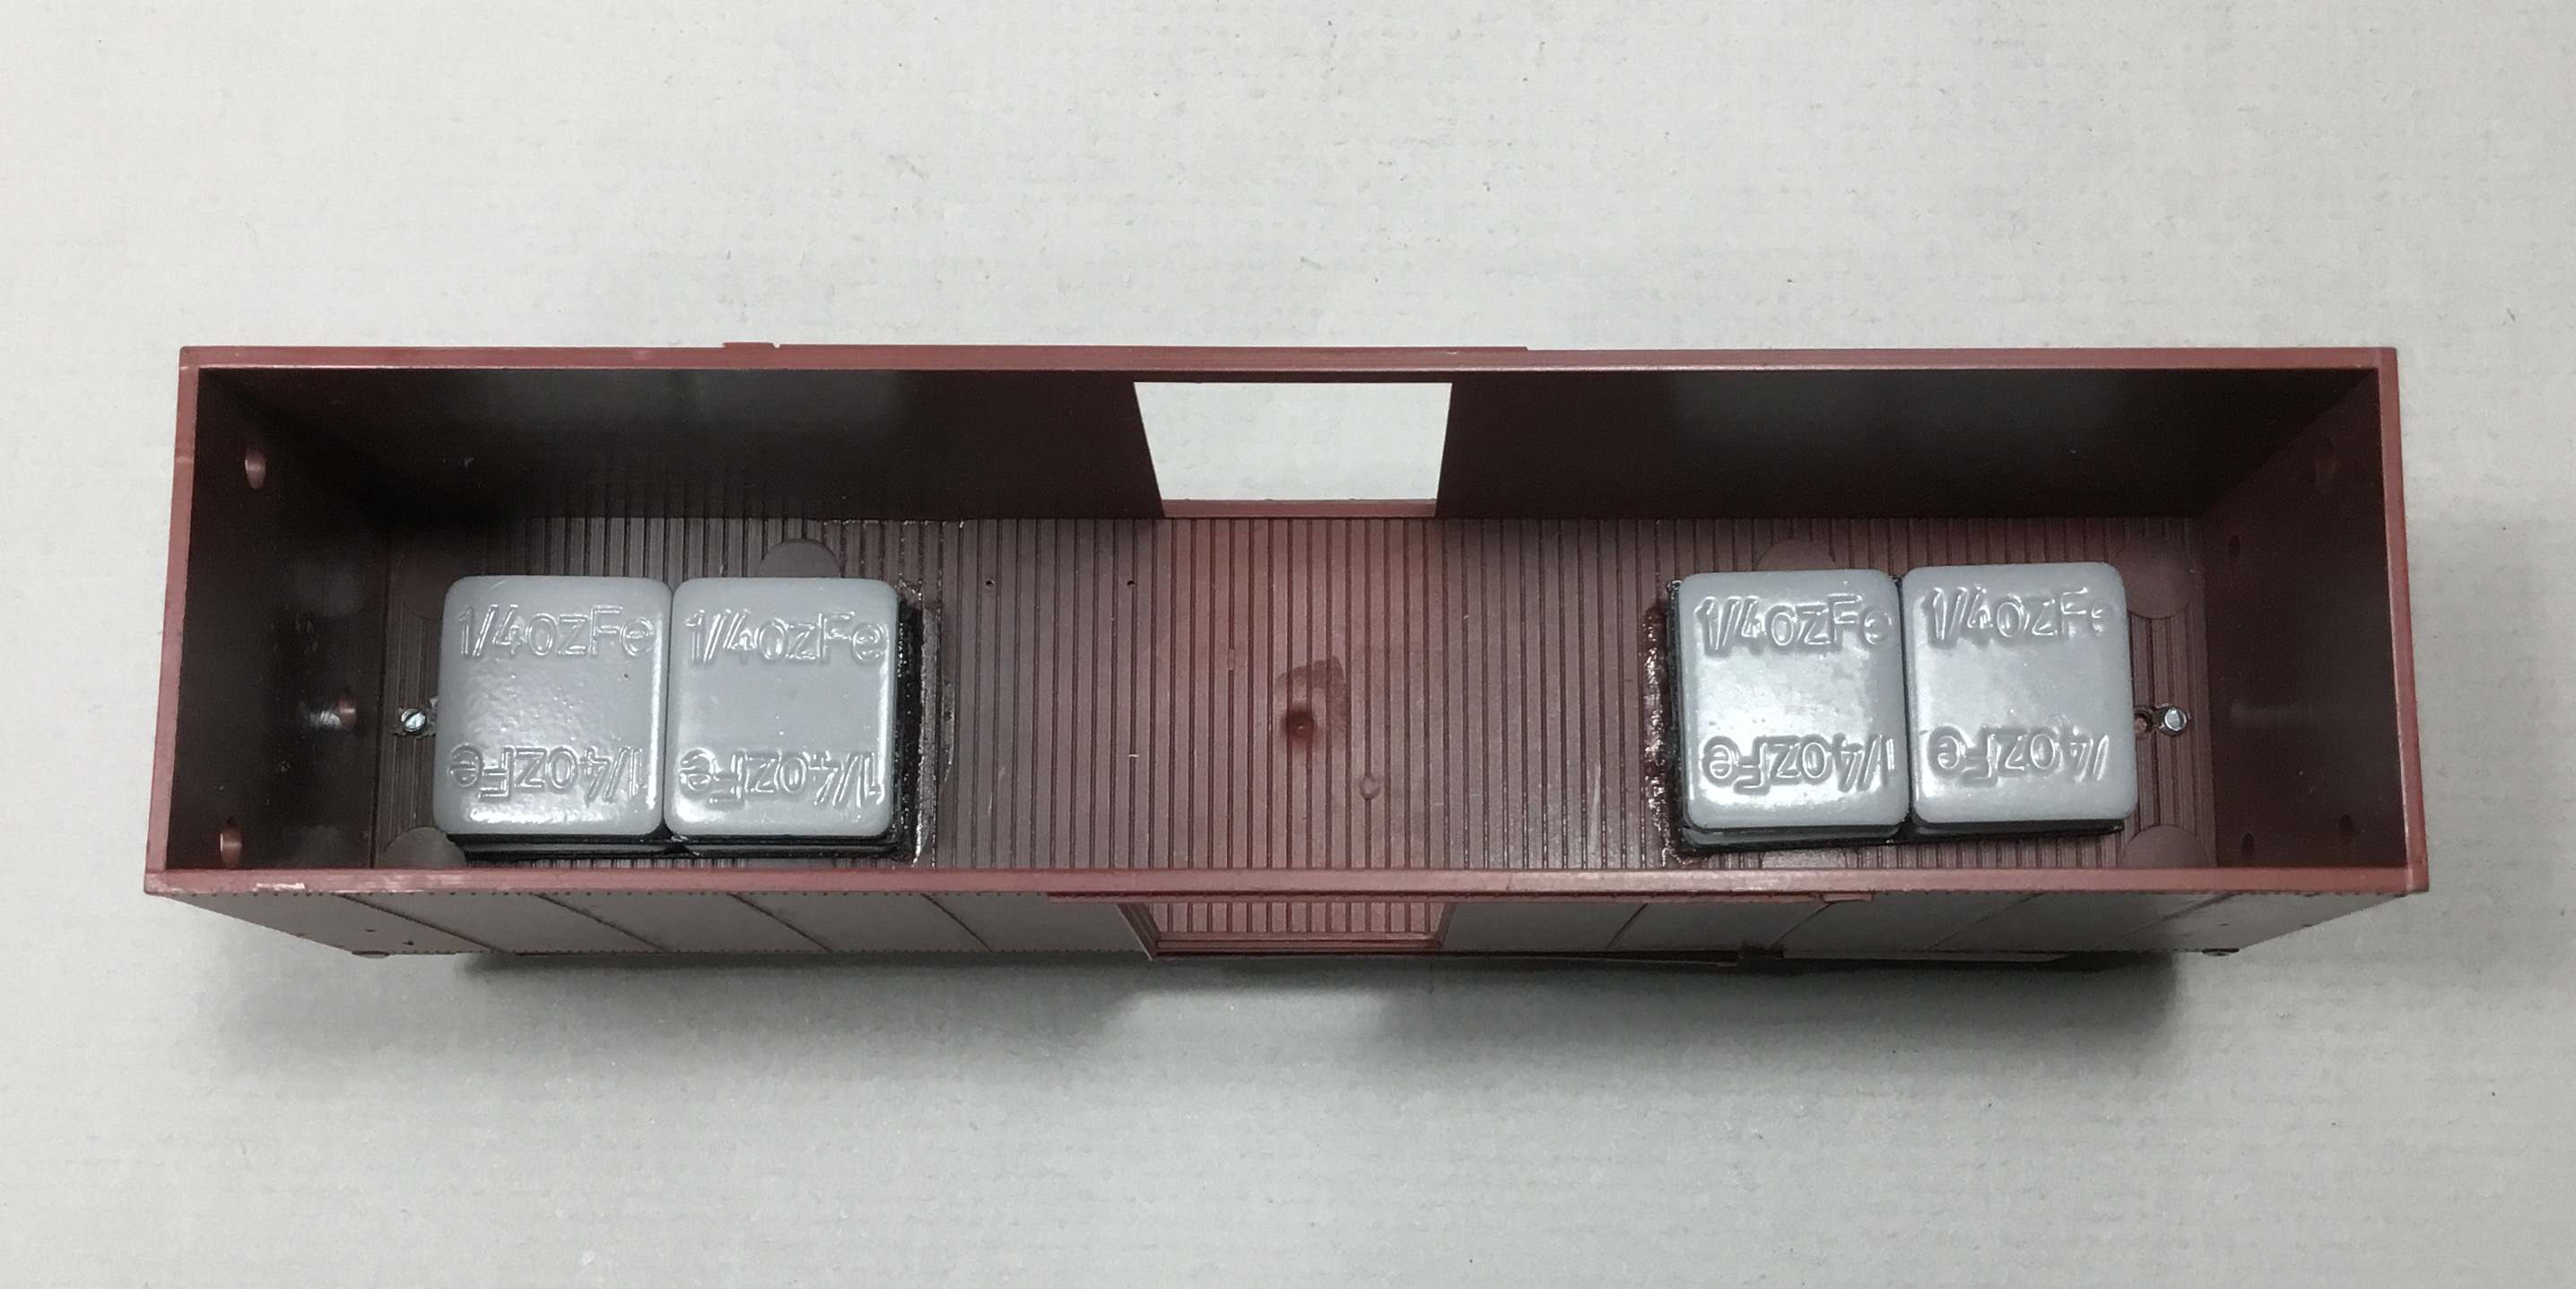
 Stick on tire weights were added to the interior floor to weight the car to 3.8 ounces.


Stick on tire weight installed.


Basic car assembly work was done.


Basic assembly done.


With the basic car assembly work done, NYC 157118 was ready upgrade details.  I began with the ladders.   Rather than use etched ladder stiles I chose to use the kit ladder stiles removing the molded ladder rungs and replacing them with “NoName” .010” diameter brass wire.   The NoName brass wire came from a friend who did not know the manufacture name, hence NoName.  To replace the ladder rungs the ladders were left on the kit sprues for drilling the holes with a #80 drill and then enlarged with a #79 drill.  After holes were drilled only every other molded on rung was cut off with a sprue nipper and a wire rung bent from .010” diameter brass wire installed.


Every other ladder rung (center ladder)
replaced with bras wire one.


After every other ladder was installed the remaining rungs were installed to complete the ladder.


Plastic rungs (center ladder) replaced with
brass wire rungs.


The kit plastic ladders with .010” diameter brass wire ladder rungs were installed on the car sides and ends.  Kadee bracket grab irons, #2251, were installed on sides.  Kit sill steps were installed and step portion cut off.  A-Line #29000, sill steps were installed. On the roof the kit running boards were installed using Testors tube cement for plastic models.  Later roof grab irons bent from .010” diameter NoName brass wire were installed using Yarmouth Model Works eye bolts without shoulder for corner legs.


Kit ladders with wire rungs, bracket grab irons
 and sill steps installed on sides.


End ladder and running boards with grab irons installed.


I moved onto the “B” end work.  Running board extension brackets, Yarmouth Model Works, #220, were installed.  Sill iron grab irons were bent from .010” diameter NoName brass wire and installed.  The bracket grab iron was made by installing  a kit bracket grab iron, cutting off the the hand grab portion with a sprue nipper and replacing it with a .010” diameter NoName brass wire one.  With grab iron install complete other B end details added  were as follows.


  • Brake step brackets, kit
  • Brake step, cut from Kadee latitudinal (lateral) running board
  • Brake housing with chain, kit. Hole enlarged with #56 drill .0465”
  • Brake shaft clevis to attach brake shaft to bell crank, kit
  • Brake shaft, Tichy #1102, .015” diameter PBW 
  • Retainer valve, kit
  • Retainer line and brackets, Tichy #1100, .008” diameter PBW
  • Brake wheel, Kadee Ajax, #2020


Some B end details installed.


B end details with better view of brake step.


After installing the above parts I hand painted all the parts with Vallejo Model Color Burnt Red 70.814.  The Burnt Red is a fine color match to InterMountain factory paint.  However, the B ends were still not done as placard boards and uncoupling levers had to be installed.  The prototype photos showed a unique placard board made up of four vertical boards on the ends.   I made a master with Evergreen strip styrene, made a mold and cast the placards boards in my M&N Shops.  After the resin cast end placard boards were installed I installed the uncoupling levers.  Uncoupling levers were bent using Tichy #1106, .0125” diameter phosphor bronze wire (PBW) and installed with uncoupling lever mounting brackets, Yarmouth Model Works #507.


Placard board and uncoupling lever installed.


Back to the sides for finishing work.  I installed the seven panel Superior doors provided in the kit.  Prior to install I had carved off the molded on door handles and replaced them with new brass wire handles bent from NoName .010” diameter brass wire.  The doors were installed now to enable the placard boards for the doors to installed.  The placard boards, resin cast in my M&N Shops, were installed.  The upper placard boards mounting brackets were added with Evergreen strip styrene from my bits box.


Placard boards installed on sides.


With car body work complete the underbody work was done.   Underbody details were installed as follows.


  • Brake cylinder lever, made with Evergreen #8108, 1 x 8” strip styrene
  • Brake floating lever, made with Evergreen #8106, 1 x 6” strip styrene
  • Brake lever hangers, plastic grab irons
  • Brake piping, air reservoir to control valve, Tichy #1101, .010” dia. PBW
  • Brake pipe, brake cylinder to control valve, Tichy #1106, .0125” dia. PBW 
  • Brake rods, Tichy #1106, .0125” diameter PBW
  • Brake rod clevises, made with MEK Goop 
  • Chain, Precision Scale #48553, 34 links per inch
  • Train line, .018” diameter flora wire
  • Dirt collector, resin cast in M&N Shops


Underbody details installed.

Once underbody work was completed I moved NYC 157118 to the M&N paint shop.  In the paint  shop, the underbody was airbrushed Vallejo Model Color Black Grey RLM66, 71.055.


Underbody painted.


After the underbody was dry.   The car body had all added detail parts touched up if necessary with Vallejo Model Color Burnt Red 70.814.   I wanted to change the new date to a later reweigh date; however, I could not find a decal match to do so.  As a temporary fix I removed the “N” from the new date  leaving the “EW” which is valid reweigh symbol for Monk, a Canadian National (CN) reweigh station.   Now the car body was airbrushed with Model Master Acryl 4636 Flat Clear.


NYC 157118 is ready for weathering.


Since I still need to change the reweigh date when I find decals to do it with I did not want to apply much weathering; however, I did not want the new look.   Therefore, I added a chalk mark, track two, with Prismacolor Premier white PC938 pencil.   And, I used a makeup brush to apply Pan Pastels Paynes Grey Extra Dark 840.1  on the roof and lightly over car body.


NYC 157118 with very light weathering.


NYC 157118 with very light weathering.


New York Central box car 157118 was ready for service on the Minneapolis & Northland Railroad Company, The Lakeland Route, “Serving today, Shaping tomorrow.”  A car card was made for NYC 157118, the final step to put the a car in service on the Minneapolis & Northland Railroad Company Railroad.


NYC 157118 sitting on Wildung Team Track
in Randolph, Minn.


NYC 157118 sitting on Wildung Team Track
in Randolph, Minn.


NYC 157118 sitting on Wildung Team Track
in Randolph, Minn.


Soon after the NYC 157118 was set out at the Wildung Team Track in Randolph, Minnesota it was reported to the M&N Shops the roping staples were missing.   So the NYC 157118 was moved back to the M&N Shops and roping staples were installed.


NYC 157118 back at the Wildung Team Track
 with roping staples installed.


I want to say, “Thank You” to Seth Larkin for the New York Central Historical Society link, Charlie Duckworth for the link to NYC Freight Car Roster & HO Model Reference Guide and to Robert Bogie, Steve Hile, T.J. Stratton, O Fenton Wells for photos and data they provided to help me with the build of this car. 


Thank You for taking time to read my blog.  You can share a comment in the section below if you choose to do so.  Please sign your comment with your name if you choose to leave one.  Please share the blog link with other model railroaders.


Lester Breuer


.


Tuesday, September 12, 2023

Missouri Pacific Box Car 34222

The phone rang.   I answered it knowing it was George Toman.   He was calling from the Collinsville Railway Prototype Modelers (RPM) meet to ask me if I wanted a Missouri Pacific (MP) Sunshine Models 2005 Mini Kit he had found there.   My answer, “Yes.”  The Sunshine Models Mini Kit (SMMK) was to be used with a 1942 design car.  The 1942 design car had a  10” 6” inside height.   An InterMountain Railway Company, kit number 41805-03, provided the needed freight car.

When the Sunshine Mini Kit arrived I examined the contents which contained Sunshine Models Modeling Notes for Missouri Pacific 1942 American Car & Foundry (ACF) Boxcars (Sunshine Models 2005), decals and the following resin castings:  5/5 “W” section ends, Youngstown doors, door stops,  and long solid straight side sill.  The masters for these castings were created by Frank Hodina.  The Sunshine Models Modeling Notes suggested using a Red Caboose straight panel roof and Apex metal running boards to improve the model.


The prototype cars built by American Car and Foundry using the 1942 design with 10’ 6” Interior Height were delivered to the Missouri Pacific (MP) in April-May 1942.  The MP assigned the ACF built delivered cars to MP series 34113-34262.  The box cars had 5/5 “W” section ends, Youngstown doors, and long straight solid side sill between bolsters.  Other features included Ajax handbrake, eight rung ladders, Apex Tri-Lok  running boards and brake step.   The Sunshine Modeling Notes contain excellent Ed Hawkins black and white photos of MP 34114 (side view) and I-GN 17766 ( 3/4 view) showing B end.  The same photos and paint information provided by Ed Hawkins appeared in the December 1996 issue of Railmodel Jounal The paint information provided for sides, ends and roof to match prototype  paint is a 50/50 mix of Floquil Box Car Red and Southern Freight Car Brown (Floquil paints are out of production).  And, black for underframe, trucks, and placards (tackboards).


Ed Hawkins Collection
(click on this or any image to enlarge)


Ed Hawkins Collection


The build of Missouri Pacific Box Car 34222 began by removing the molded on brake component mounting brackets.  After the mounting bracket removal the underframe was installed.  Coupler pocket holes and kingpins were drilled and tapped for 2-56 screws.


Underframe installed.


Next the molded on sill tabs were removed and the resin long straight solid sill from the  SMMK was installed.  When I build another car, I will use Evergreen strip styrene to create the long straight solid sill rather than the resin one as the styrene sill part when glued with liquid styrene cement would provide a cleaner looking seam between the two.


Long straight solid sill installed.


Next I needed to remove the lettering from the car body since I had decided I wanted to retain the manufacture applied paint.   To remove the lettering I used a method Jim Betz has shared on RealSTMFC.groups.iso that he uses to remove lettering.   I made a change to Jim’s method using Walthers Solvaset rather than isopropyl alcohol.  So to remove the lettering, the Solvaset was applied with a brush and a large wooden toothpick was used to go over the lettering until removed.  The method is slow, time consuming and tedious; however, it does the job well without removing the paint.  Previous to using a toothpick I would use a nylon scratch brush which removed the lettering much faster, however, much easier to remove paint as well as the lettering.


Tools used for lettering removal.

Majority of lettering removed.


On most builds I do, I like to paint added upgrade or detail parts after being added.   Therefore, I hand painted the side sill with Polly Scale Oxide Red.  Now I went back to do some basic work on the underbody.   I installed Kadee #262 coupler pockets, with Kadee #148 couplers installed, with Fastenal 2-56 x 1/4” screws.  I added the underframe sections between the bolsters and the coupler pockets using Evergreen I-beam styrene.   Now the underbody was airbrushed with Vallejo Model Air Nato Black 71.251.  I installed the kit trucks with InterMountain 33” metal wheel sets installed with Fastenal 2-56 x 1/4” screws. 


Underbody before airbrushed black.


Underbody after airbrushed black.


I finished removing the remaining lettering on the sides and ends and added stick on tire weights to weight the car to 3.8 ounces.


All lettering from carbody removed.


Car weighted with tire weights.


The car body was ready for the install of ends and roof; however, I decided not to use the Sunshine Model Mini Kit (SMMK) parts.   Why?  When I reviewed the photos of cars other than the Missouri Pacific in the Railmodel  Journal mentioned above I realized I could use these parts to build other freight cars of the 1942 design.  Therefore, I used the SMMK ends and a Red Caboose panel roof as masters to make rubber molds to produce resin parts used to build MP 34222.   After fitting the resin cast roof and ends to the InterMountain car body I assembled them with cyanoacrylate (CA).   Maybe one day some manufacture will produce a one piece mini kit assembly to make an easy install.  


Assembled roof and ends ready to install on carbody.


When CA was set, the assembled car ends and roof were installed on the InterMountain car body.  CA was used to bond the assembly to the car body.  After the resin assembled car ends and roof were installed I installed sill steps.  The plastic sill steps provided in the kit were installed for a sill filler (increase width) were cut off and A-Line #29001, style B, sill steps were mounted in holes drilled with a #76 drill in the widen sill mounting area.


Assembled roof and ends installed on carbody.


B end view of assembled roof and ends
 installed on carbody.


With a car body ready for adding the detail parts, I installed the plastic kit eight rung ladders.   After glue set, kit ladders stiles had the plastic rungs removed with a sprue nipper and replaced with wire rungs bent using No Name  .010” brass wire ( No Name wire was given to me by a friend who did not know manufacturer).  If I had not used the No Name .010” diameter brass wire, Tichy Train Group (Tichy) #1100, .010” phosphor bronze wire (PBW) would have been used.


Ladder with wire rungs installed.


On the roof, Kadee Apex running boards #2001, were installed rather than suggested metal one.  Formula 560 canopy glue was applied with a toothpick to the roof saddles to install the running boards. 


Kadee Apex running boards installed.


Now the B end work was done.   The following B end detail parts were installed 


  • Plano Apex metal brake step, #11322 set 
  • Brake step brackets, kit
  • Brake housing with chain, kit
  • Brake shaft clevis to attach brake shaft to bell crank, kit
  • Brake shaft, Tichy #1102, .015” diameter PBW 
  • Retainer valve, kit
  • Retainer line and brackets, Tichy #1100, .008” diameter PBW
  • Uncoupling levers, bent using Tichy #1106, .0125” diameter PBW
  • Uncoupling lever mounting brackets, Yarmouth Model Works #507
  • Brake wheel, Kadee Ajax, #2020


The brake gear had the brake shaft removed with a sprue nipper between brake housing chain and clevis to mount each separately allowing a replacement wire brake shaft to be installed between them once mounted on the car end.  If you use the Yarmouth Model Works #507 uncoupling lever mounting brackets, I suggest you use a #79 drill to enlarge the hole prior to bending and mounting.  I had to enlarge the hole after mounting to allow my uncoupling lever to pass through the bracket hole.  I had to bend cardboard to create a wedge for backing to allow drilling the hole.  Without backing to hold the bracket in place it would bend or it will break off.   I broke one resulting in frustration and “verbal blue smoke”.  Lesson learned.


B end details installed.


With B end work done, work needed on the sides was done.  Kadee bracket grab irons, Kadee #2250, were installed in the manufacture drilled holes.   Doors and door stops from the SMMK were installed with CA.  On the doors the cast on door handles were carved off and replaced with wire door handles bent using Tichy #1101, .010” diameter PBW.


Side grab irons, doors and wire handles and
door stops installed.


The underbody work which had been done before the B end work included the install of the following parts:


        -       Brake cylinder, kit, resin mounting bracket, Sunshine Models

- AB (Control) valve, kit, resin mounting bracket, Sunshine Models

- Air reservoir, kit, mounting brackets - plastic grab irons

- Above brake components were predrilled for piping

- Slack adjuster, Yarmouth Model Works pin plate #508

- Brake cylinder lever, cut from Evergreen #8108, 1” x 8” strip styrene

- Brake floating lever, cut from Evergreen #8106, 1” x 6” strip styrene

- Brake levers hangers, plastic grab irons

- Brake piping from air reservoir to control valve, Tichy #1101, .010” dia. Brass wire

- Brake pipe from brake cylinder to control valve, Tichy #1106, .0125” dia. PBW

- Brake rods, Tichy #1106, .0125” diameter PBW

- Brake rod clevises, Tichy turnbuckles #8021

Chain, Precision Scale # 48553,  34 links per inch

- Train line, kit

- Dirt collector, resin cast in M&N Shops


Underbody details parts installed.


Missouri Pacific 34222 was now moved to the paint shop.  After previous review of the numbers in the kit provided decal set,  I chose number 34222 for the car number.


 Since the  underbody had already been airbrushed Vallejo Model Air Nato Black #71.251 only the added detail parts were hand painted with again Vallejo Model Air Nato Black #71.25.  Trucks were also hand painted the same color.


Underbody added detail parts painted black.


Next the car body was sprayed with a mix of Vallejo/MicroMark Model Air, Boxcar Red  # X29015X2, 50% and my mix of Southern Freight Car Brown 70.990, 50%.  I mixed the Southern Freight Car Brown using a mix of Vallejo Model Color Black Red 70.859, 2/3 (2 parts) and Vallejo Model Color Flat Yellow 70.953, 1/3 (1 part).


Car body airbrushed.


Car body airbrushed.


Once dry, car body was sprayed with Vallejo Gloss Medium 70.470 for decal base.  After drying overnight, decals were applied.  Decals provided in the kit were used.  Due to the age of the decals, the decals were coated with Microscale Liquid Decal Film to prevent them breaking up.  I used photos of MP box car 34114  and  B end of box car I-GN 17768 (above) as a guide to apply decals.

Decals were soaked off in distilled water and applied to the car body where MicroScale Micro Set had been applied with a brush.   After the decal was applied in the Micro Set and positioned the edges had MicroScale Micro Sol applied.  Any excess solution was sucked away with the torn edge of a paper towel.  Again when dry, car body sprayed with Vallejo Gloss Medium 70.470 to better hide edges of decals and protect decals during handling. 


Decals applied.


Again when dry, the car body was sprayed with Model Master Acryl, #4636, flat to protect decals and provide a flat finish for weathering when applied.


MP 34222 ready for weathering
before placard boards.


MP 34222 ready for weathering
after placard boards.


One more step before putting MP 34222 in service was to weather the car with Artmatic eye shadow and Pan Pastels.  An Artmatic eye shadow color like a RR light earth brown color were applied over rivet seams and sill areas.  Pan Pastels Paynes Grey Extra Dark 840.1  was used on the roof and lightly over safety appliances on car body.


Car body weathered.


Car body weathered.


Missouri Pacific  boxcar 34222 was ready for service on the Minneapolis & Northland Railroad Company, The Lakeland Route, “Serving today, Shaping tomorrow.”  A car card was made for MP 34222, the final step to put the a car in service on the Minneapolis & Northland Railroad Company Railroad.


Car spotted for unloading at Bass Lake Jct. Team Track.


Car spotted for unloading at Bass Lake Jct. Team Track.


Car spotted for unloading at Bass Lake Jct. Team Track.


Car spotted for unloading at Bass Lake Jct. Team Track.


I want to say, “Thank You” to Ed Hawkins for permission to use his photos of MP cars in in the Sunshine Models Modeling Notes for Missouri Pacific 1942 American Car & Foundry (ACF) Boxcars (Sunshine Models 2005) and the December 1996 issue of Railmodel Jounal.  And, a “Thank You” to George Toman for notifying me of the 2005 Sunshine Models Mini Kit for a Missouri Pacific Box Car, purchasing and shipping it for me.


Thank You for taking time to read my blog.  You can share a comment in the section below if you choose to do so.  Please sign your comment with your name if you choose to leave one.  Please share the blog link with other model railroaders.


Lester Breuer


.