The Milwaukee Road (MILW) USRA Box Car 703818 was built using Westerfield Models resin flat kit #3391, a USRA single-sheathed box car kit. The kit with parts removed for other projects was gifted to me by a friend in 2020. I decided to build the kit as a MILW Box Car, one of my favorite roads, as I had decals available to letter it. The car I decided to build was one of 25,000 50 Ton single sheathed cars built between 1918 and 1920 to a United States Railway Administration (USRA) standard freight car developed design, built by various builders and assigned to 26 roads of which the Milwaukee Road was one.
MILW Box Car 703818 was one of 950 cars built by American Car and Foundry (ACF) in 1919 and upon delivery to the MILW assigned to series 702897-703846. The USRA design features included single sheathed Howe truss pattern sides, six foot side door opening with wood doors, 5/5/5 steel stamped ends, a Murphy-XLA-Flexible roof and Cramer uncoupling levers. The cars rode on an Andrews truck. A drawing of a USRA box car and roster of railroad receiving cars and builder appeared in the July/August 1980 issue of Mainline Modeler.
 |
| MILW 703425 Altoona Association of Model Railroaders Collection (Click or tap on any image to enlarge.) |
A car diagram from The Milwaukee Road Freight Cars Official Employees’ Shop Diagrams for In-Service Freight Cars & Cabooses in 1937 (Normandie House) is shown below.
 |
| MILW Car Diagram |
Onto the kit build that began as any resin box car flat kit with the “basic box.” First, the sides were checked to make sure they were the same length and they were. A side was glued using CA (super glue used for all joints or parts install unless another adhesive specified) to an end to make an “L”. The two “L”s were glued together to form the basic box. The roof was next. Being this was an old kit the roof was also cast flat. Therefore, the roof had to be cut in half and each section fitted and glued to roof contour to complete the basic car body.
 |
| Roof cut in middle to allow install. |
 |
| Car body or "basic box" with roof. |
 |
| Car body or "basic box" with roof. |
With the roof installed the car body was prepared for install of the underbody. Two Evergreen strip styrene, #146, .040 x .125, were cut to the inside length of the car body and installed at a depth of the kit floor giving the kit underbody supports to sit on ensuring the underbody is glued in straight.
 |
| Underbody supports. |
Now the underbody was checked for fit into the car body. The underbody casting was narrower in width than I liked for a proper fit. Therefore, two pieces of Evergreen strip styrene # 8204, 2” x 4” were cut to the length of the floor and glued to each side. The coupler box pads and bolster center plates were drilled and tapped for 2-56 screws. Kadee #262 coupler boxes with Kadee #148 couplers inserted were installed with Fastenal 3/16” screws. Accurail Andrews trucks, #166, with InterMountain 33” metal wheels were installed with Fastenal 1/4” screws.
 |
| Underbody increased in width ready for install. |
On the floor side of the underbody electrical outlet box punchouts were used to weight the car to 3.8 ounces. The punchouts were glued together with Walthers Goo to form stacks and the stacks attached to the floor side with Permatex clear adhesive silicone RTV sealant. When the silicone adhesive was set the floor was glued into the car body with CA.
 |
| Car weighted to 3.8 ounces with electrical outlet box punchouts. |
Next the longitudinal running board was installed on the car body roof. I glued the longitudinal running board with ZAP Formula 560 Canopy glue to the roof saddles. I place a ruler and weight on the running board and let the car sit for the glue to setup.
The end brackets were made with Evergreen #8103, 1” x 3” for the flat section attached to running board and #8102, 1” x 2” for the angle braces. Work on the “B” end followed. The detail parts installed on the B end were as follows:
- Brake step (platform) & brackets, Tichy #3005 brake gear pkg. in kit
- Brake shaft sill bracket, reworked Tichy one , #3005, in kit
- Brake rod, cut from .015” brass wire, kit
- Retainer valve, kit
- Retainer line and brackets, Tichy #1100, .008 diameter PBW
- Brake wheel, Tichy #3005 brake pkg. in kit
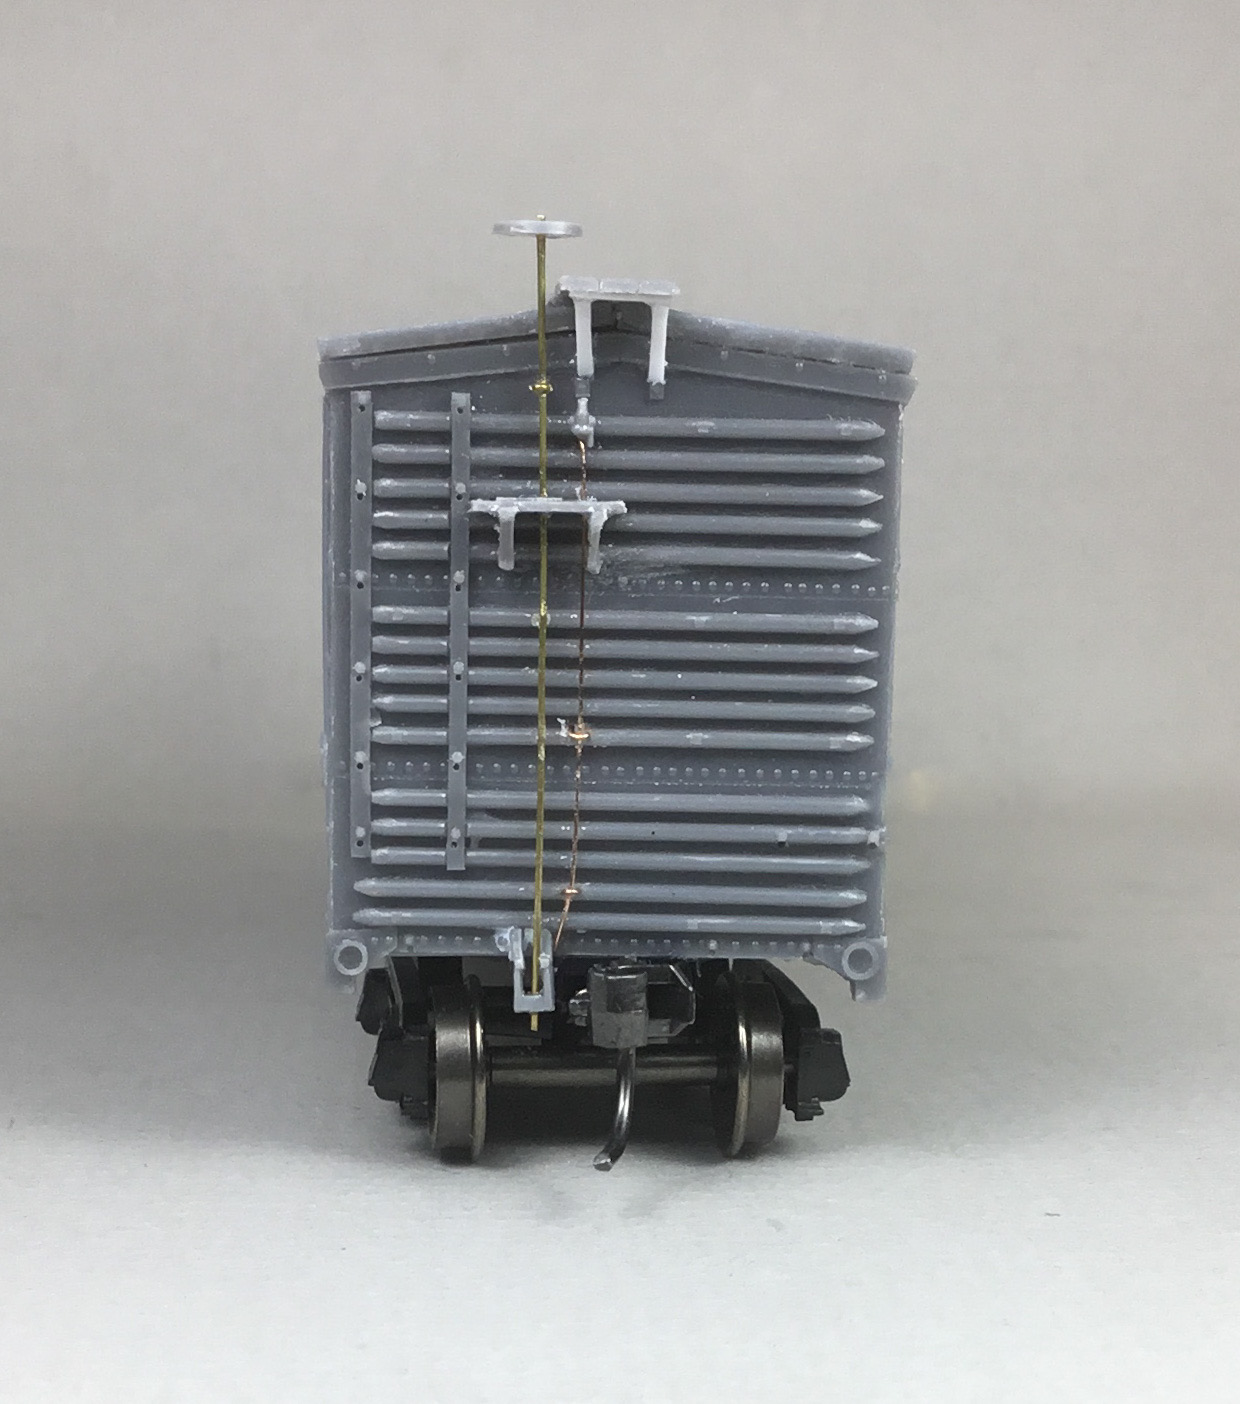 |
| "B" end parts installed. |
Back to the roof to install the latitudinal (laterals, corner walks) running boards. I found a couple USRA types in my parts box that I sanded thinner and installed on recently released Yarmouth Model Works, #406, etched brackets.
 |
| USRA running board laterals installed. |
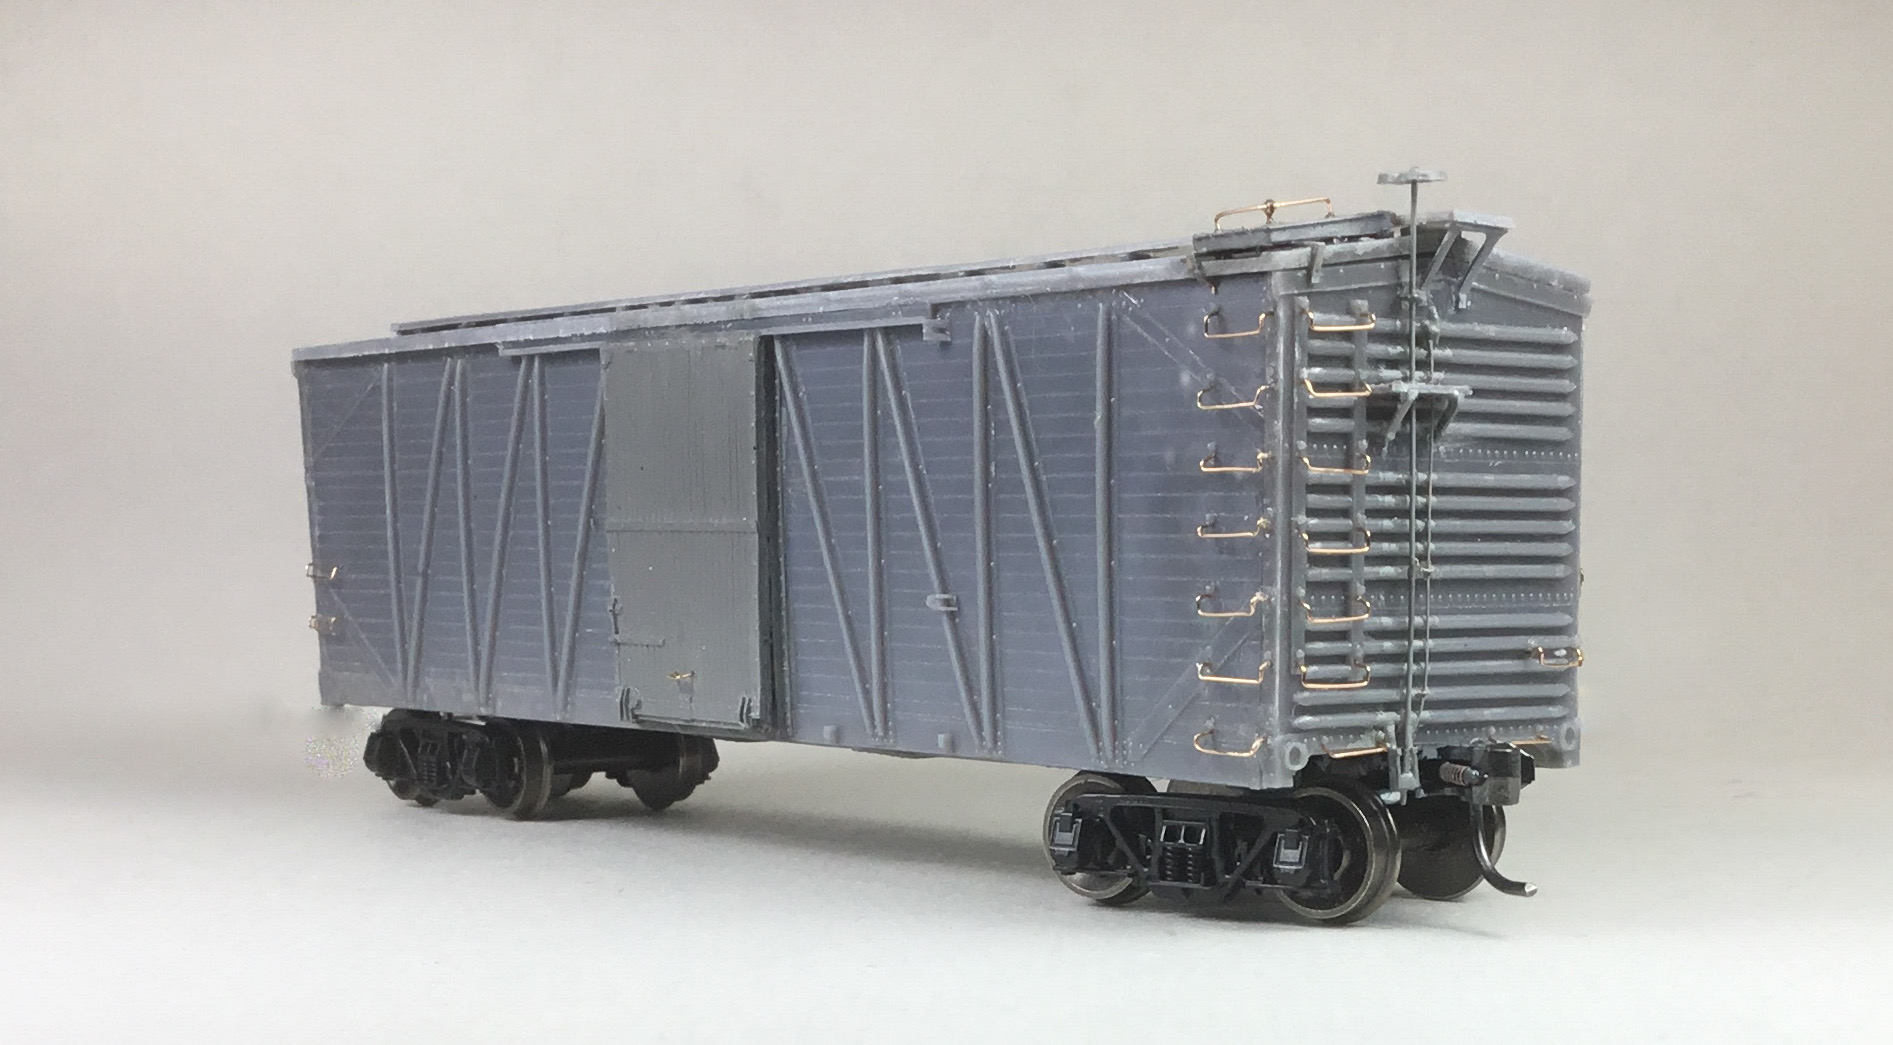
And, appropriate wood doors, resin cast in the M&N Shops, were installed.
 |
| Wood doors installed. |
Now to install the grab irons and ladder drop grab irons. All grab irons, straight and drop type, were bent from Tichy Train Group (Tichy) #1101, .010” diameter phosphor bronze wire (PBW). The bent grab irons were installed in holes drilled with a #80 drill. Roof grab irons have Yarmouth Model Works etched eye bolts without shoulder for corner posts. And, on the resin cast doors a wire handle was bent and installed.
 |
| Grab irons & door handle installed. |
 |
| Grab irons installed. |
 |
| Grab irons installed. |
Once grab iron install was complete the sill steps, A-Line, #29000, were installed to complete car body work except for placard boards and uncoupling levers. Next the work on the underbody was done. By my Minneapolis & Northland Railroad Company time period of late spring 1955 this car would have received AB brakes which I chose to install. First the basic AB brake components, the brake cylinder, brake cylinder piston, control valve and mounting brackets from Tichy AB set #3013 (not in kit) were installed. An air reservoir from my parts box was installed. Brake Levers cut from Evergreen strip styrene, #8108, 1” x 8” and #8106, 1” x 6” were installed. And, brake lever hangers bent from Tichy #1101, .010 diameter PBW were installed.
 |
| Basic AB brake components installed. |
At the next modeling session, other under body details installed were as follows:
- Piping from air reservoir to control valve, Tichy #1101 .010” PBW
- Piping from brake cylinder to control valve, Tichy #1106, .0125” diameter PBW
- Brake rods, Tichy #1106 .0125” PBW
- Brake rod clevises, MEK Goop (plastic melted in MEK)
- Chain, A-Line, #29219, black 40 links per inch
- Train line, Tichy #1114, .020” diameter PBW
- Dirt collector, Tichy, AB set #3013
- Train line couplings and dirt collector tee, MEK Goop
- Frame extensions between bolsters and coupler boxes, bits box styrene
 |
| Train line, piping, brake rods, dirt collector installed. |
With the underbody parts installed the car was moved to the paint shop. Any installed part that had not been already hand painted with Vallejo/MicroMark Undercoat Light Grey, #29013X2 was painted now. In viewing build photos you may have noticed I do like to hand paint parts installed parts during the build.
When dry, the car body and underbody were wiped with a makeup cotton swab dipped in 91% alcohol. Airbrushing of the car body and underbody with Vallejo Model Air/MicroMark Box Car Red, 29015X2, followed. When dry the car body was airbrushed Vallejo Gloss Medium 70.470 to provide a gloss base for decal application.
 |
| Car body painted. |
 |
| Car body painted. |
 |
| Car underbody painted. |
Once the gloss base was dry decals were applied. Unknown used decal sets provided the herald, car numbers, reporting marks and reweigh date. Dimensional data came from Champ Decals set, HD-1, Box Car Data 40 Ton 36 foot and 40 foot cars.
I used photo of MILW USRA box car 703425 as a guide to apply decals. Decals were soaked off in distilled water and applied to the car body where MicroScale Micro Set had been applied with a brush. After the decal was applied in the Micro Set and positioned the edges had MicroScale Micro Sol applied. Any excess solution was sucked away with the torn edge of a paper towel.
After setting overnight to dry (air dried), car body was airbrushed with Vallejo Gloss Varnish, 70.510, to better hide edges of decals and protect decals during handling.
 |
| MILW 703818 decals applied. |
 |
| MILW 703818 decals applied. |
Normally at this point in a car build the car is airbrushed with a flat coat, weathered and put into service on the Minneapolis & Northland Railroad Company; however, not on this build. Why? Placard boards from the parts drawer were now installed. Install of Carmer uncoupling levers, Yarmouth Model Works, YMW #400, followed. Mounting brackets for the Carmer uncoupling levers were cut from scrap styrene from the bits box and a drilled to accept a mounting pin cut from Tichy #1106, .0125 diameter PBW. Once uncoupling lever parts were placed over the pin and glued MEK was used to make a pin cap.
 |
| Placard Boards and Uncoupling Levers installed. |
 |
| Placard Boards and Uncoupling Levers installed. |
After placard boards and uncoupling levers were installed they were hand painted with Vallejo Model Air/MicroMark Box Car Red, 29015X2 and Vallejo Gloss Varnish 70.510 as the car. Now after air drying, the car body was airbrushed with Model Master Acryl Flat Clear, #4636, to protect decals and provide a flat finish for weathering when applied.
 |
| MILW 703818 ready for weathering. |
 |
| MILW 703818 ready for weathering. |
Now to weather Milwaukee Road 703818 before being put in service on my Minneapolis & Northland Railroad Company. Car weathering was done with Prismacolor Premier Pencils and Pan Pastels. First Prismacolor Premier Pencils were used to color various boards with the following colors: Cool Grey PC1061, Dark Umber PC947 and Burnt Ochre PC943. Next Pan Pastels Neutral Grey 820.5 was applied over rivets and various areas on car body. Pan Pastels Paynes Grey Extra Dark 840.1 was used on the roof and lightly over entire car body and underbody.
 |
| MILW 703818 right side weathered. |
 |
| MILW 703818 B end weathered. |
 |
| MILW 703818 left side weathered. |
Milwaukee Road USRA single sheathed boxcar 703818 was ready for service on the Minneapolis & Northland Railroad Company, The Lakeland Route, “Serving today, Shaping tomorrow.” A car card was made for MILW 703818 the final step to put the a car in service on the Minneapolis & Northland Railroad Company Railroad.
 |
| MILW 703818 on MILW Interchange in Eureka Center, Minnesota |
 |
| MILW 703818 on MILW Interchange in Eureka Center, Minnesota |
 |
| MILW 703818 on MILW Interchange in Eureka Center, Minnesota |
 |
| MILW 703818 on MILW Interchange in Eureka Center, Minnesota |
 |
| MILW 703818 on MILW Interchange in Eureka Center, Minnesota |
Thank You for taking time to read my blog. You can share a comment in the section below if you choose to do so. Please sign your comment with your name if you choose to leave one. All comments are reviewed and approved before they appear. Please share the blog link with other model railroaders.
Lester Breuer
.