Thursday, May 31, 2018

MILWAUKEE BOX CAR 711470

I pulled from my to build kits, Milwaukee Road, single- sheathed box car, Sunshine Models, kit 47.3, number 711470, series 711000 to 711999, for this build.  The prototype information and photos of this car are in the Prototype Data Sheet #47A provided in the kit which contains the only good  photo of the “B” end I could find, Steam Era Freight Cars Reference Manual, Vol.1, pages 70 and 71, and several color photos are in the Milwaukee Road Color Guide, Vol. 2, page 7.  A diagram of the car is in The Milwaukee Road Freight Cars–Official Employees’ Shop Diagrams for 1937 book, p. 16.


Click or tap on photo to enlarge


I began the build of this flat kit by gluing an end to a side to create a “L” and repeated the process for the other end and side.  The two “L” units are glued together to create the basic box.   The underbody was now cemented in place.   Car body inside corners and sides were reinforced with Evergreen #164 .080” x .080” strip styrene. Next I attached Kadee #262 coupler pockets with super glue to hold them for drilling.  Now the coupler pockets and bolsters were drilled for 2-56 screws.  I like to complete this step before adding weight to the interior of the car body so I do not cover the holes with weights, in this case electrical outlet box punch-outs, used to weight the car to 3.8 ounces.  With the weights in place I cut a baffle from Evergreen .040” sheet styrene and installed it in the center of the car body to prevent sides from bowing in.  Hutchins all steel roof resin casting was now installed to complete the car body.


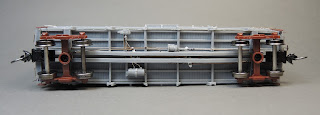
I turned back to the underbody to install Kadee #148 “whisker” couplers and Tahoe Model Works, TMW-006, Buckeye ARA trucks with InterMountain 33” metal wheel sets with 2-56 screws. Underbody work was now completed per the kit instructions with the following changes.   I used Detail Associates #2503 .010” brass wire for the piping from the air reservoir to the control valve and Tichy Train Group #1106 .0125” dia. phosphor bronze wire for the pipe from the back of the brake cylinder to the control valve. Tichy Train Group #1106 .0125” phosphor bronze wire was used to make the brake rods which were attached to brake levers with clevises made by cutting Tichy Train Group # 8021 turnbuckles in half.  The chain between the brake cylinder lever and brake rod is Campbell 42 links per inch black chain.  A train line fabricated from Plastruct #90851 .020” dia. styrene round rod installed.


With underbody complete I now began the detailing of the "B" end.   As with the underbody I did make changes from the kit instructions. The longitudinal running board extension brackets, seen on the "B" end, were made from Evergreen #8102 1” x 2” strip styrene with fasteners made with MEK “Goop” (styrene plastic melted in MEK).  On the “B” end the brake shaft step was fabricated using an A-Line #29000 sill step shaped per prototype photo.  To install the A-Line brake shaft step the top mounting pins were bent back ninety degrees and then half of that bend was again bent back up ninety degrees which when installed moved the brake shaft step forward from the underbody to enable to brake shaft, .015” brass wire, upon install to rest on it.  To complete the brake shaft step to look like the prototype in photos, additional parts of the brake shaft step such as the angle brace from the side to the underbody were made using Evergreen strip styrene.  A Precision Scale #31796 retainer valve was used and a retainer line fabricated from Tichy Train Group # 1100, .008” dia. phosphor bronze wire was installed.  A bracket for the brake shaft was made using the kit provided shim brass.  The uncoupling lever brackets were made by cutting one of the spare resin mounting “L” brackets in half and attaching it to the underbody under the left side of the end ladder.  Yarmouth Model Works #355 eyebolts were installed in the resin “L” bracket to complete the uncoupling lever bracket. The uncoupling levers were bent from Tichy Train Group # 1106 .0125” dia. phosphor bronze wire and installed in the fabricated resin mounting brackets and the Detail Associates #2206 eyebolts provided in the kit for the mounting brackets above the coupler pocket.


On the car body sides the grab irons for the left side in the kit were not the correct length so new left side grab irons were bent from Tichy Train Group # 1106 .0125” phosphor bronze wire and installed.  The car body detailing  was now complete.


With car body complete the car was now moved to the paint shop for paint and lettering .  First, car body and underbody were washed with an all-cotton cosmetic applicator dipped in 99% isopropyl alcohol prior to being sprayed with PollyScale Box Car Red, F414281.  After drying, car body was sprayed with Model Master 4638 Gloss Clear Acryl for decal base.  The paint  and gloss for spraying were thinned, 2 parts paint 1 part thinner,  with a custom mix thinner of distilled water, Vallejo Airbrush thinner and airbrush flow improver mixed per formula found in Guide to Acrylic Painting by Joe Fugate.  Paint was sprayed with a Paasche Talon airbrush at 28 psi.  Decals by Rail Graphics provided in kit were applied using Micoscale Micro Sol.  Photos in various sources were used to position lettering.  Once decals were dry the car body was sprayed with Model Master 4636 Flat Clear Acryl.  Trucks were painted with PollyScale Tarnished Black, F414140.


Car is sitting on Schwenke Cement siding for loading


Building this kit provided me with many fun filled hours.  The fun continues when the card car is made to put Milwaukee box car, number 711470, in service on my Minneapolis & Northland Railroad Company, an operating railroad.  I wish to thank Frank Hodina who created the masters to make this kit possible.


Thank You for taking time to read my blog.  You can share a comment in the section below if you choose to do so.  Please share the blog link with other model railroaders.
Lester Breuer

Thursday, May 24, 2018

MILWAUKEE BOX CAR 713406

Milwaukee box car 713406, series 713000-713999, is an Accurail special run kit for Milwaukee Trainfest 2008.  The prototype, a single sheathed, Howe truss design, three panels on either side of the wood doors, and braced ends was built in 1925 by the Pullman Company. The cars when built had Hutchins Dry Lading roofs and the underframes used an ARA straight center sill. These cars stayed in service for more than 40 years.  Black and white photos and history can be found on pages 70 and 71, in Steam Era Freight Cars Reference Manual, Vol. one: Box & Automobile Cars, complied by Ted Culotta, published by Speedwitch Media.  A color photo of  Milwaukee box car 713168 is on page 7 in Milwaukee Road Color Guide to Freight and Passenger Equipment, Vol.2, by Doug Nighswonger, published by Morning Sun Books.

Click or tap on photos to enlarge

Before starting to assemble the kit I reviewed the car body and underbody for prototype accuracy finding the roof correct and sides, except for corner brackets, with modifications I could make were correct.  The car had braced ends; not the correct type found on the Milwaukee Road cars. If I had been willing to cut off the ends I could have used proper ends found on Sunshine Models, kit 47.3, Milwaukee box car 711470 ( build found on this blog and Resin Car Works blog) or Westerfield, kit #8202, stock car kit.  The underbody has the a fishbelly rather than a straight center sill and brake components needed to be relocated to correct location for the Milwaukee cars. Paint and lettering were acceptable except for build date which is 1929 rather than 1925.

The different ends.  Accurail on left.  Sunshine Models on right.

I began the build of this car as any other Accurail car by carving off all molded on grab irons and cutting off molded on sill steps. Next all holes for grab irons were drilled using a #80 drill bit. I installed grab irons on sides and ends bent from Detail Associates, #2504, .012" diameter brass wire.  I continued with the other work needed on the sides.  The ladders were seven rung ladders, incorrect for the Milwaukee car, so I carved off all ladder rungs and shortened the left stiles to match Milwaukee car photos.  I installed new ladder rungs bent from Tichy Train Group (Tichy), #1106, .0125" phosphor bronze wire (PBW).  The new ladder rungs were spaced correctly to create six rung ladders used by the prototype.  A bent drop grab iron was installed under each ladder.  The door stops as molded on the model did not match the Milwaukee so the lower door stop was carefully removed and reinstalled a better distance from the upper one and covered with a scrap piece of strip styrene to match the look of the Milwaukee door stop. A-Line, #29000, style A, sill steps were now installed in #76 drilled holes. The molded on door handle was carved off and replaced with one bent from Detail Associates, #2503, .010" diameter brass wire.


With the sides finished I installed the running boards in the kit on the roof.  Longitudinal running board extension supports were made from Evergreen, #8102, 1x2" strip styrene (see "B" end photo).  Grab irons bent from Tichy, #1106, .0125" diameter PBW with Yarmouth Model Works, YMW 255, eyebolts for corner brackets, were installed.


Now I turned my attention to the "B" end work.  Since the car was painted and lettered, I decided to keep and rework the ends on this car rather than replace them making this an acceptable stand-in car. First the ladders were reworked the same way the side ladders were.  The brake shaft step was opened with a 2-56 drill and cleaned up with a small file.  Brake shaft, Tichy, #1102, .015" diameter PBW with a bracket made from Detail Associates, #2503, .010" wire, was installed. The kit supplied brake wheel was installed on the brake shaft.  A Sunshine Models resin cast retainer valve was installed followed by a retainer line made from Tichy, #1100, .008" diameter PBW. Finally, top mounted uncoupling levers made from Tichy, #1106, PBW with eyebolt brackets formed with a Xuron wire bending plier from Detail Associates, #2503, .010" diameter brass wire, were installed.


With the car body finished, I did the needed underbody work.  The first task was to replace the fishbelly center sill provided in the kit with a straight center sill correct for the Milwaukee car. A new straight center sill was made with Evergreen #145, .040x100" strip styrene.  The brake components were drilled for piping and located in the proper location.  The air reservoir was mounted with brackets that were the sill steps cut off of this car.  Brake levers cut from Evergreen, #8101 1x8" and #8106 1x6" strip styrene and slack adjuster cut from scrap styrene were installed.  Piping from the air reservoir to the control valve is Tichy, #1101, .010" diameter PBW and the pipe from the brake cylinder to the control valve is Tichy, #1106, .0125" diameter PBW.  All brake rodding is Tichy, #1106, .0125" diameter PBW with a half Tichy, #8021, turnbuckle for a clevis to attach to brake levers.  Chain is A-Line, #29219, black 40 links per inch.  Flora wire, .020" diameter, was used for the train line. The dirt collector is from Tichy set, #3013.  Brake lever hangers were added after this photo was taken.


With underbody work done the car was moved to the paint shop.  In the paint shop a color match to the Accurail applied paint had to be found. I worked with three Vallejo paints to create two mixes.  The first mix was Vallejo Model Air Brown, RLM26, one drop, and Model Color Saddle Brown, 70940.  The second mix, my preferred mix,  was Model Color Black Red, 70.859, one drop and Model Color Saddle Brown, 70.859, two drops.  The small number of drops used is because the mixes were done in a plastic water bottle cap. The underbody and trucks did require the mix to be made several times for complete coverage.  After car body was left for a couple of days I did the weathering with Pan Pastels and Prismacolor Premier color pencils using black, burnt ochre, cool grey and light umber. The weathering did not receive a clear coat to enable it to be removed if I should want to change it later. I have found that cars weathered with these methods stand up well when handled on an operating railroad.

Color photos in MILW Nighswonger book used to add weathering.


Milwaukee box car 713406 now joins Milwaukee 711470 to serve customers on the Minneapolis & Northland Railroad Company. A future project for a second Accurail Milwaukee box car in inventory will be to build it with correct ends in addition to the work done to this stand-in.

MILW SS box cars in M&N Minneapolis Chestnut Street Yard


Thank You for taking time to read my blog.  You can share a comment in the section below if you choose to do so.  Please share the blog link with other model railroaders.
Lester Breuer

Sunday, May 6, 2018

Soo Line (Wisconsin Central) box car 133542

Another build has produced a single-sheathed Soo Line (Wisconsin Central) "sawtooth" box car numbered 133542, now in revenue service on the Minneapolis & Northland Railroad Company.  The Soo Line (Wisconsin Central) box car is Speedwitch Media, resin Kit 108.2, that once built can be lettered for a Soo Line box car or a Soo Line (Wisconsin Central) box car. The prototype cars were built in 1923.  Using the same design, 500 cars built in March by American Car & Foundry were assigned numbers for the Soo Line, series 39200-40198 (even numbers), and 500 cars built in April by Pullman Car Company were assigned numbers for the Soo Line (Wisconsin Central), series 133400-134398 (even numbers). When I completed my previous build of this same resin kit, I numbered the car 39826 in the Soo Line series ( the build is posted on this blog) so I numbered this build 133542 in the Wisconsin Central series. The only difference in the Soo Line cars and the Wisconsin Central cars were the number series and a small "W.C." lettered in the upper left hand corner on the car side with a trust plate under it. The Speedwitch Media kit instruction sheet history portion states these cars closely followed the Canadian Pacific Fowler design; however, with some exceptions. The most distinctive feature of the cars was the method used to tie the crossbearers and body bolsters into the side structural members. The zee bar structural members extended below the side sill and tied into the ends of the crossbearers and bolsters.  This arrangement has been called the "sawtooth" single sheathed design by freight car researchers. The Soo Line Freight Equipment and Cabooses book by Ken J. Soroos, on page 11, states these cars were the last of the 40 ft. single-sheathed cars built with five-foot doors and peaked roofs. The cars became the dominant visual standard for Soo Line box cars into the 1950's.

Click or tap on photo to enlarge

The kit has an excellent one piece body so I start by fitting the underbody into the car body.  I did use or make some parts not in the kit.  I used Kadee #262 couplers boxes rather than the resin cast kit ones. The Kadee coupler boxes being shorter than the resin kit boxes created a gap between the mounted coupler box and the truck bolster.  I filled this gap with scrap Evergreen .080x.080 styrene pieces.  Other changes I made included brake levers made from Evergreen #8108 1x8" and #8106 1x6" strip styrene, and .019" diameter soft brass wire, was used for the train line.  A tee made available due to efforts of Tom Madden and Geroge Toman and printed by Shapeways was installed on the train line to hook up the Tichy Train Group (Tichy) , set #3013, dirt collector. In addition, a half of Tichy, #8021, turnbuckle was used for a clevise on brake rodding and A-Line, #29219, black 40 links per inch was used. The Accurail Andrews trucks provided in the kit received InterMountain 33" metal wheels after molded on brake shoes were removed. The Soo Line freight car diagram found in the Freight Car Diagrams book published by the Soo Line Historical And Technical Society Archives Committee states these were 33" cast iron wheels so a ribbed back rather than the smooth back wheel might be better.

 
Look for Madden/Toman tee on train line


With underbody work done, I added the "B" end details. I added a bracket to the brake shaft and a two brackets to the retainer line on the "B" end.  I bent the top mounted uncoupling levers from Tichy, #1106, .0125" diameter phosphor bronze wire and installed them with the Detail Associates provided eyebolts for brackets.


On the sides I made only two minor changes. I carved off the cast door handles and replaced them with ones I bent from .010" diameter brass wire. I added a trust plate, cut from removed resin flash, to the upper left on the side of the car.


Next I completed the roof details.  All running boards are in the kit as is the 1x4" strip styrene you use to form the support brackets for the laterals.  I did add lateral support bracket fasteners using MEK Goop, plastic melted in MEK. I used Yarmouth Models Works etched eyebolts, #YMW 256, for the roof grab irons corner brackets rather than the supplied eyebolts. I also made the longitudinal running board extension support brackets from Evergreen, #8102, 1x2" strip styrene which can be see in the photo of the "B" end.


The Wisconsin Central box car was now moved to the paint shop. Before paint application, I washed the car body with a makeup cotton swab dipped in 91% isopropyl alcohol to remove any final traces of mold release agent and build grime.  I next sprayed the underbody Vallejo Model Air Dark Grey Blue, 71.054 (tarnished black).  The color for the box car body was based on the paint color mix of Zinc Chrome Primer with a touch of Red Oxide suggested in the kit instructions.  I used the suggested colors to create a paint mix of Polly Scale Zinc Chrome Primer, F414293, 50 drops and Model Master Oxide Red Flat, #4882, 10 drops, thinned with a custom thinner mix of distilled water, Vallejo air brush thinner and flow improver, to spray the car body. The paint mix after applied to the car, in my opinion, is a nice match for colors photos of early Soo Line box cars in The Soo Line Freight Equipment and Cabooses book by Ken Soroos.  Once the paint was dry I sprayed the car body with Model Master, #4638, Gloss Clear Acryl for a decal base.  Kit decals, with design credit to Ken Soroos of the Soo Line Historical & Technical Society, were applied using MicroScale Micro Set and Micro Sol.  Once dry the decals were cut through on board lines on the car body with a single-edged razor blade and recoated with MicroScale Micro Sol.  I like to cut the decals and recoat as it provides the model with the appearance that the lettering is really painted on the wood sides.  Again after the decals were dry the car body was sprayed with Model Master, #4636, Flat Clear Acryl for decal and handling protection. No weathering yet.


Wisconsin Central single-sheathed "sawtooth" box car 133542 is now in revenue service along with Soo Line 39826 showing light weathering.


Thank You for taking time to read my blog.  You can share a comment in the section below if you choose to do so.  Please share the blog link with other model railroaders.
Lester Breuer